Just some notes I made while following along with this now-famous blender donut tutorial. I’ll be making additional notes for each of the videos in the series!
- Notes below correspond to this YouTube video
- You can download a PDF copy of this post here
- You can download the associated “.blend” file here. This file is the result of my work after following along with the steps in the YouTube video.
Compositing Link to heading
We can think of compositing as “post-processing” after a render. It allows us to add visual effects after the render has completed. This includes things like making adjustments to the lighting, color grading, etc…
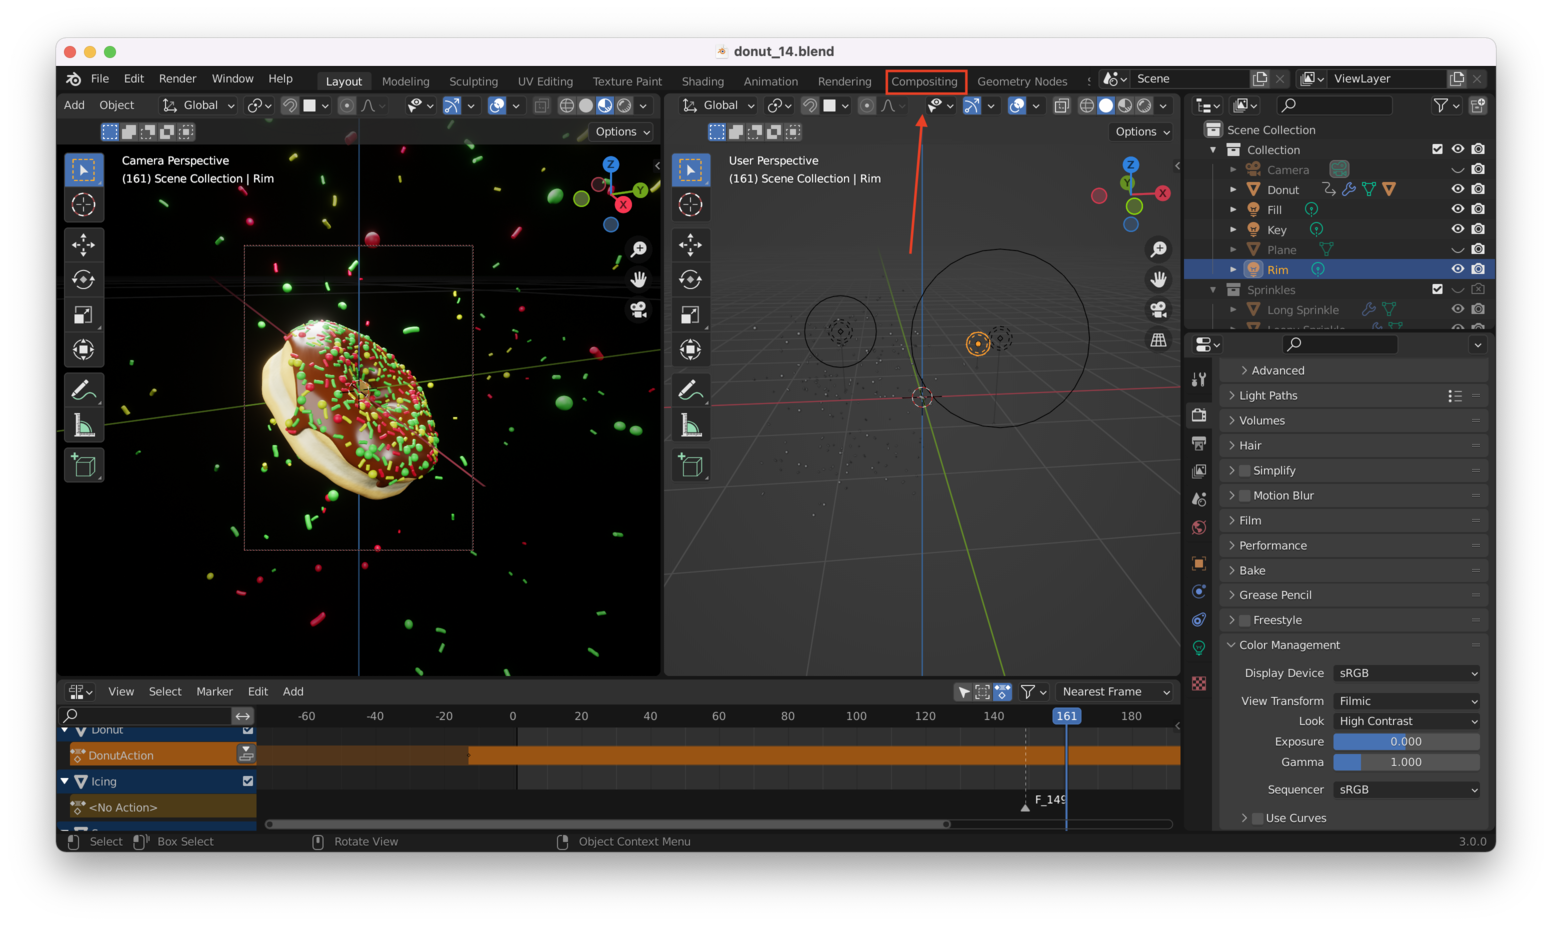
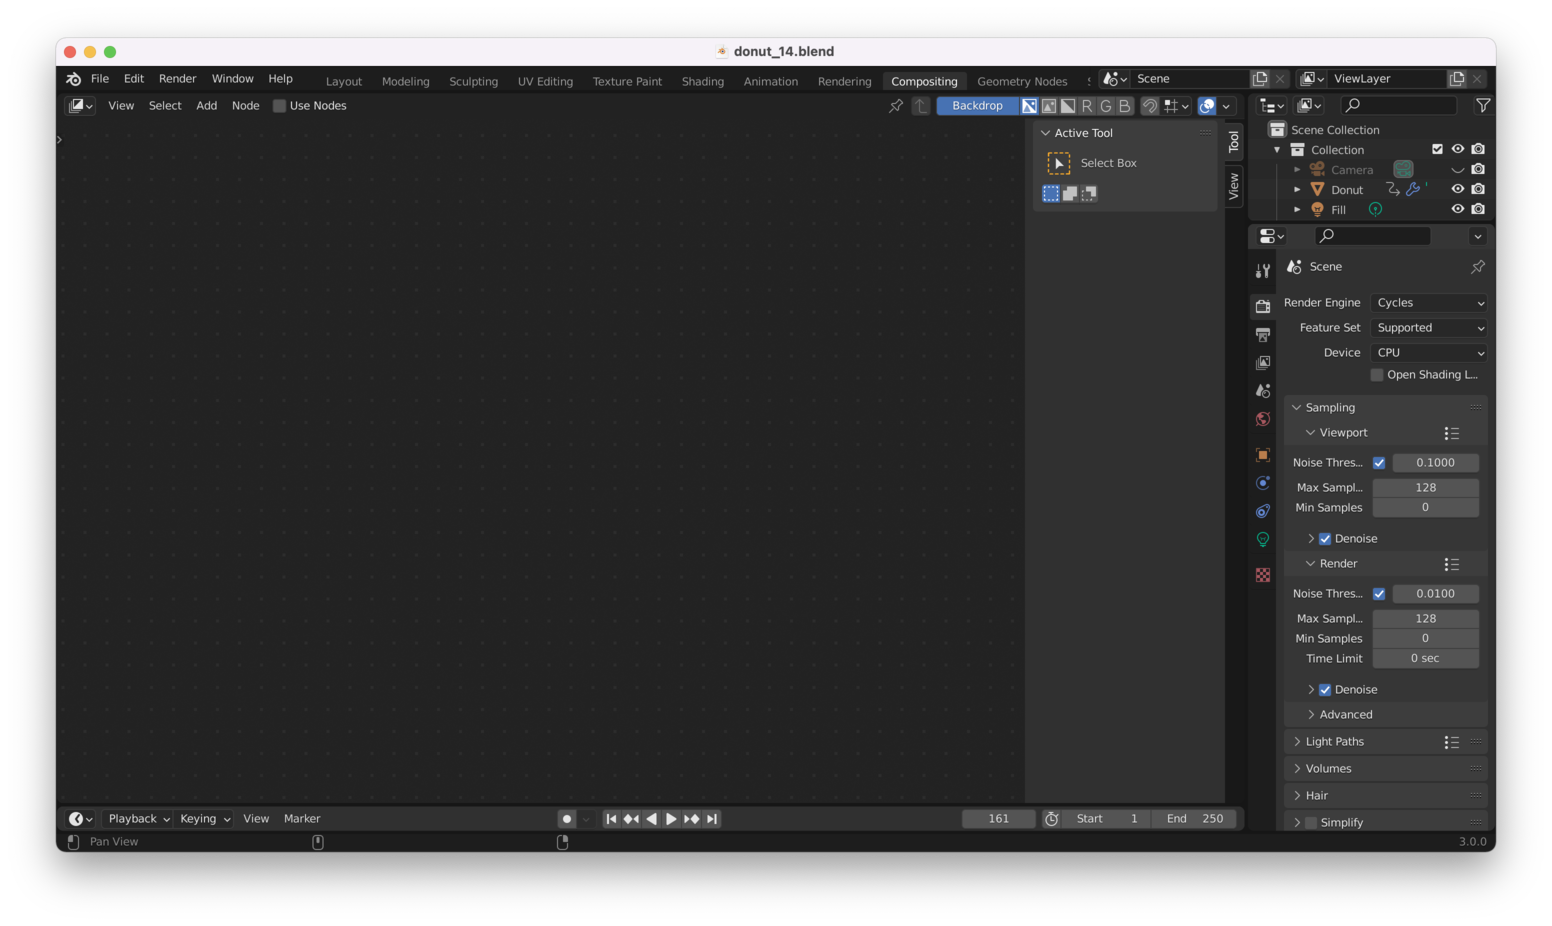
Blender includes a built-in compositor, which is accessible from the “Compositing” tab:
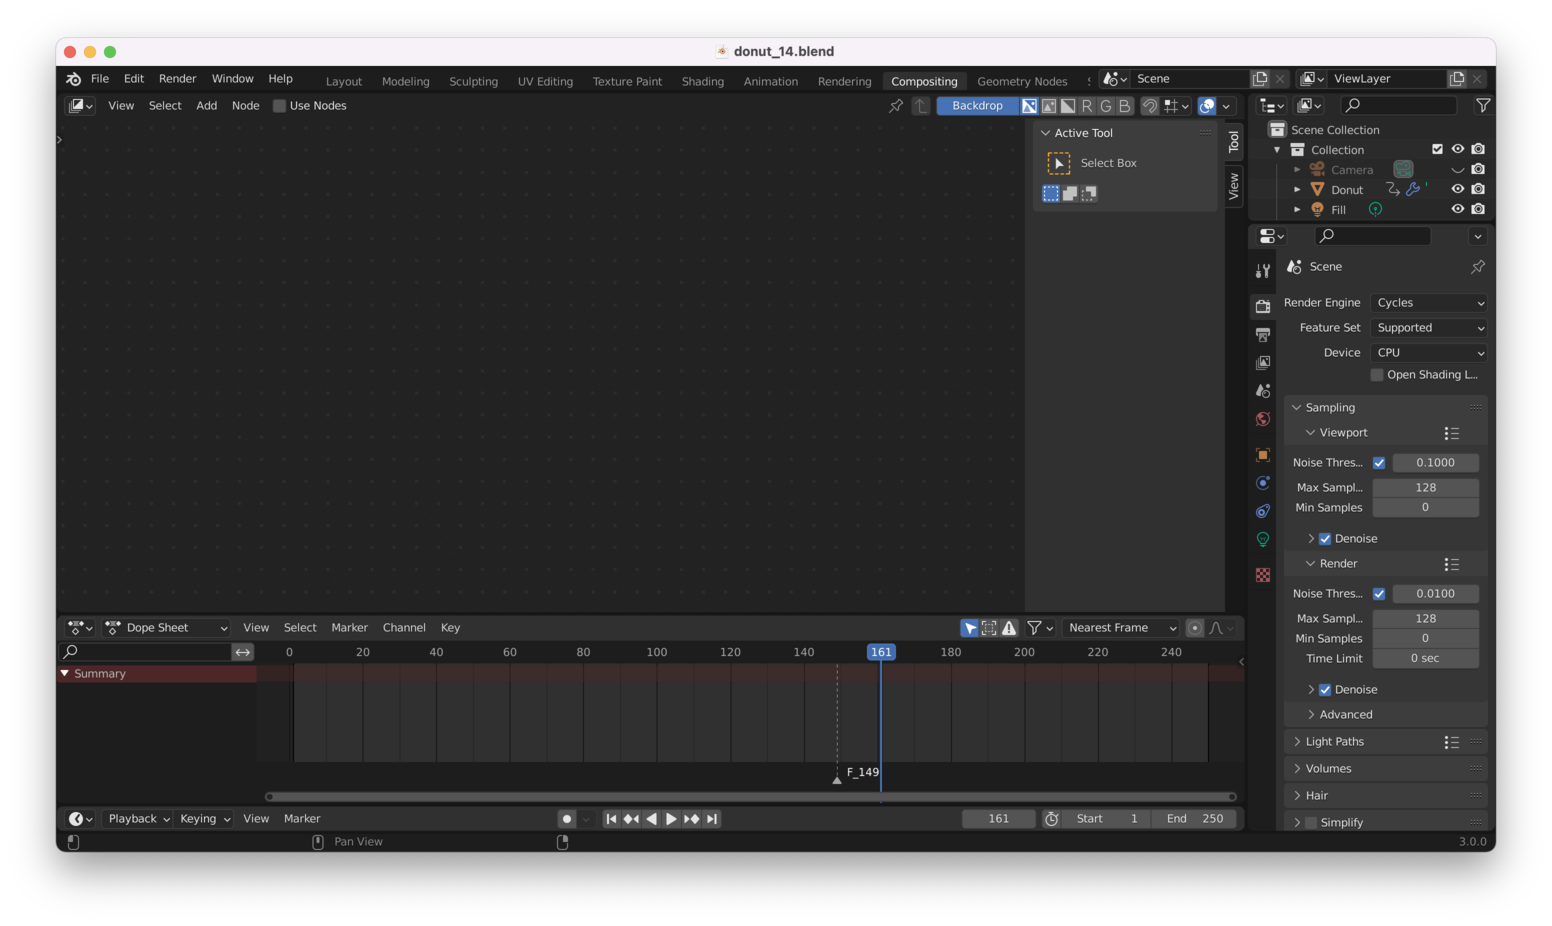
When you first open the compositing tab, it will look pretty empty:
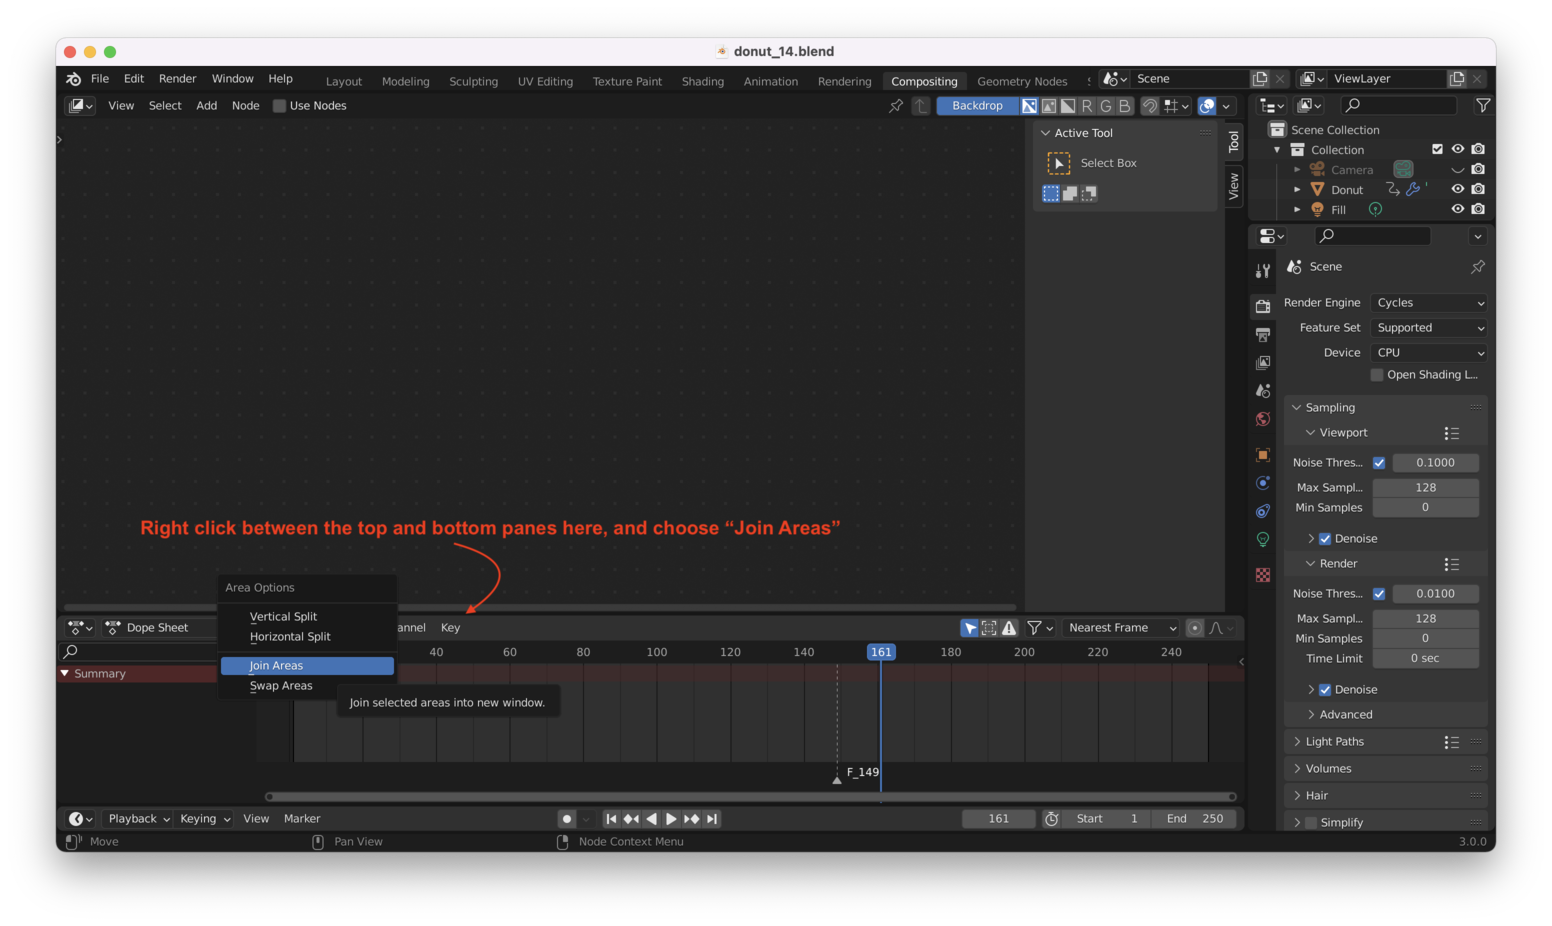
We won’t need the dope sheet at the bottom, so you can close that:
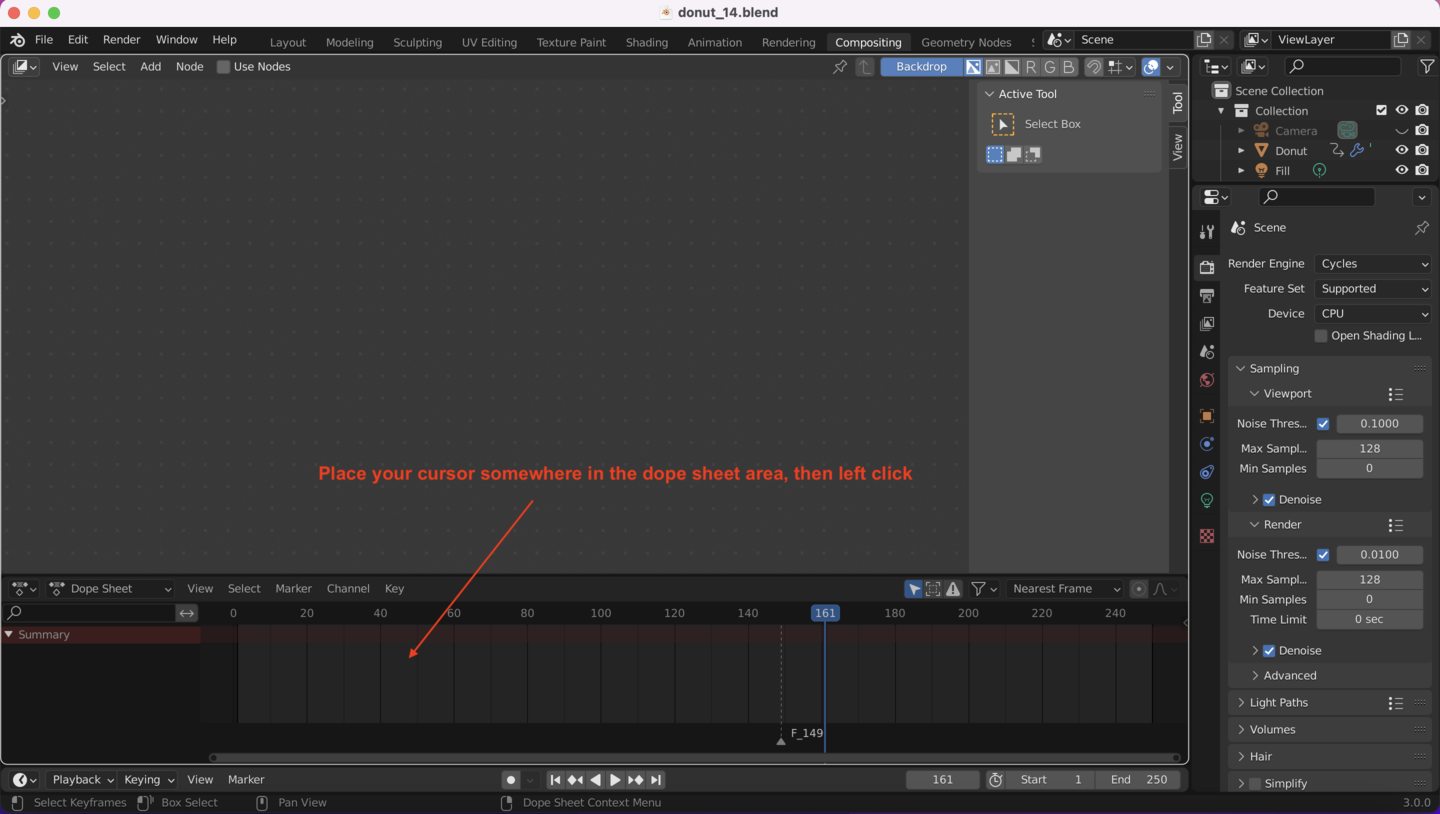
You should now have something that looks like this:
Next, check “Use Nodes”:
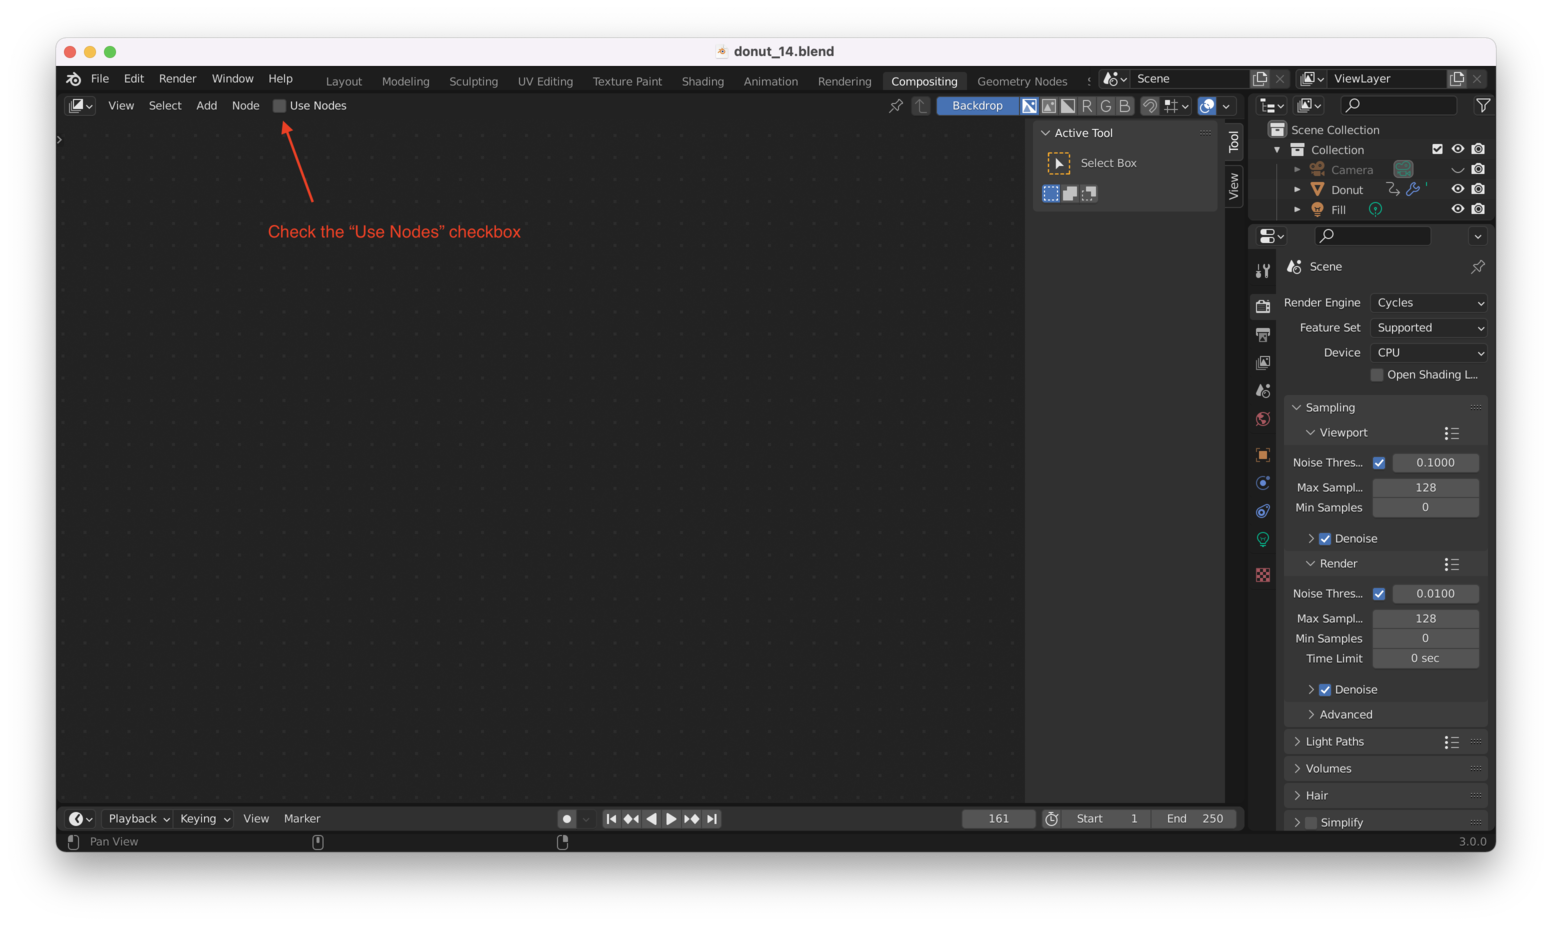
You should see two nodes, “Render Layers” and “Composite”:
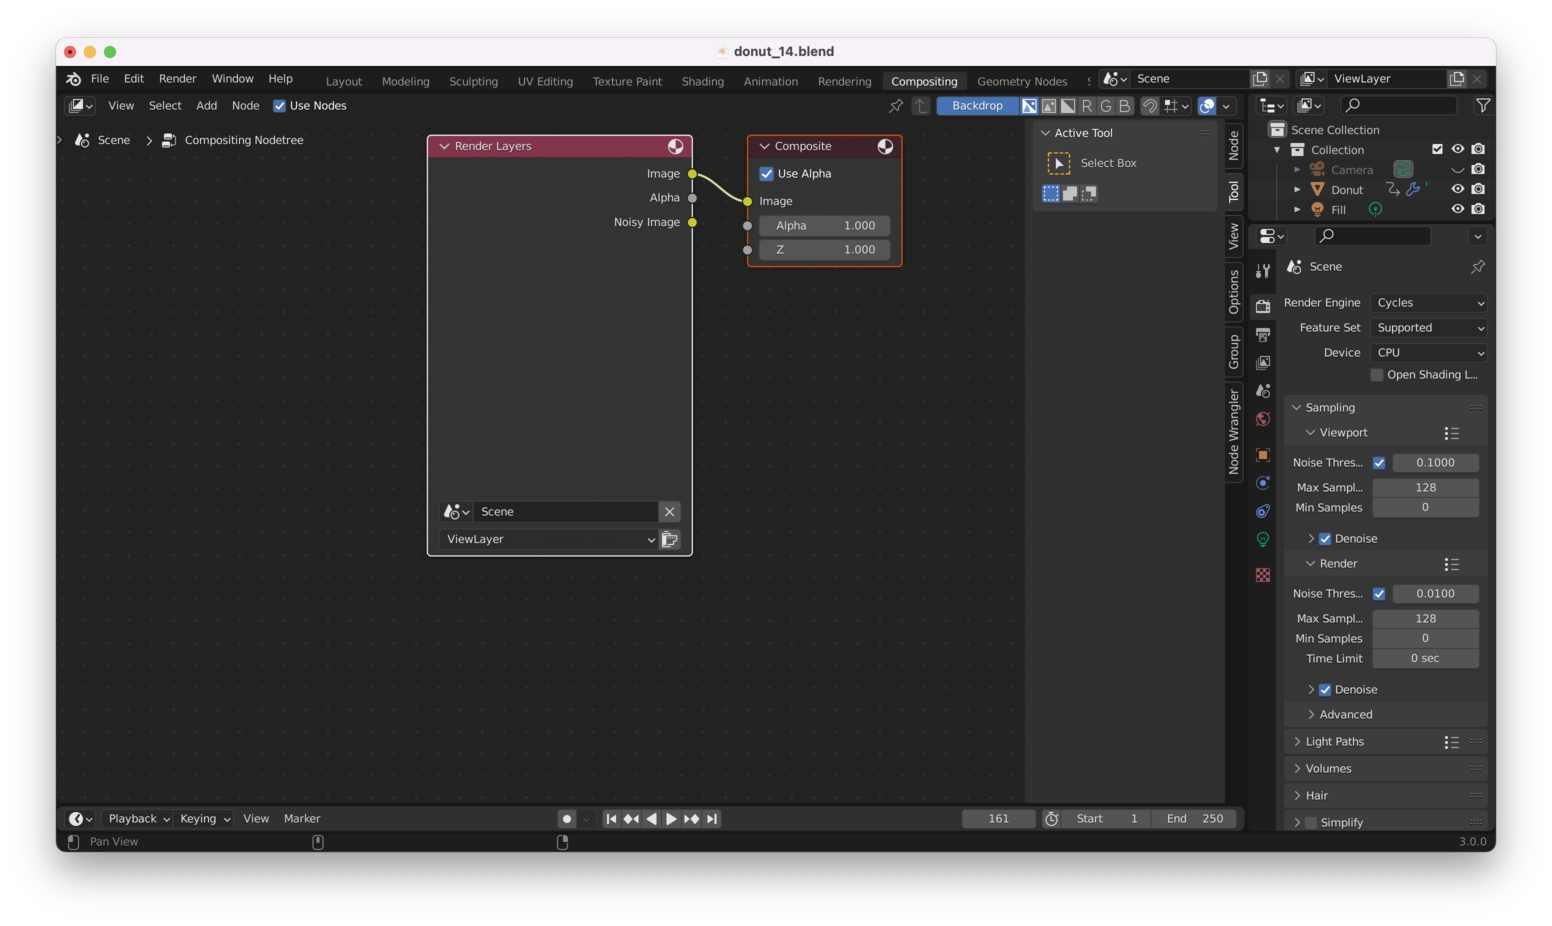
The “Render Layers” node corresponds to what will be rendered. We will be adding nodes between the “Render Layers” node and the “Composite” node. The nodes we add will correspond to effects we want to apply to the render.
Note that “Backdrop” is enabled here:

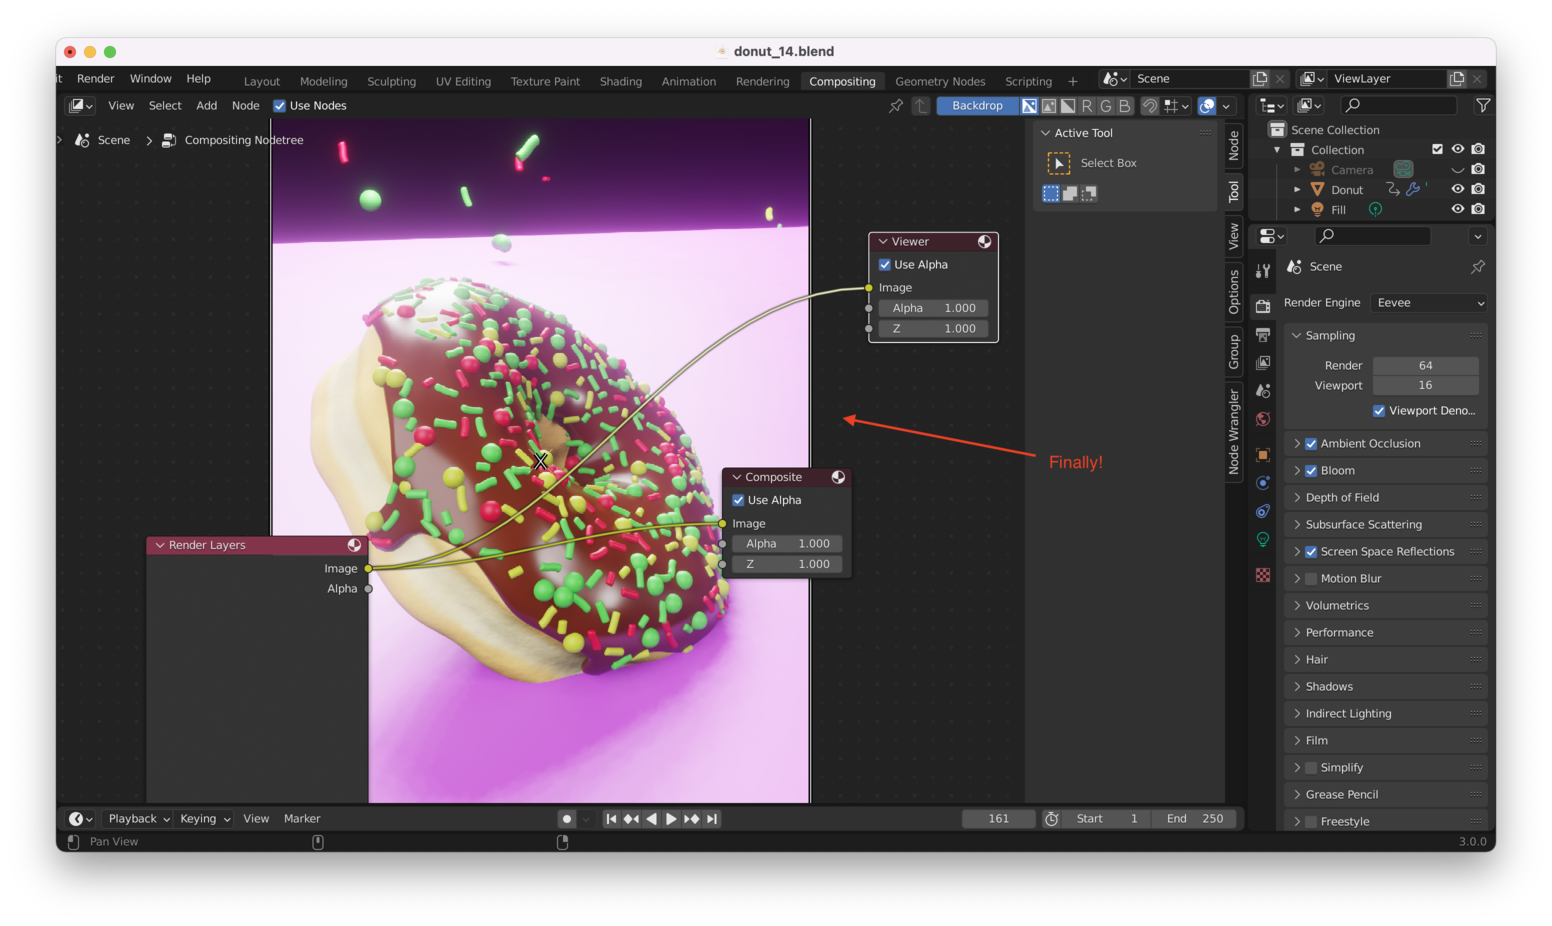
We can hit “Ctrl + Shift + Left Click” with the “Render Layers” node selected, which will automatically add a new “Viewer” node:

The background here is still blank. We need to render our donut with “F12” before we can see a background image.
Tip: If hitting F12 generates an image, but you still don’t see anything in the background, it could be that you have rendered your image into the wrong “Slot”. Blender has multiple “Slots” for rendering, but we should be using “Slot 1”.
To ensure that I have rendered my image into Slot 1, I switch to the “Rendering” tab, choose “Slot 1” from the dropdown, then hit “F12” to produce a render:
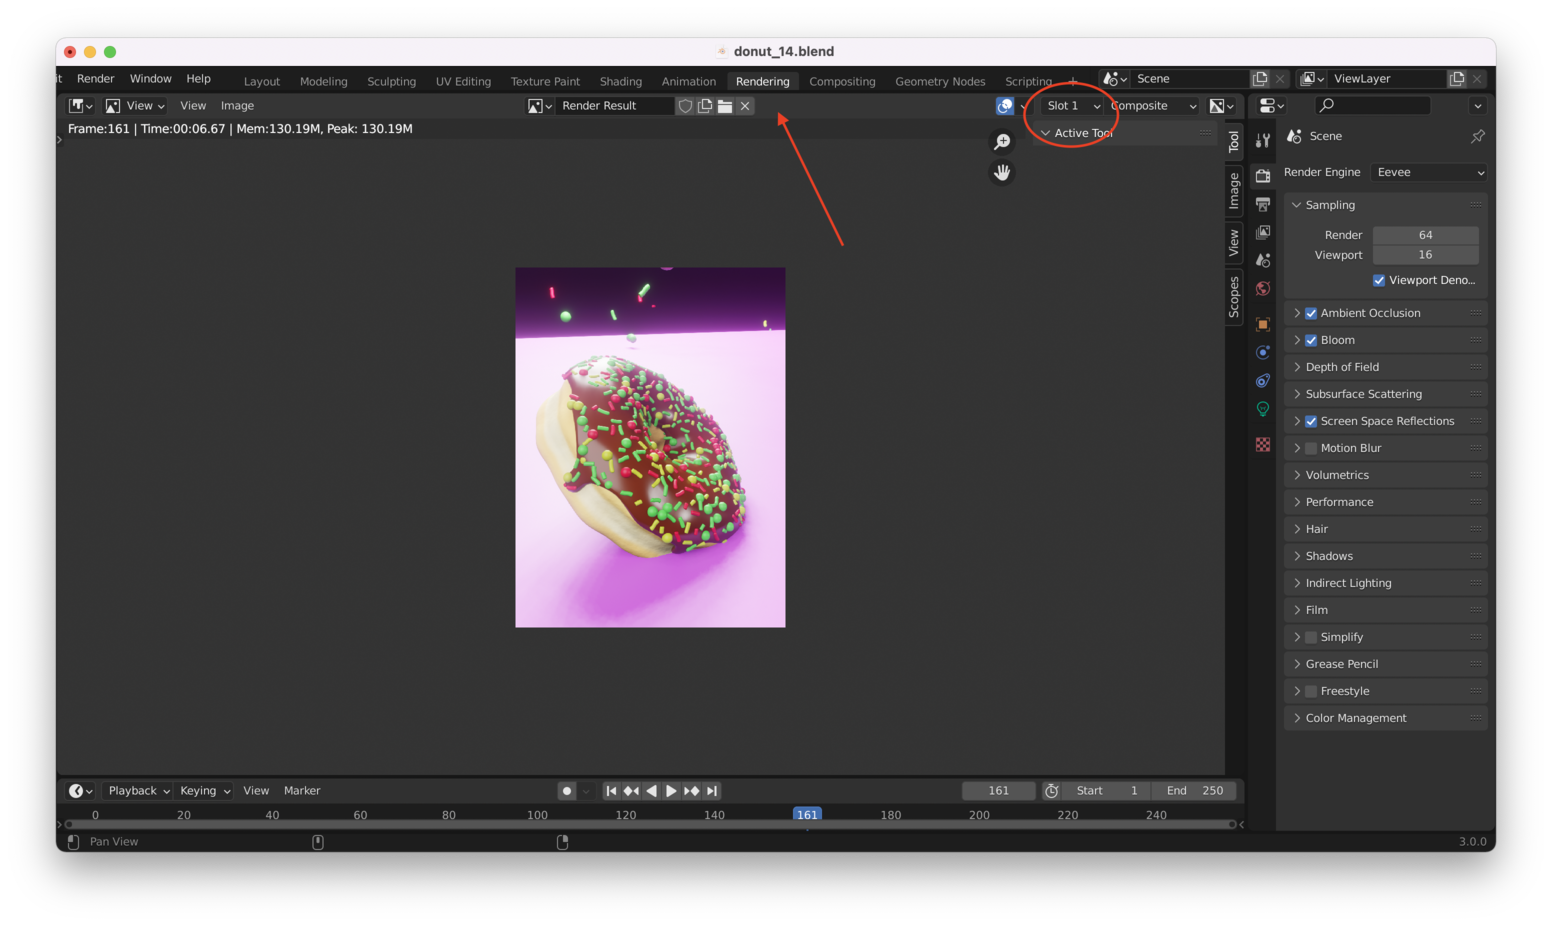
Tip: If your render is taking a long time, or you are on a less powerful laptop (like I am), you can go back to Blender’s “Layout” tab, open up the “Render” settings, and set your Rendering Engine to “Eevee”, which will render significantly faster than cycles (albeit at a lower quality, especially for shadows and reflections):

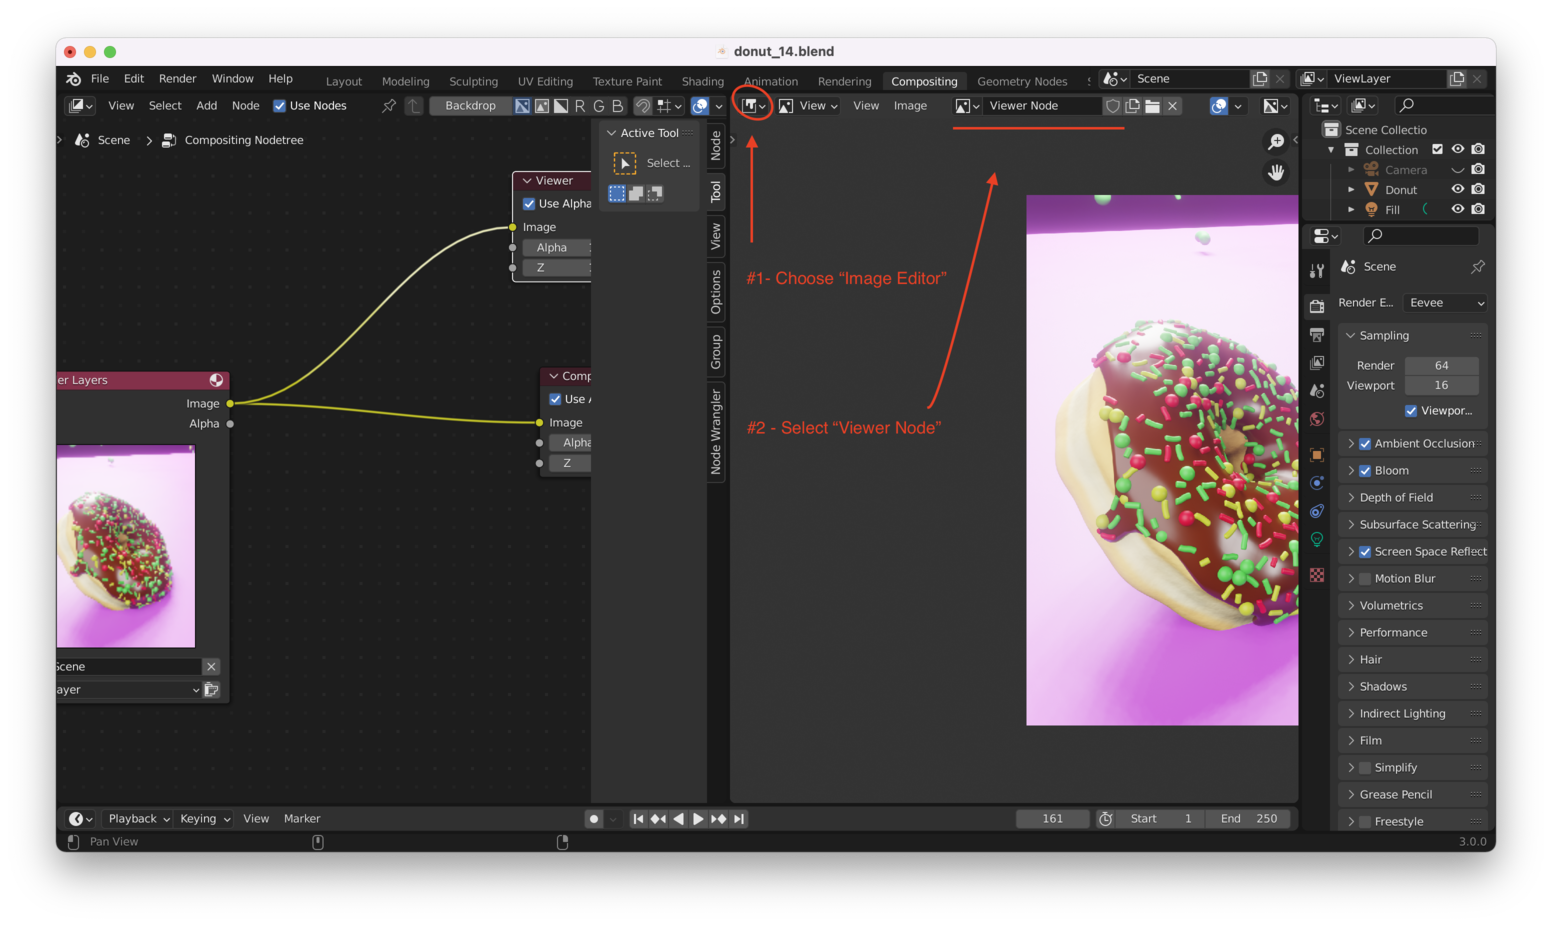
Viewing the donut render inside the compositing window directly can be a little inconvenient. An alternative is to create a new Vertical Split in the Compositing Layout, choose “Image Editor”, and then choose “Viewer Node”, like I have done here:
We don’t actually want to render the black background or the pink plane, so now I need to:
- Hide the plane
- Check the “Transparent” box under the renderer’s “Film” settings
First, hide the plane:

Next, make sure we render with a transparent background:

Since these changes apply to the rendered result, we won’t see them until we hit “F12” and re-render our image. Doing that, we now see something like this:

Simple Compositing: Add A Solid Background Color Link to heading
Now, we can use the compositing tools to add any background color we want.
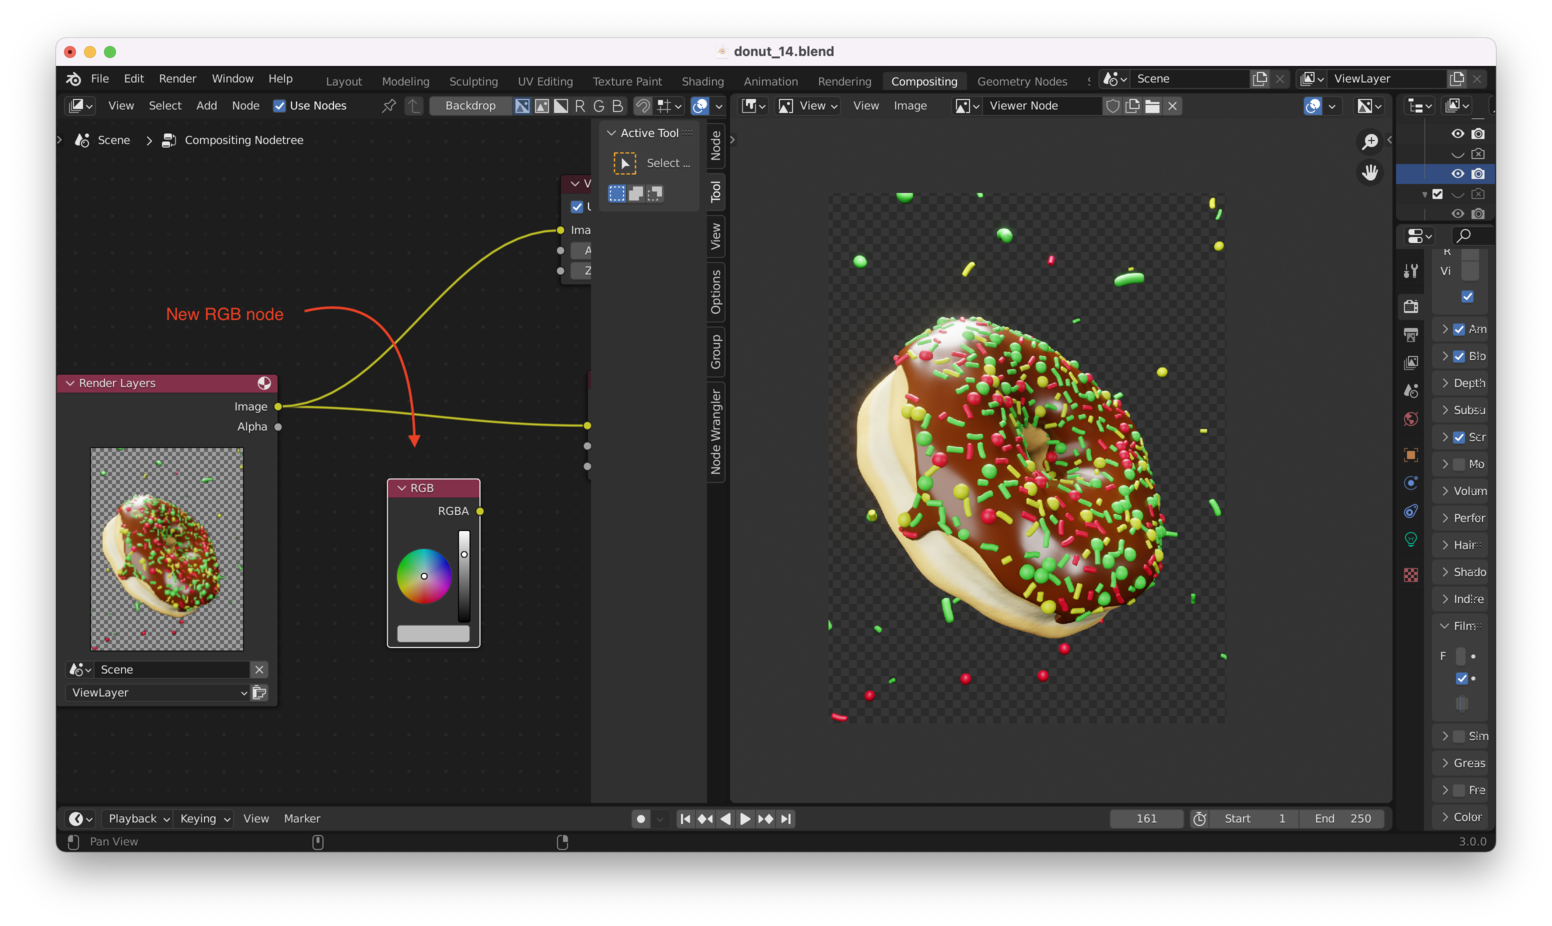
From the Compositing node view, we can hit “Shift + A” and choose “Input -> RGB”, like here:
We also need to add a “Color -> Alpha Over” node:
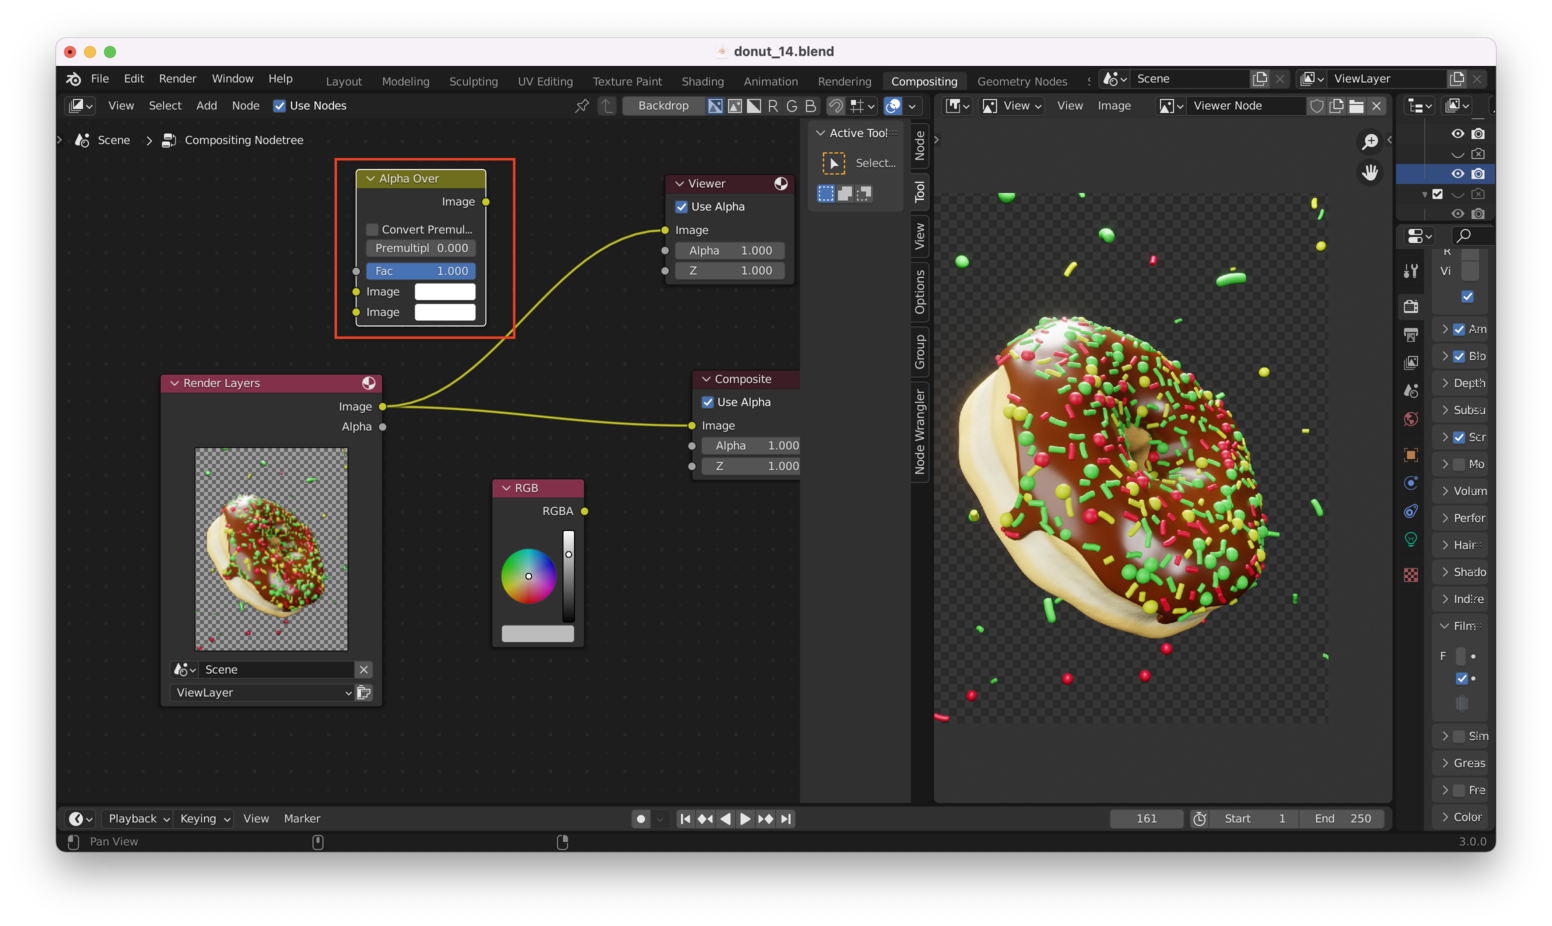
Hooking these nodes together and using them to drive the Viewer output, we have:

We get a single solid color, because we aren’t using the “Alpha” channel from the Render Layers node. Adding that information to the “Alpha Over” node’s “Fac” input, we have:

Better, but it’s backwards! Reversing the order of the two “Image” inputs to the “Alpha Over” node will fix this:

Great! Now we can non-destructively set the background to any color we want.
Tip: If you wanted the background to match the color of something on the donut (like a sprinkle or the icing itself), you could use the “eye dropper” tool from the “RGB” node’s color picker to choose a color at will.
The color picker is shown below (just left click on the color picker tool, then left click anywhere on the rendered output to choose a color):

We can use compositing to do all kinds of fancy stuff, like “gradient” coloring (i.e. having lighter background colors near the top of the rendered images, gradually getting darker towards the bottom).
Adding A Gradient Background Link to heading
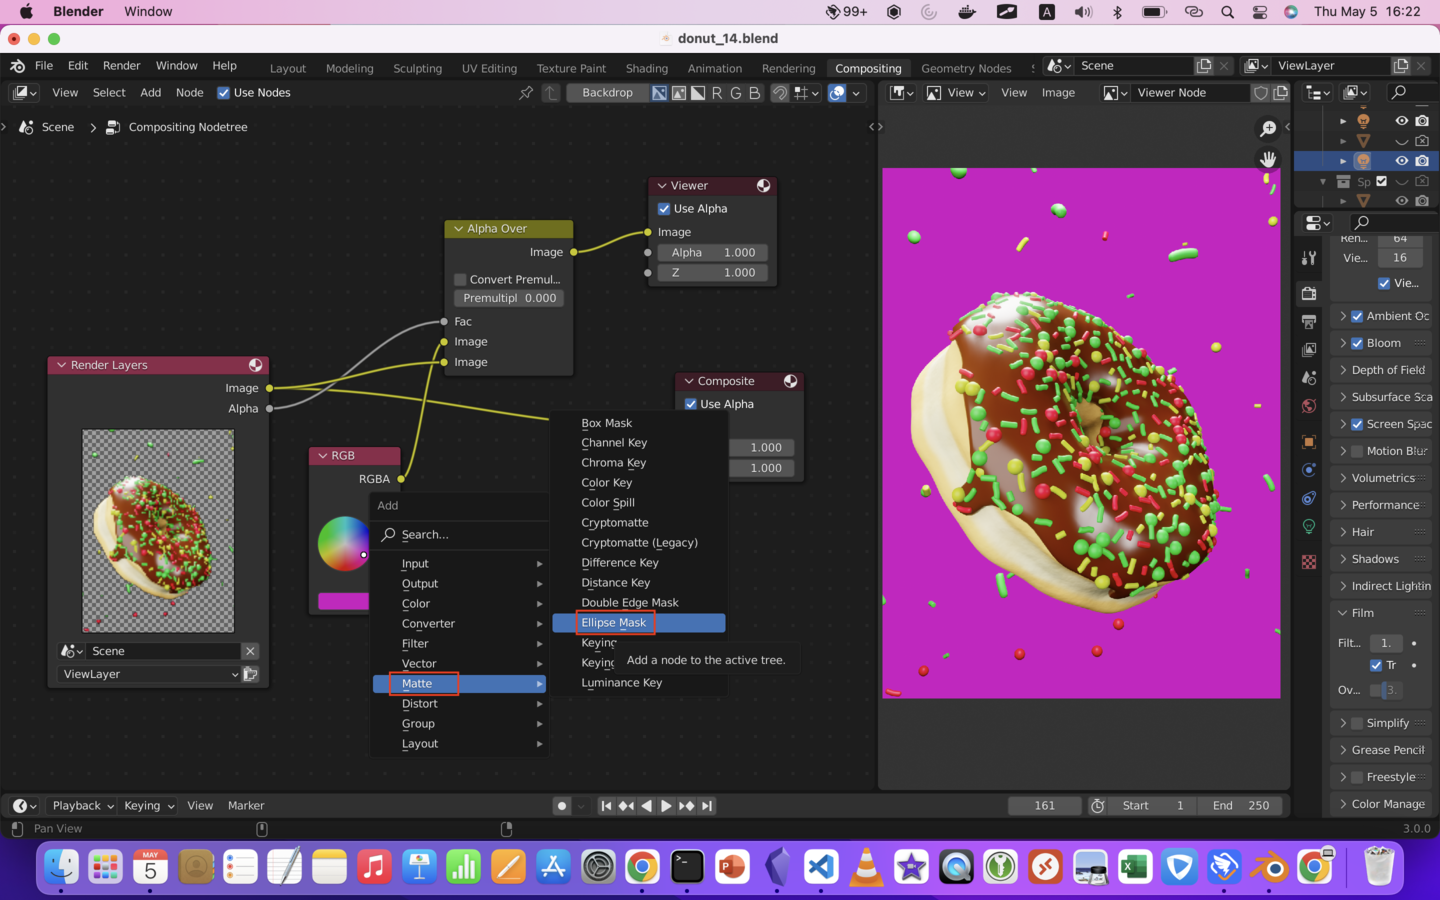
From the Node view, hit “Shift + A” and choose “Matte -> Ellipse Mask”:
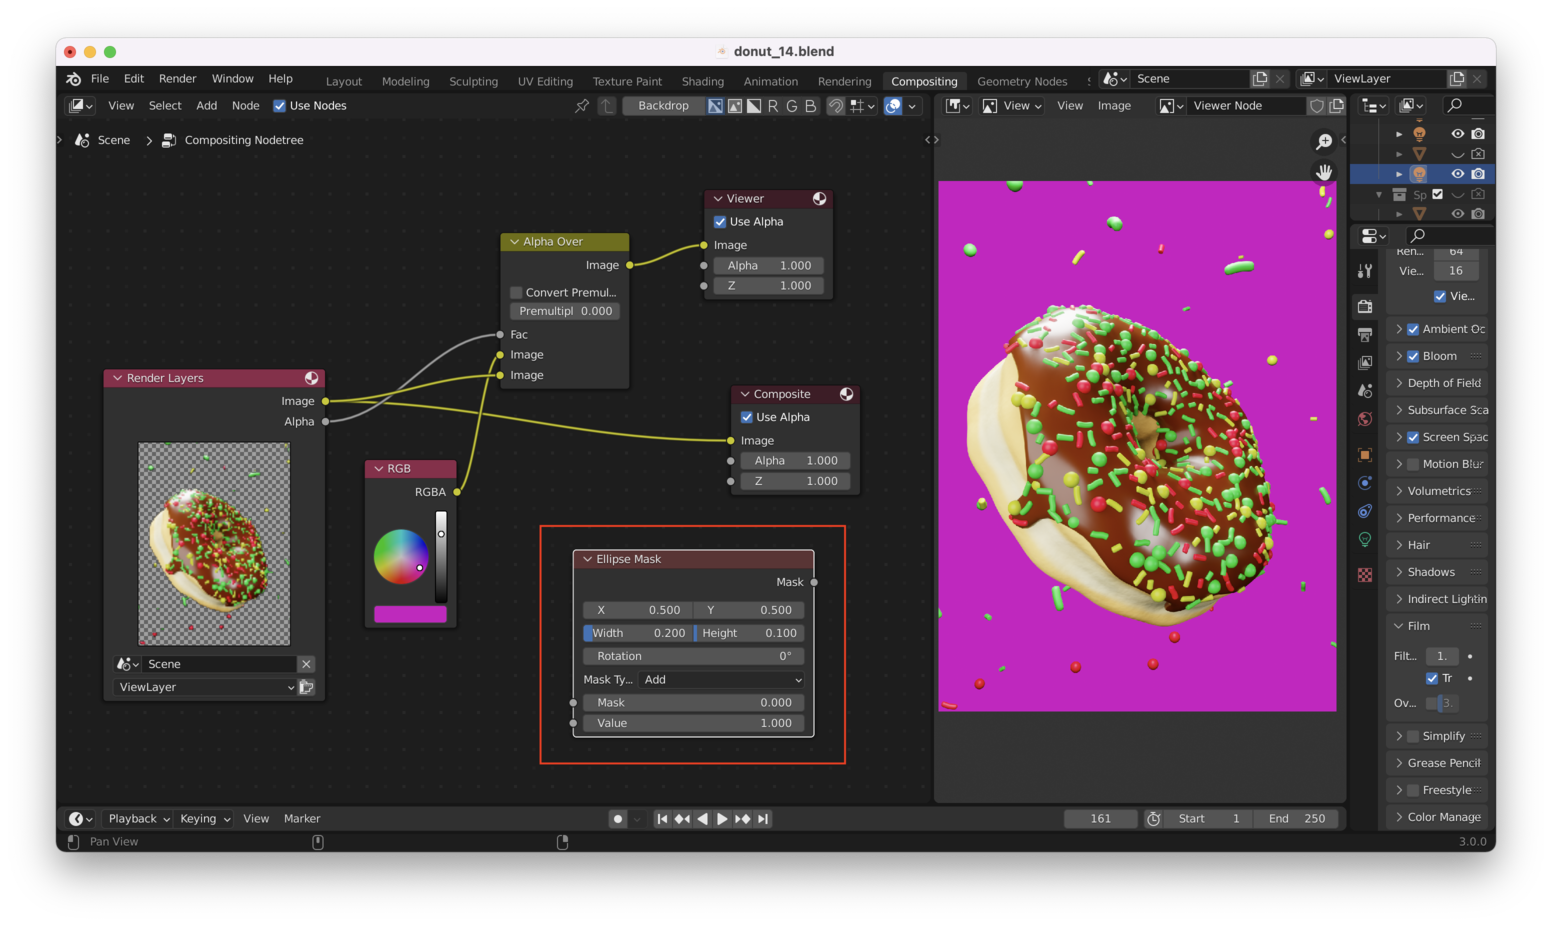
Using “Ctrl + Shift + Left Click”, we can get an idea what the Ellipse Mask actually looks like:

Set the “Width” and “Height” fields to 0.5 to create a circle, then reposition the circle so that it sits in the top left corner of the scene, like this:
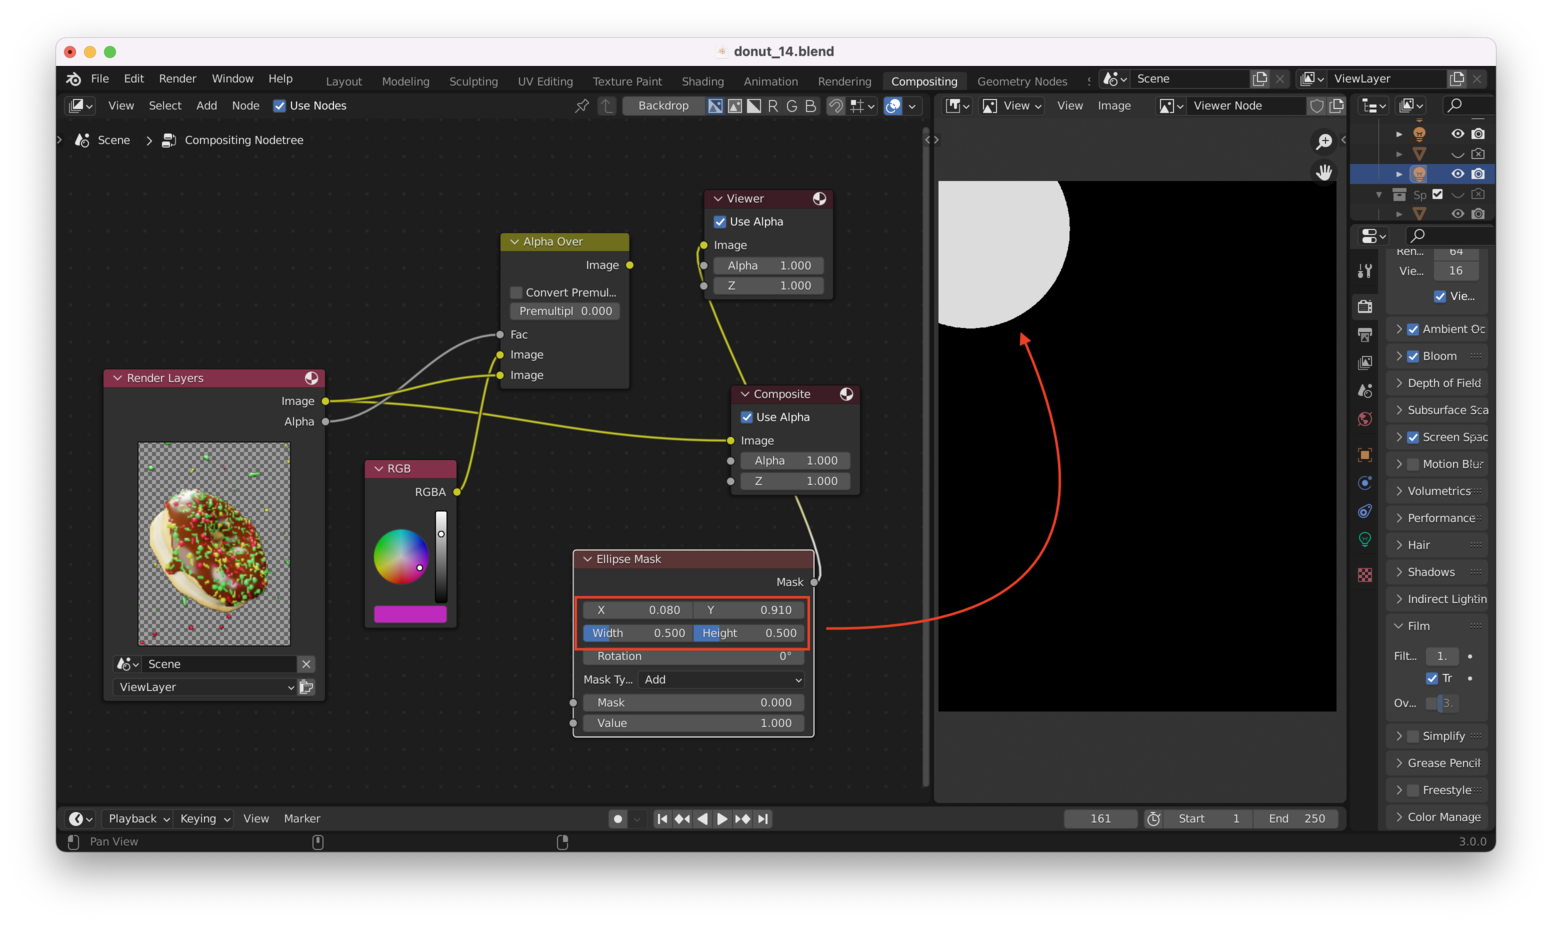
Tip: You can hold down “Shift” while dragging the “X” and “Y” slider bar, to slow down the rate at which the Ellipse Mask moves around.
Now, we will add a “Blur” node. Again, from the node view hit “Shift + A”, then choose “Filter -> Blur”:
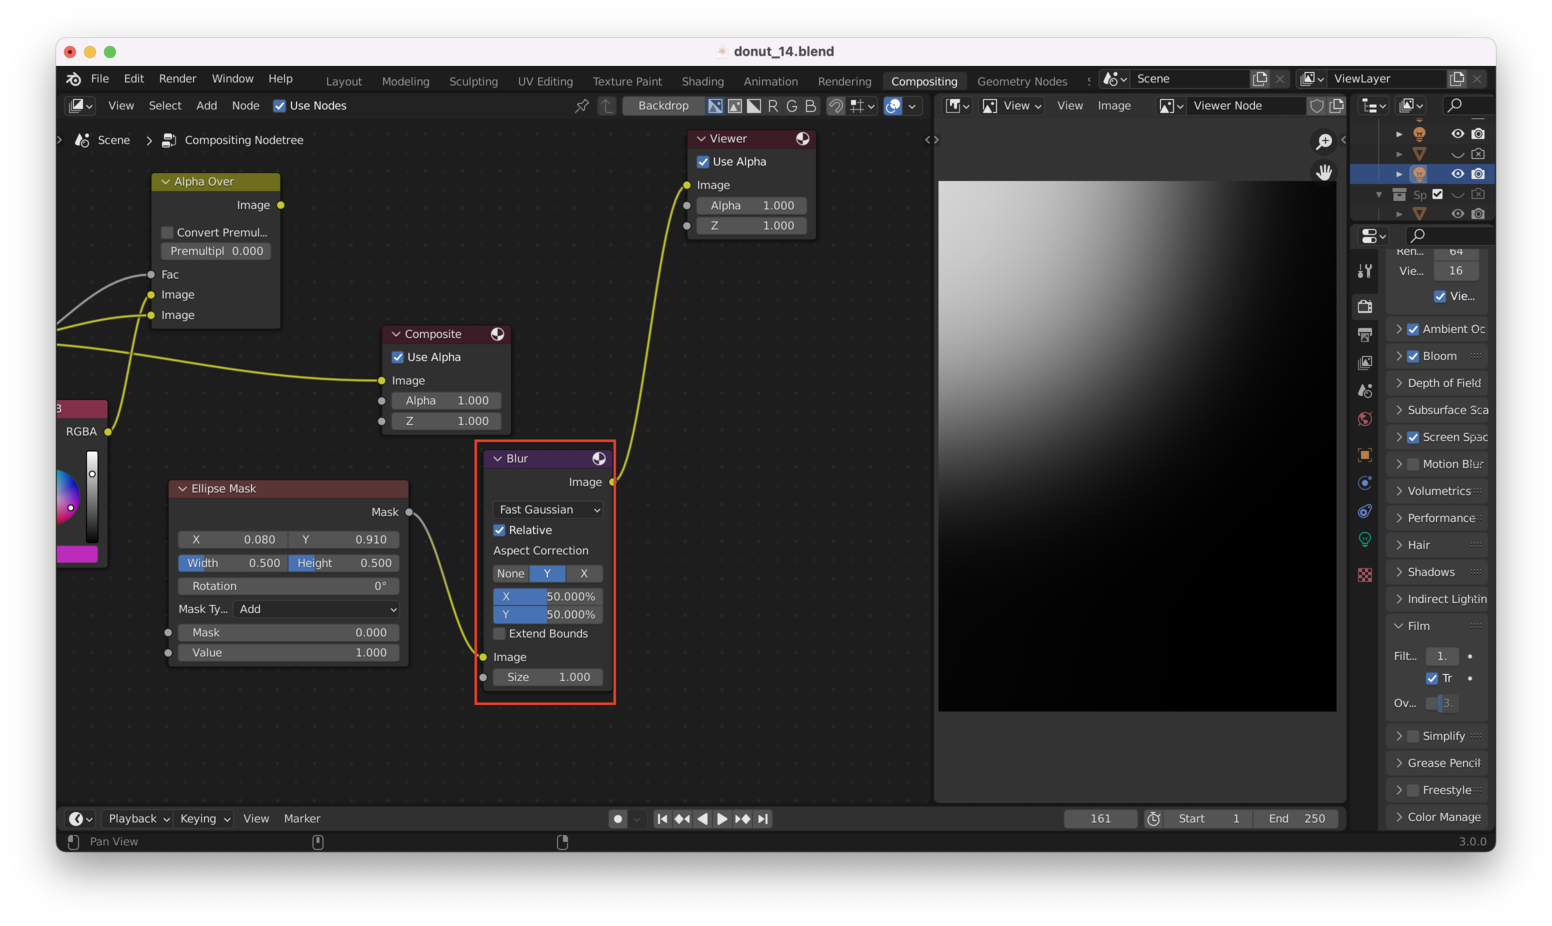
Take note of the settings:
- “Fast Gaussian” is selected as the blur type
- “Relative” is selected
- “Aspect Correction” is set to “Y”
- We have set the amount of X and Y blur to be equal
Setting higher values for the “X” and “Y” settings will result in more blur.
Note: You’ll need to “Ctrl + Shift + Left Click” on the “Blur” node itself, if you want to see the result of the blur effect on the Ellipse Mask!
We now want to add the “Ellipse Mask” and “Blur” nodes into our workflow.
To do this, we need a “Mix” node (from “Color -> Mix”) to combine the outputs from our “RGB” node and our “Blur” and “Ellipse Mask” nodes.
Like this:
Note: I had to select the “Alpha Over” node then hit “Ctrl + Shift + Left Click” to see the final result in the Viewer pane on the right side of the screen.
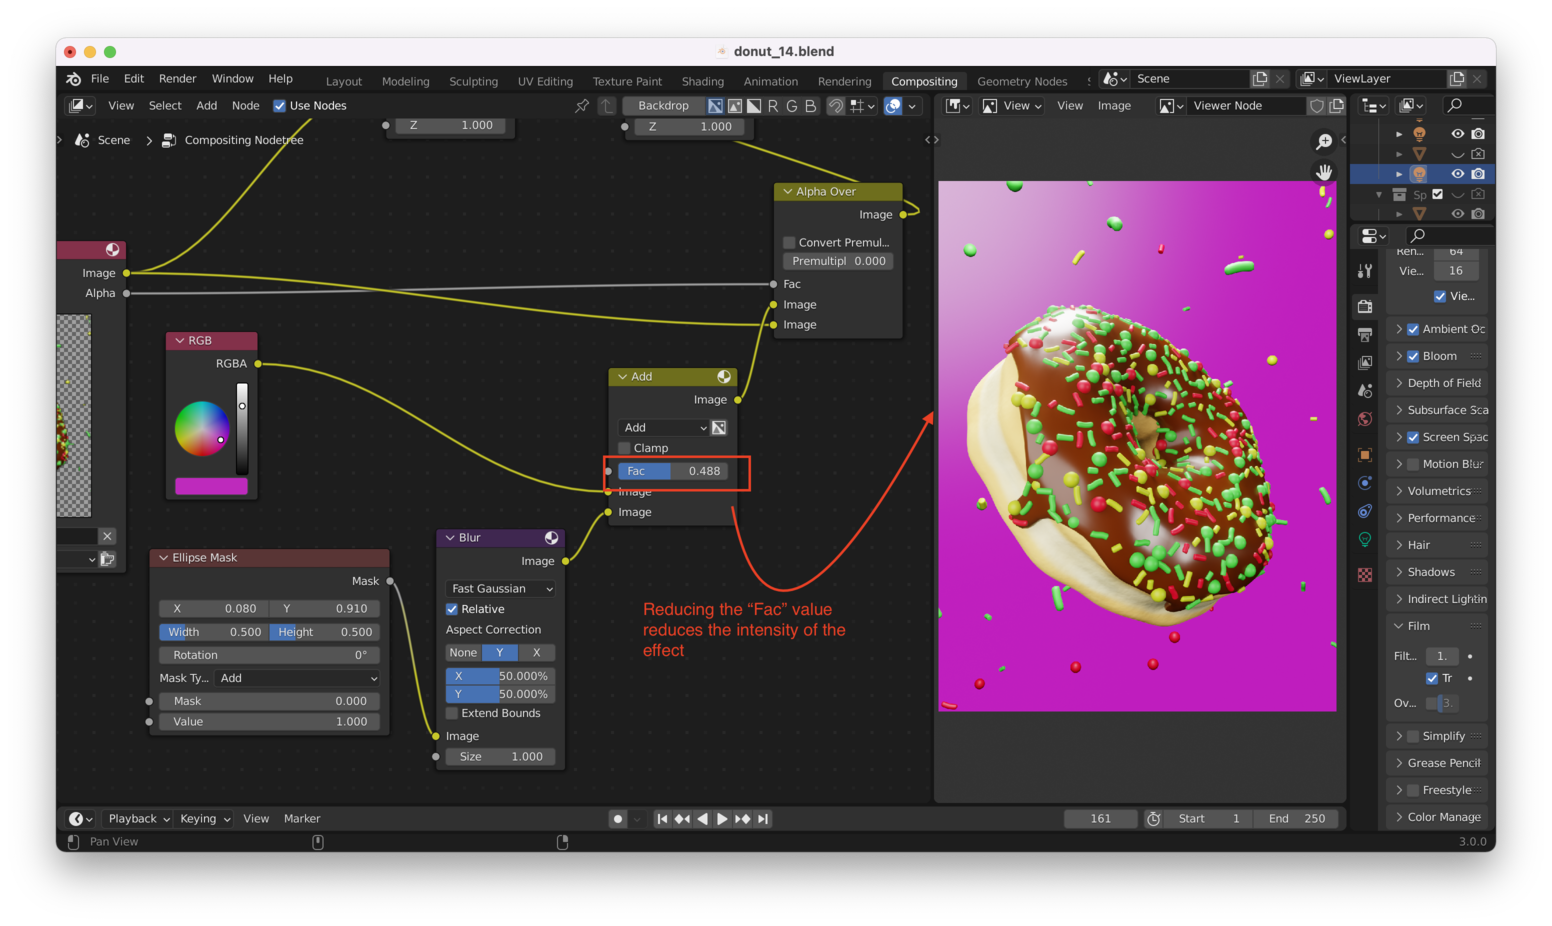
Changing the “Fac” at the “Mix” node can now be used to effect the “opacity”:
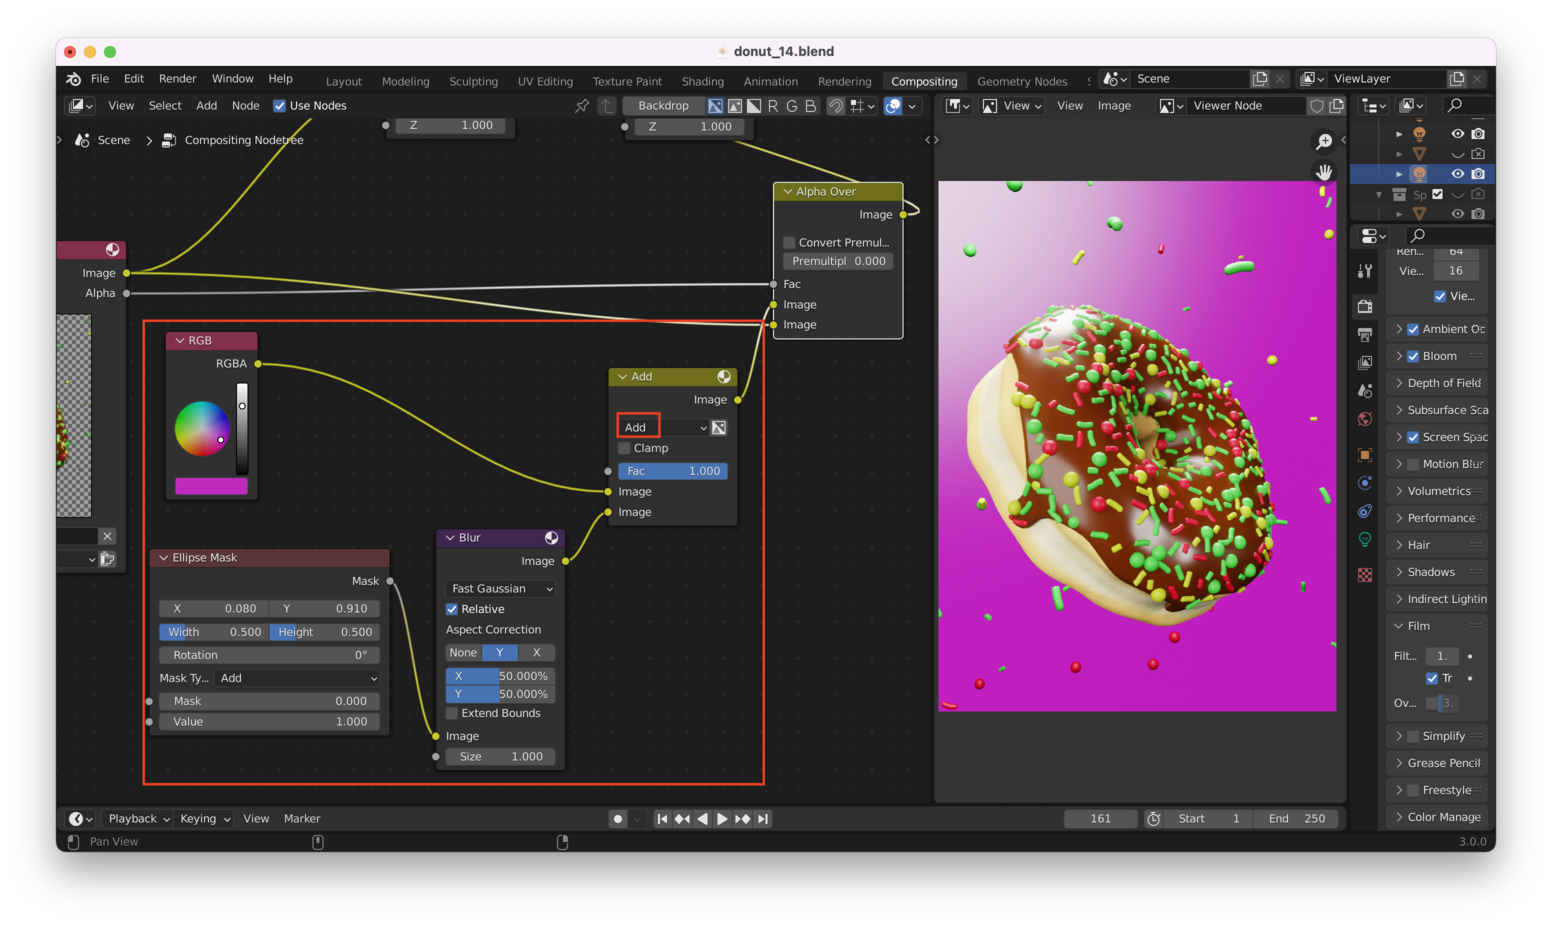
Adding “Glare” Effects Link to heading
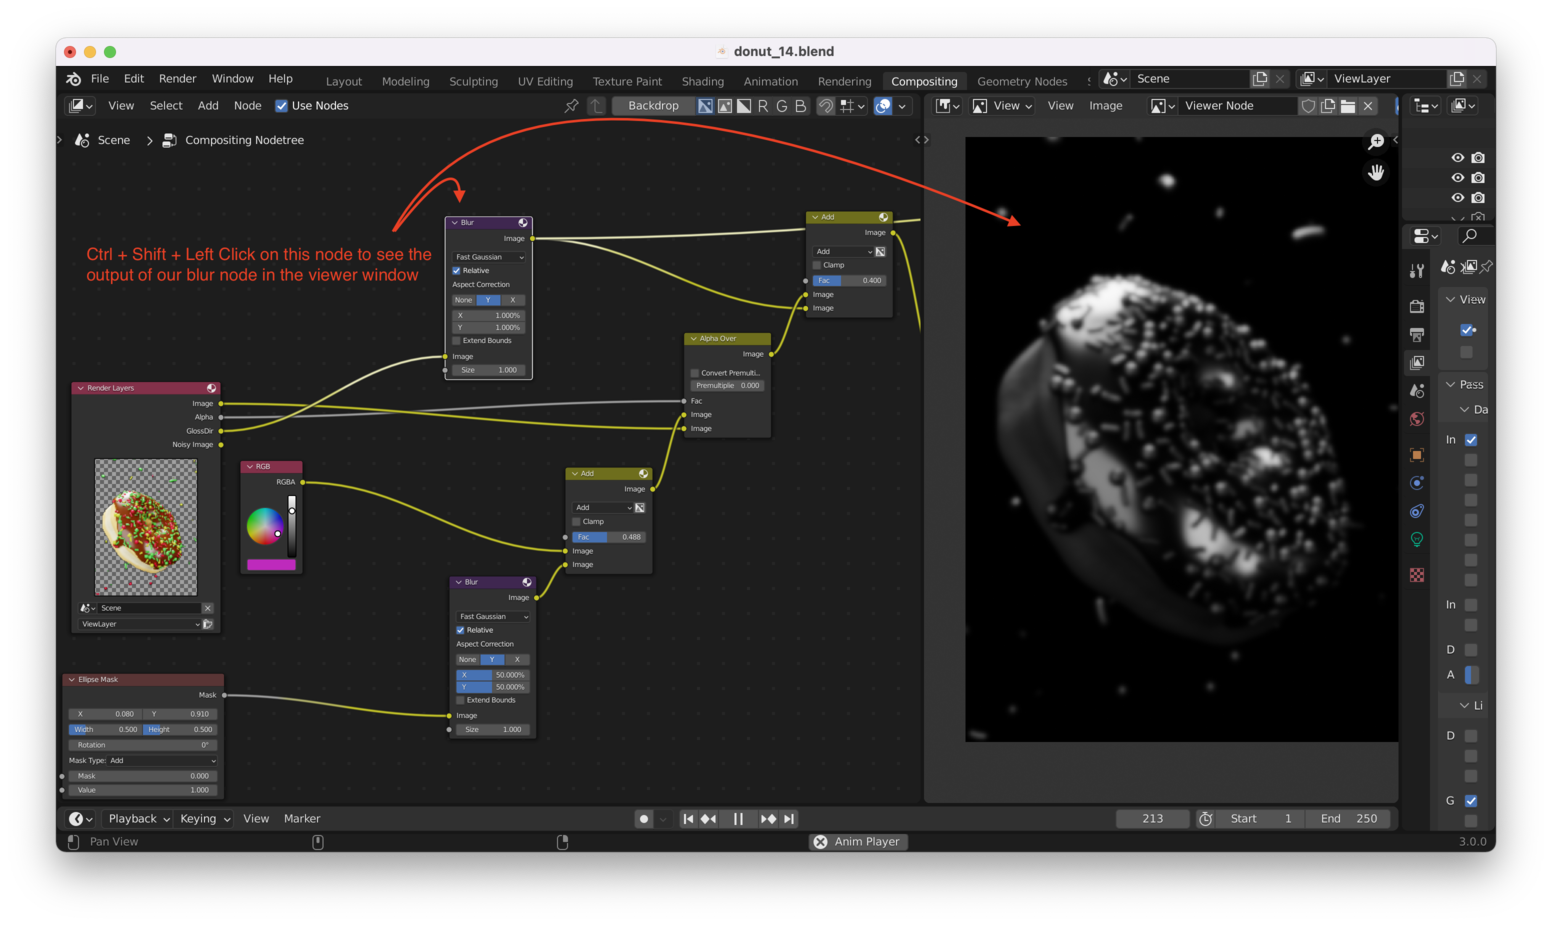
We can get the effect of colors “bleeding” in brightly lit areas by adding another “Blur” node.
We can start by duplicating our existing “Blue” node with “Shift +D”.
We can then feed the output of the “Render Layers” node into this new “Blur” node, select the “Blur” node, hit “Ctrl + Shift + Left Click”, and take a look at the result:

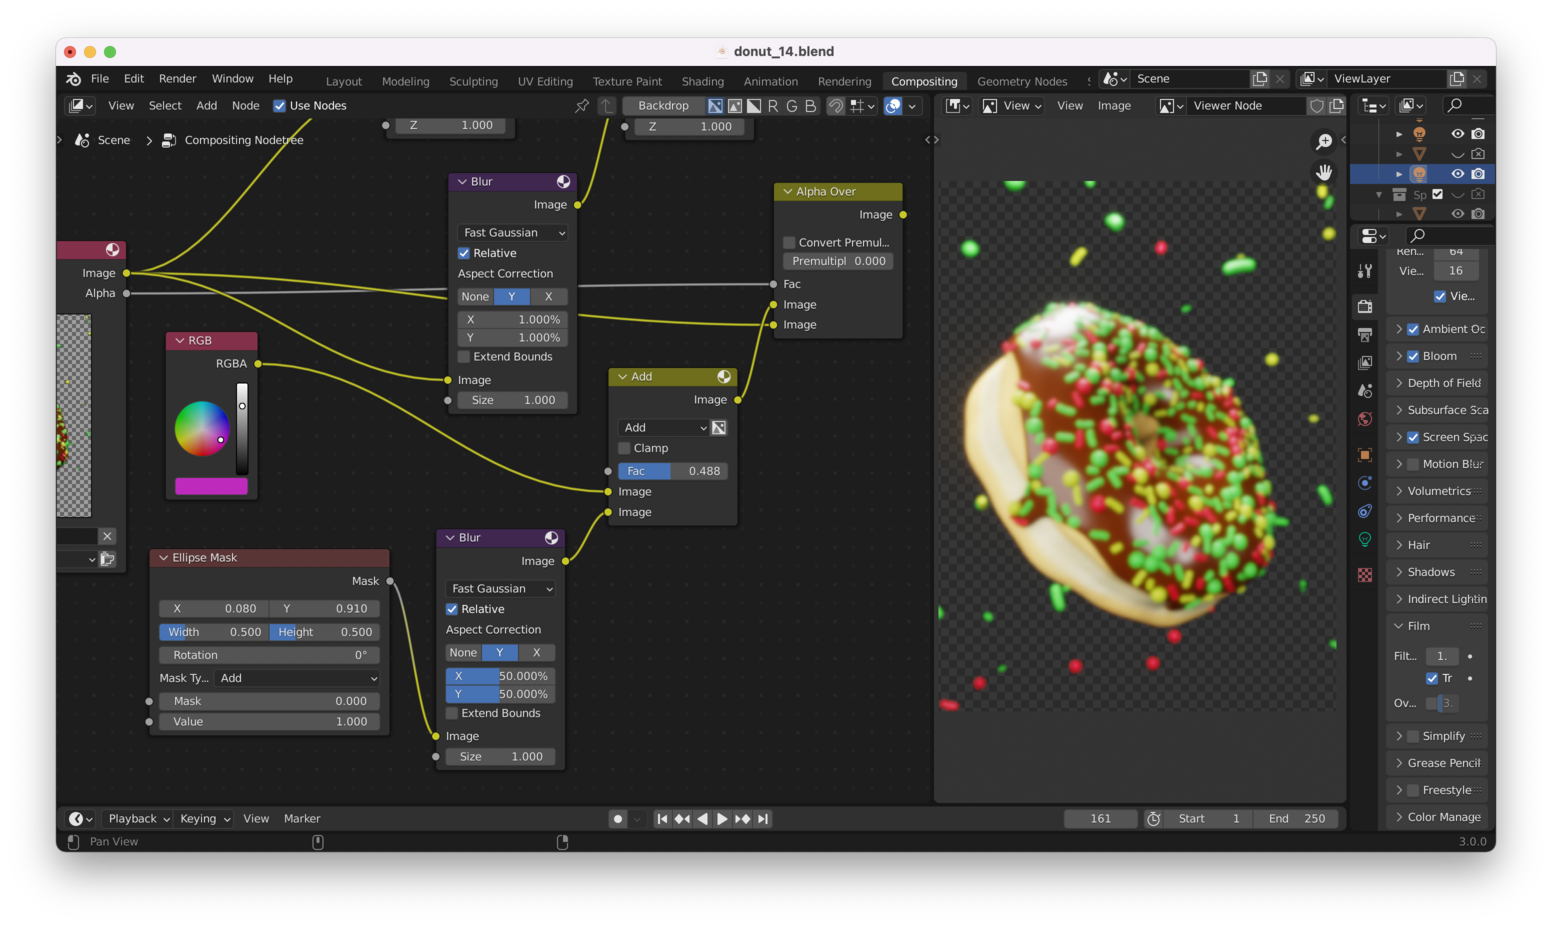
We need to reduce the intensity of the blur, and also “mix” this blur into the final result. Reducing the X and Y blur to 1%, we get:
Much better. Now, we want to use the information only from brightly lit parts of the image. There’s also a lot of color and shading information in the image that we don’t need to drive our “glare” effect.
We only want to show glare in brightly light areas where reflections are happening. We can get that information from the render by enabling “passes”.
We can enable this from “Passes” under “Layer Properties”:

Essentially, all of the information about how the final render was produced is encoded in different “passes”. Turning these on allows the pass information to be exposed to other tools (like Photoshop, or Blender’s compositing tool).
Here, we are interested in light directly hitting “glossy” areas in the image, so we check the “Direct” box under “Glossy”:

Don’t see these settings? You won’t have some of these options if you are using Eevee as your rendering engine. You will need to switch to “Cycles”.
Selecting our “Render Layers” node and “Ctrl + Shift + Left Click”-ing on it several times (until the new GlossDir output is selected) will show our result:
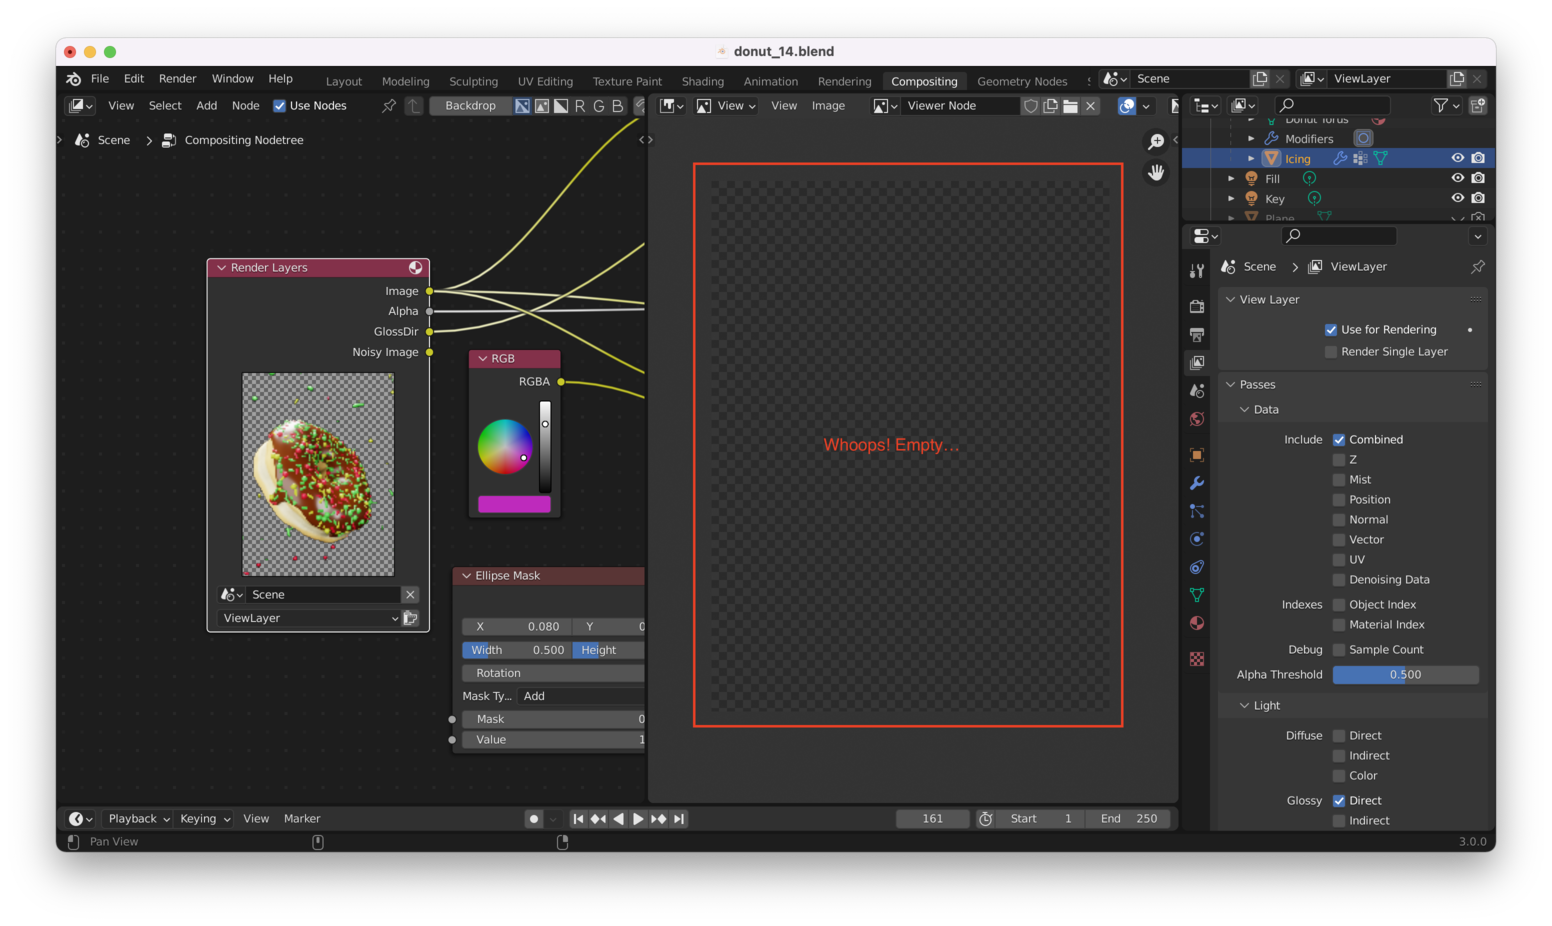
It’s empty! Again, we have to re-run the render in order to update it with the pass information we just asked the renderer to generate. We can do that by hitting “F12”:
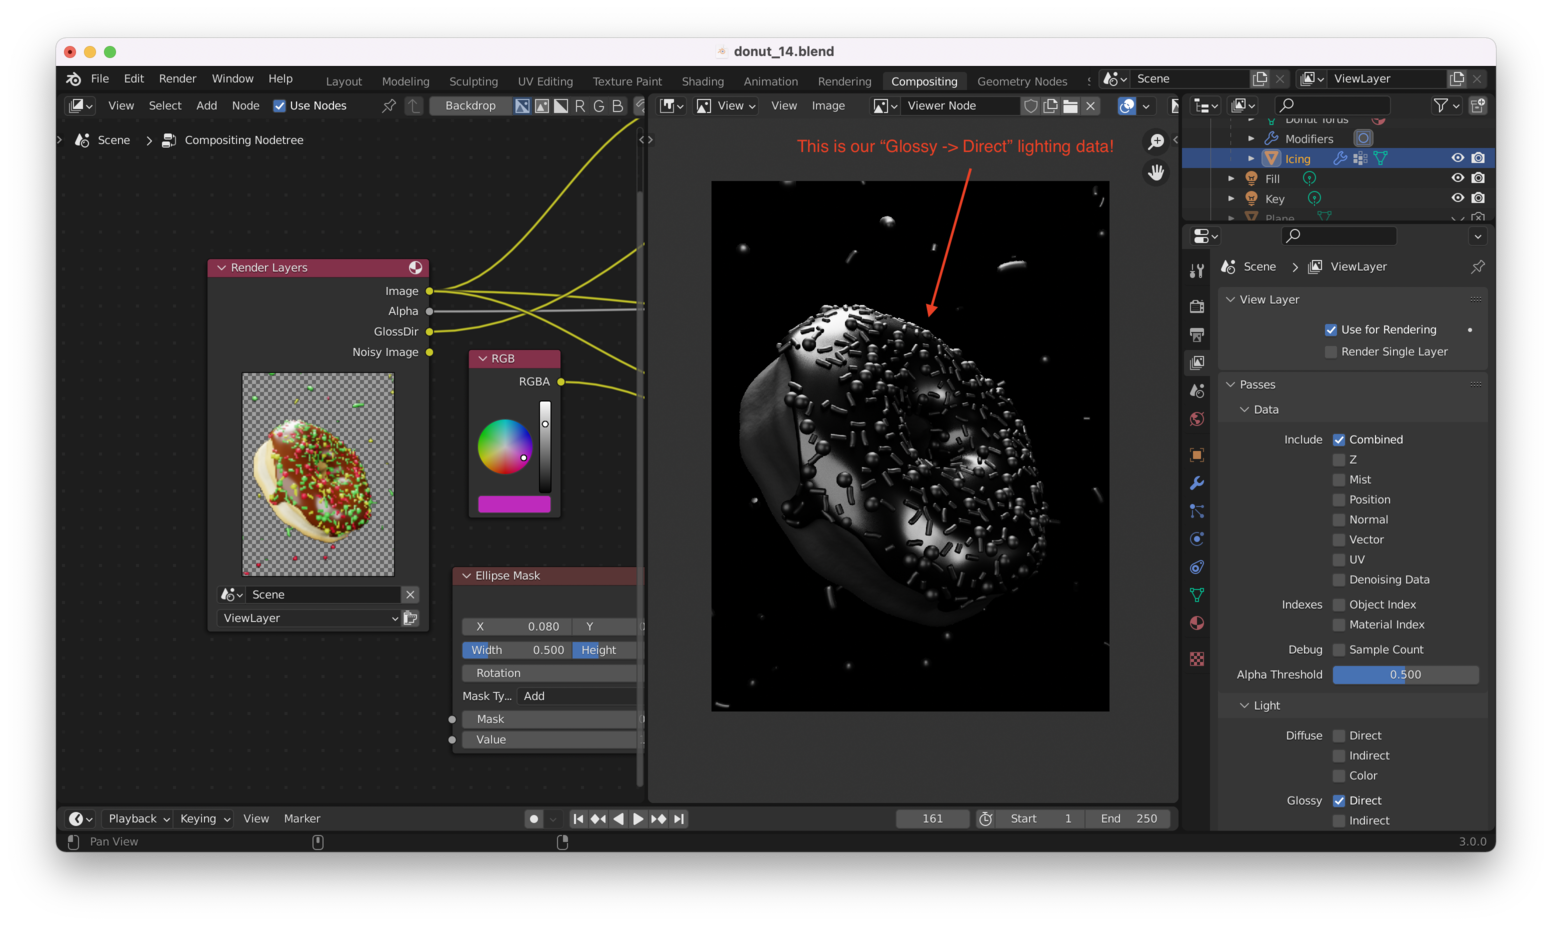
Let’s put the “Glossy -> Direct” pass into our “Blur” node. Now we get something like this:

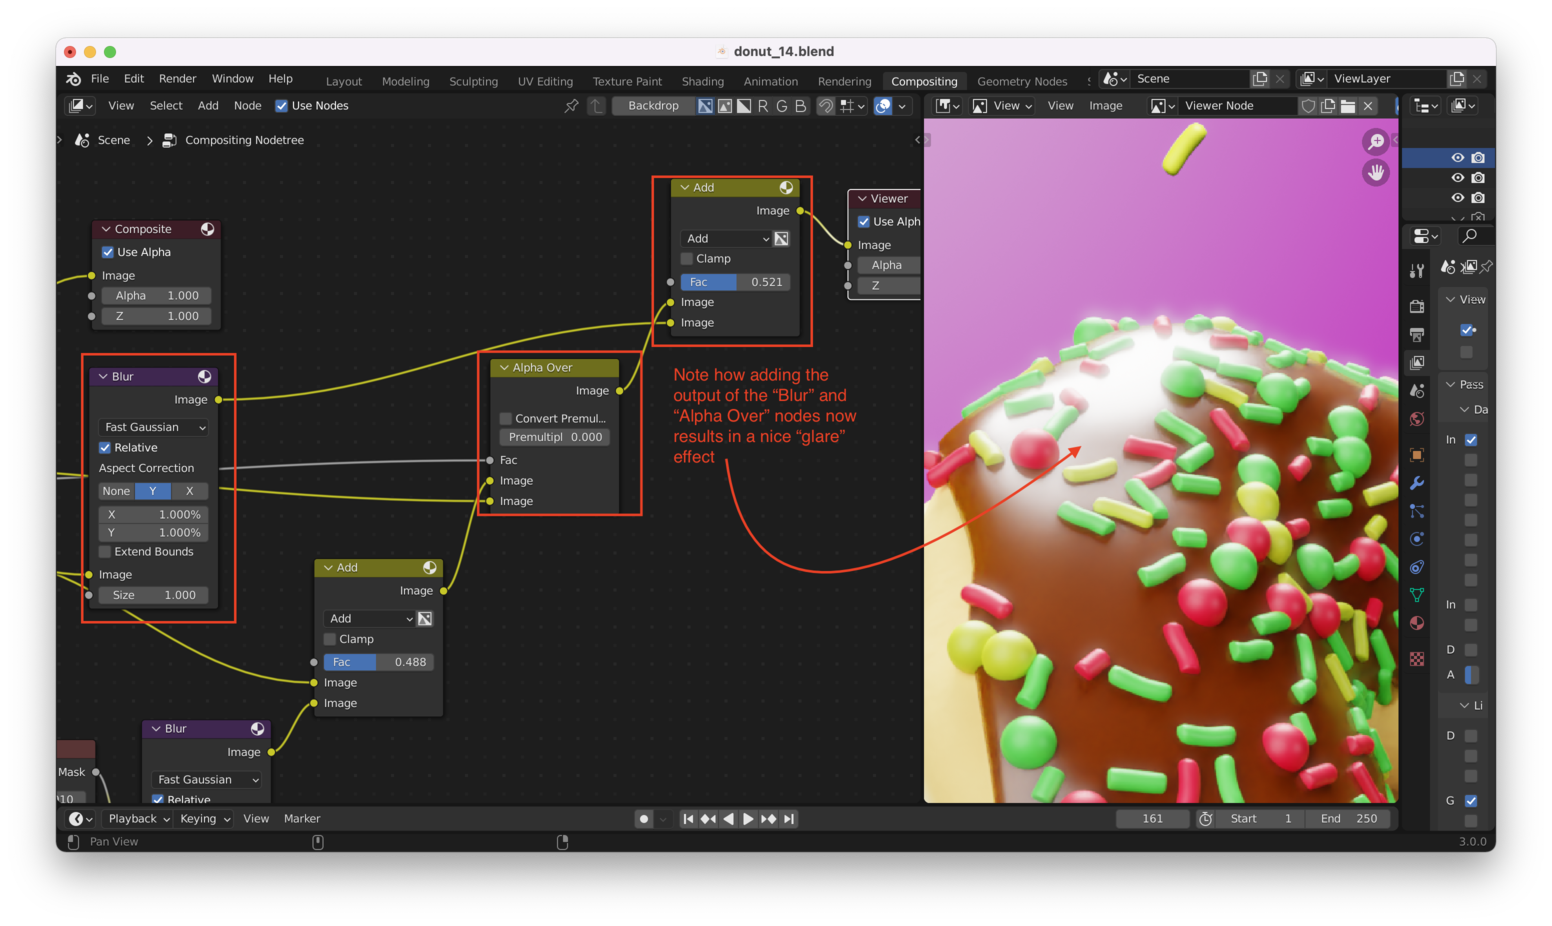
Awesome! We can combine this with our color data to get a “bleed” effect by adding a new “Mix” node (we can duplicate our existing Mix node with “Shift + D”):
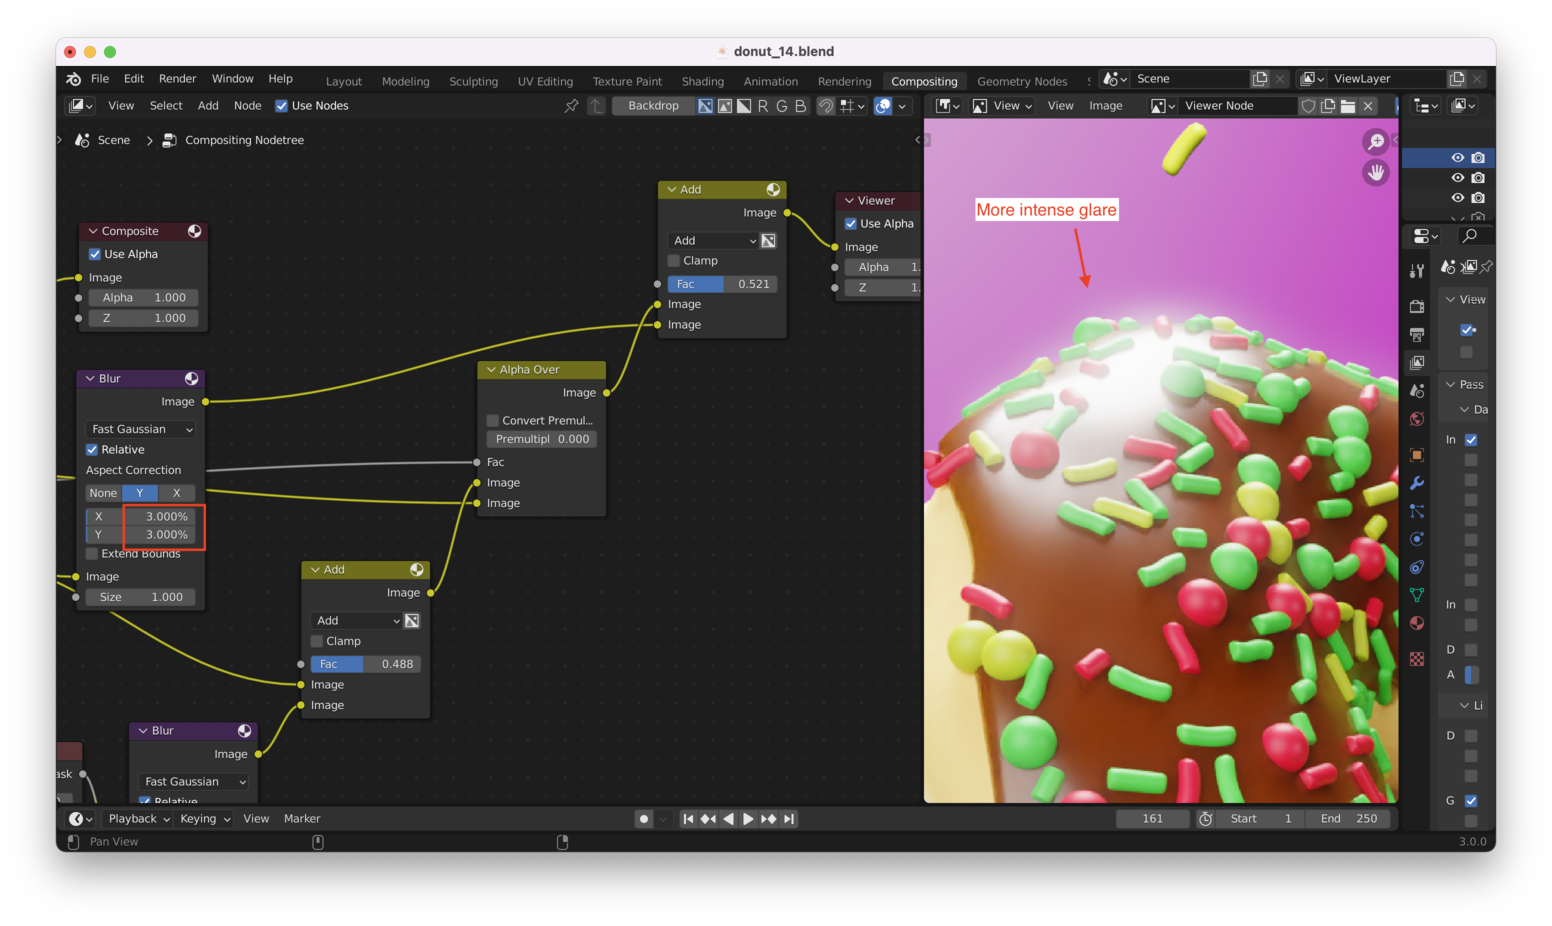
Adjusting both the “Mix” node’s “Fac” value and the amount of blur will change the intensity of the effect. For instance, increasing the blur to 3%, I get:
Going back to the 3D layout editor and adjusting the intensity of the lighting can also help us reduce the glare if it is too intense in some parts of the scene!
Of course there are many ways to adjust things: this is the great thing about 3D software.
Color Grading Link to heading
There are several different ways to do color grading, but the method we will use is to do our color grading in the compositor, by adding a “Color Balance” node, like this:
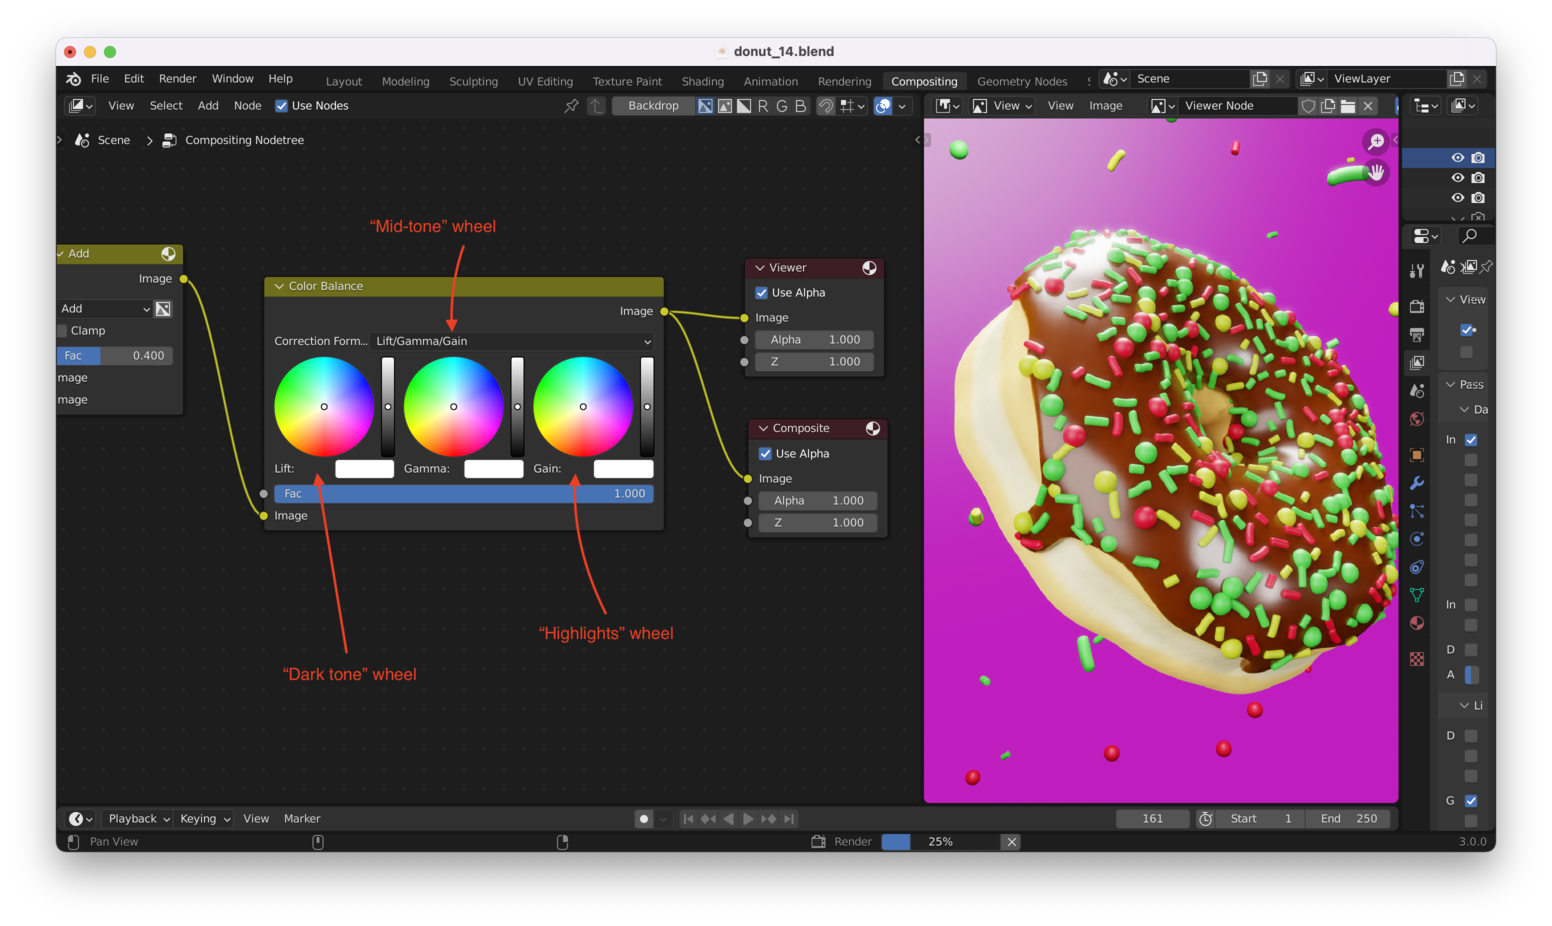
For Correction Format, use “Offset Power Slope”. Note that this mode inverts the center color wheel, for some reason. Just keep that in mind as you work on your color grading:
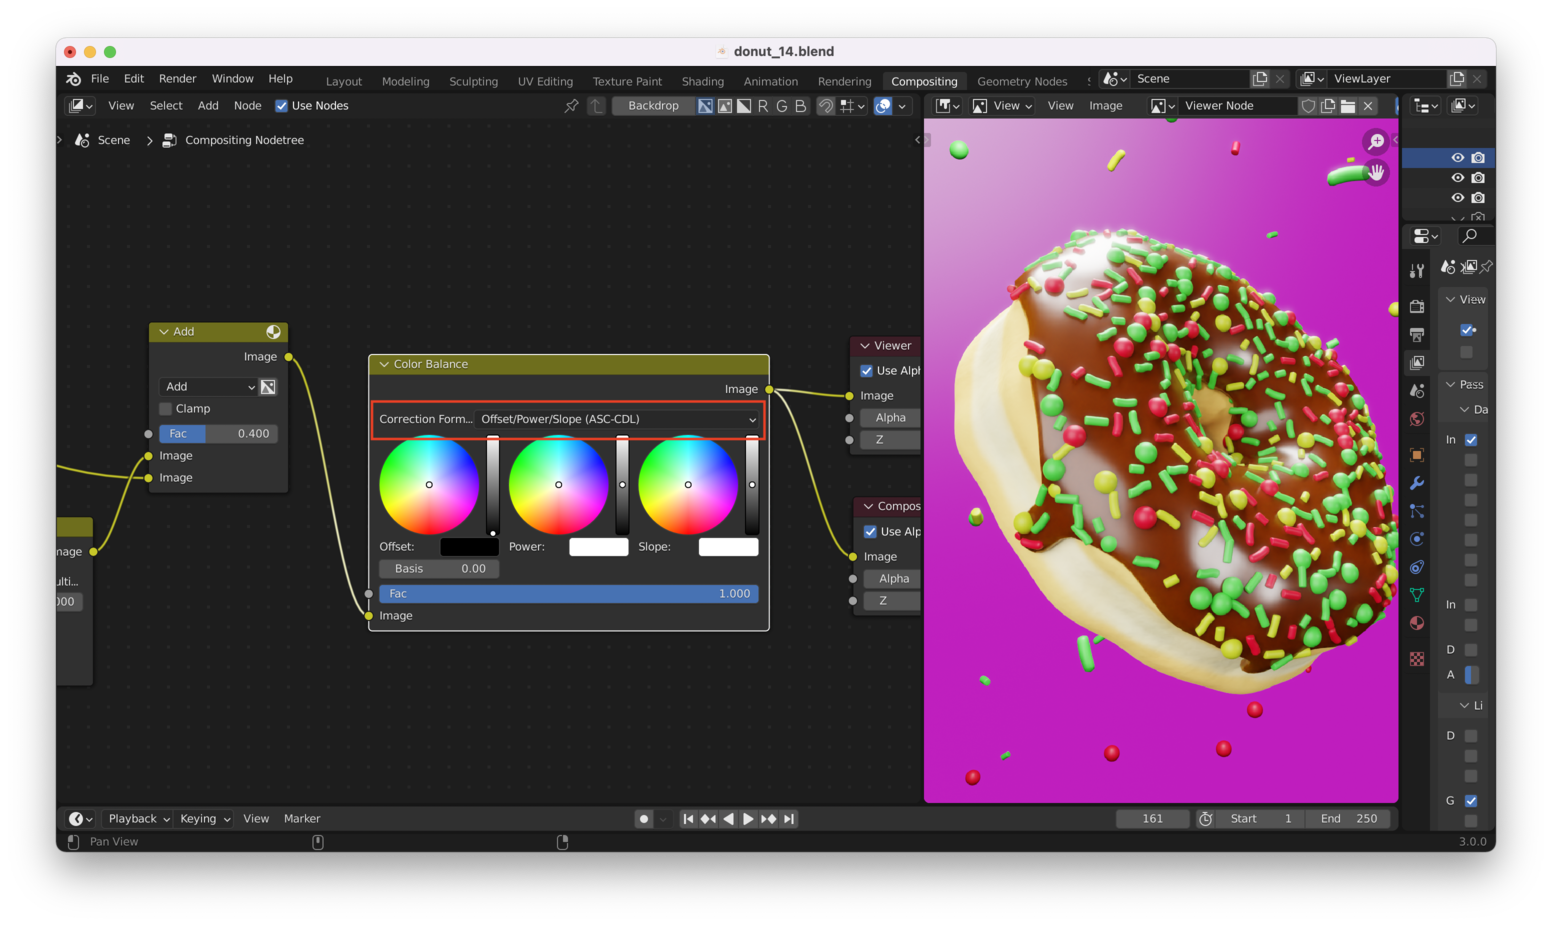
Again, on the center color wheel the “mid-tones” are inverted, so if you want pink you choose green, if you want blue you choose orange, and so on.
Distortion Link to heading
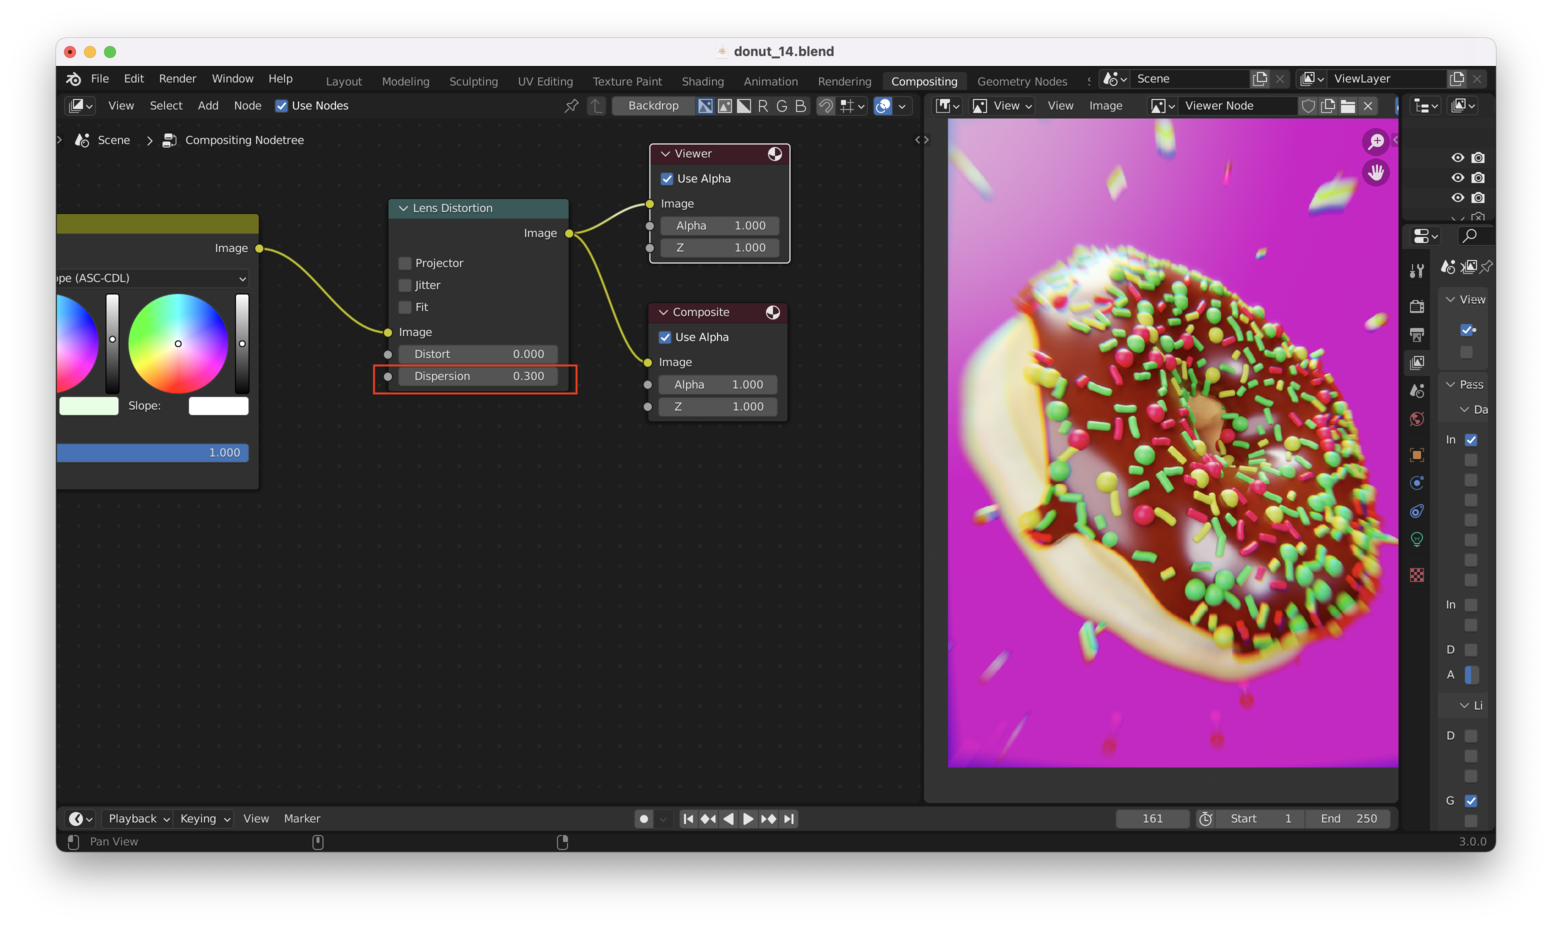
The compositor can also simulate lens distortion and dispersion, like what you might get from the lens on a cheap cell phone camera.
Here’s the output from the compositor after we add lens dispersion (but no distortion):
And here’s the output with lens distortion (but no dispersion):
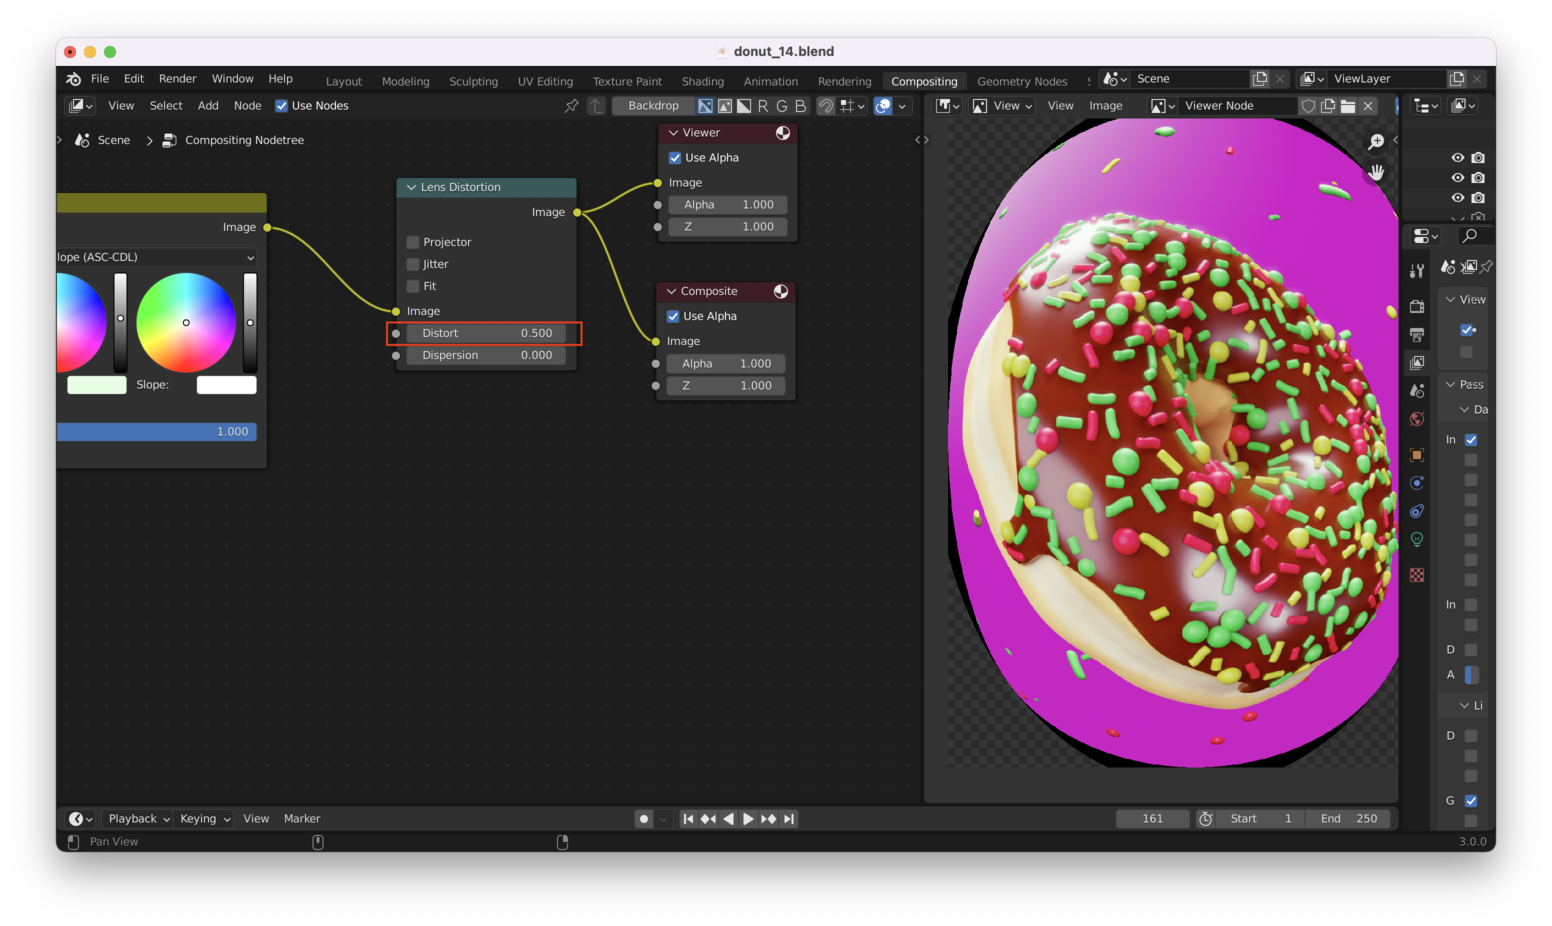
Note: distortion “bends” the image, while dispersion creates a “blur”. This happens with non-ideal lenses when light at different wavelengths gets “bent” to a different degree (so the colors appear to “separate out”). All lenses have this issue, but better lenses and sensors correct for it very well.
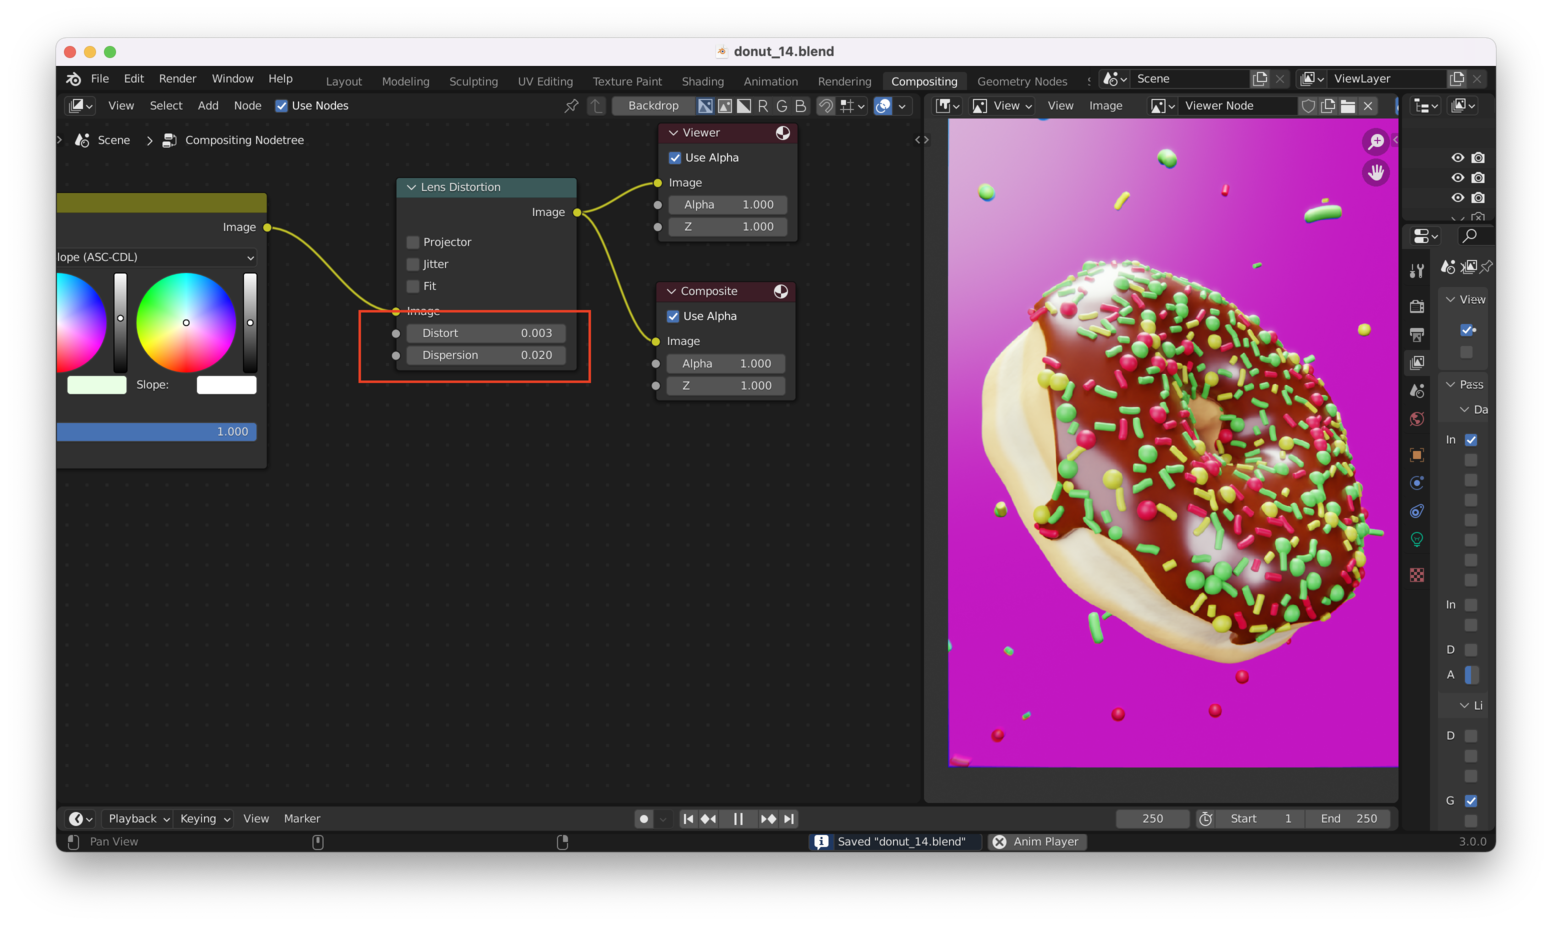
I’m going to add slight distortion and dispersion to my donut to make it look more “real”. But only a tiny amount!
Like this:
Sharpening Link to heading
The compositor can also sharpen the image. Let’s add a “Sharpen” node after our “Lens Distortion” node:
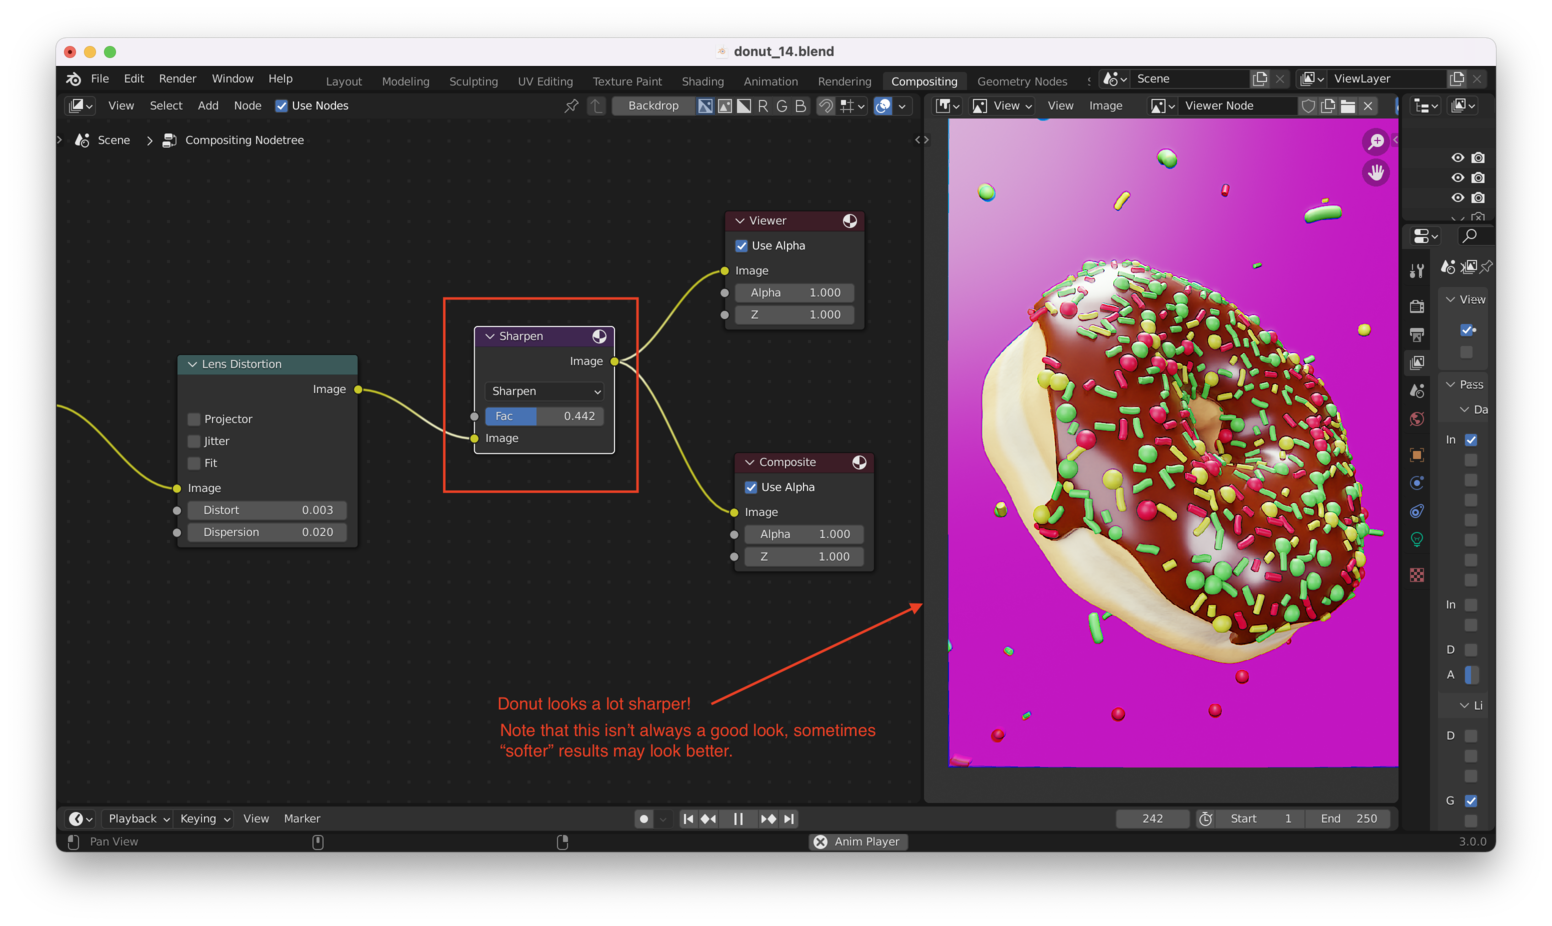
Note: This node is actually called “Filter” if you’re searching for it in the Compositor’s node view. After adding a filter node, you set its type to “Sharpen”.
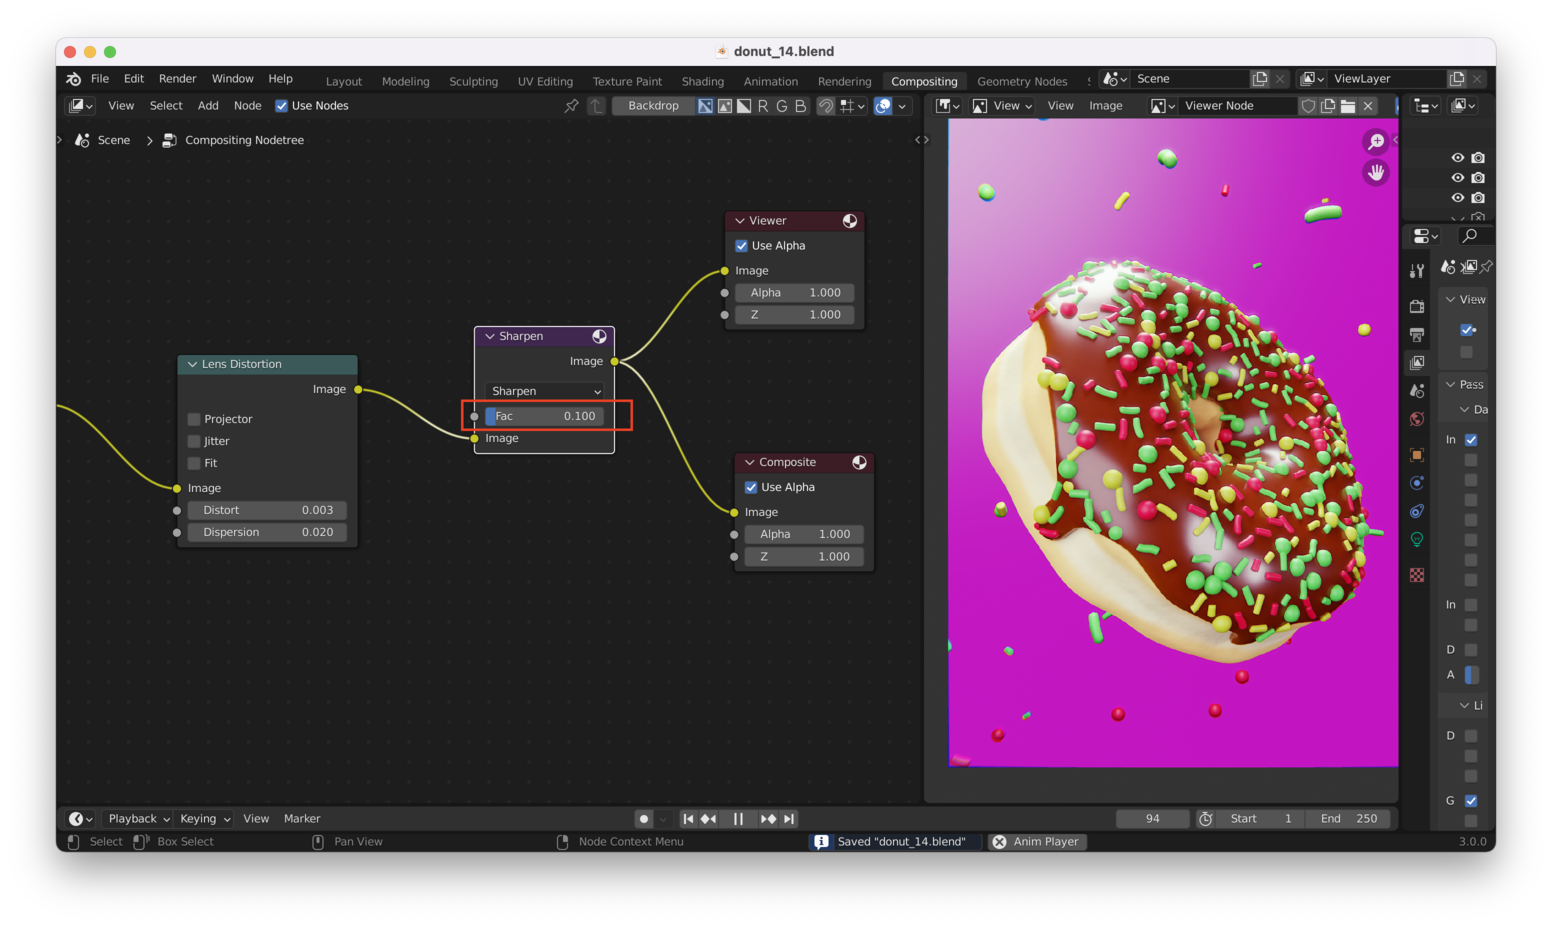
Tip: Don’t do too much sharpening! It’ll look bad.
In my case, I’ll add just a tiny bit, like this:
Isolating The “Glow” Link to heading
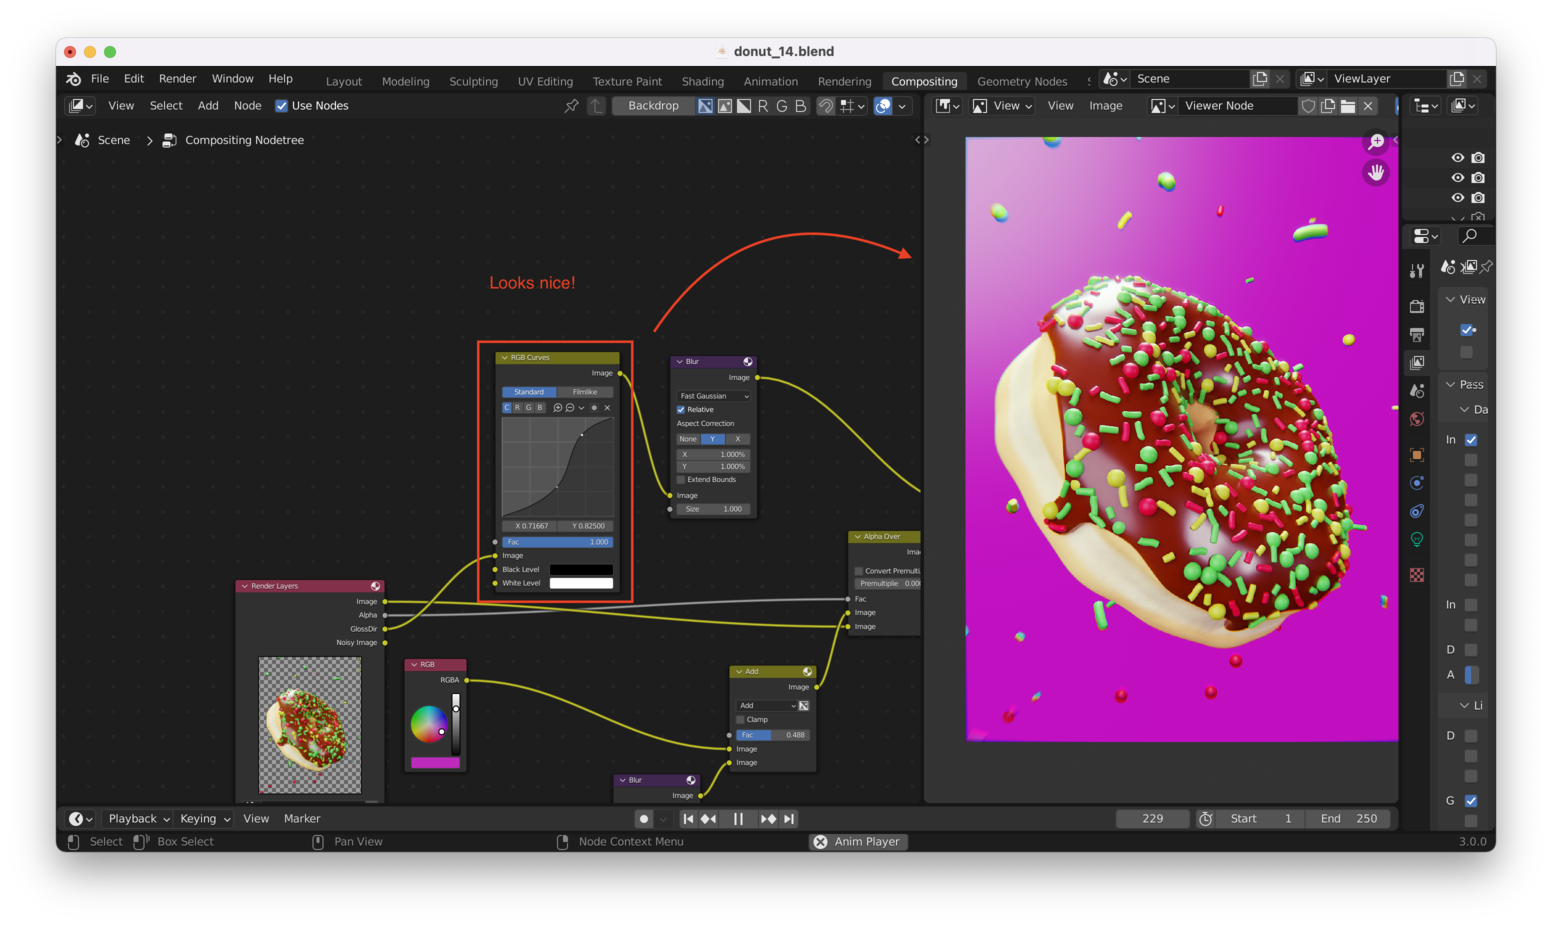
We can make sure that our “glow” effect is isolated to only the bright areas within our image, which will look better. To do this, we need to limit the blur effect to “saturated” areas within the image. We can do this by adding an “RGB Curves” node in front of our “Blur” node, like this:
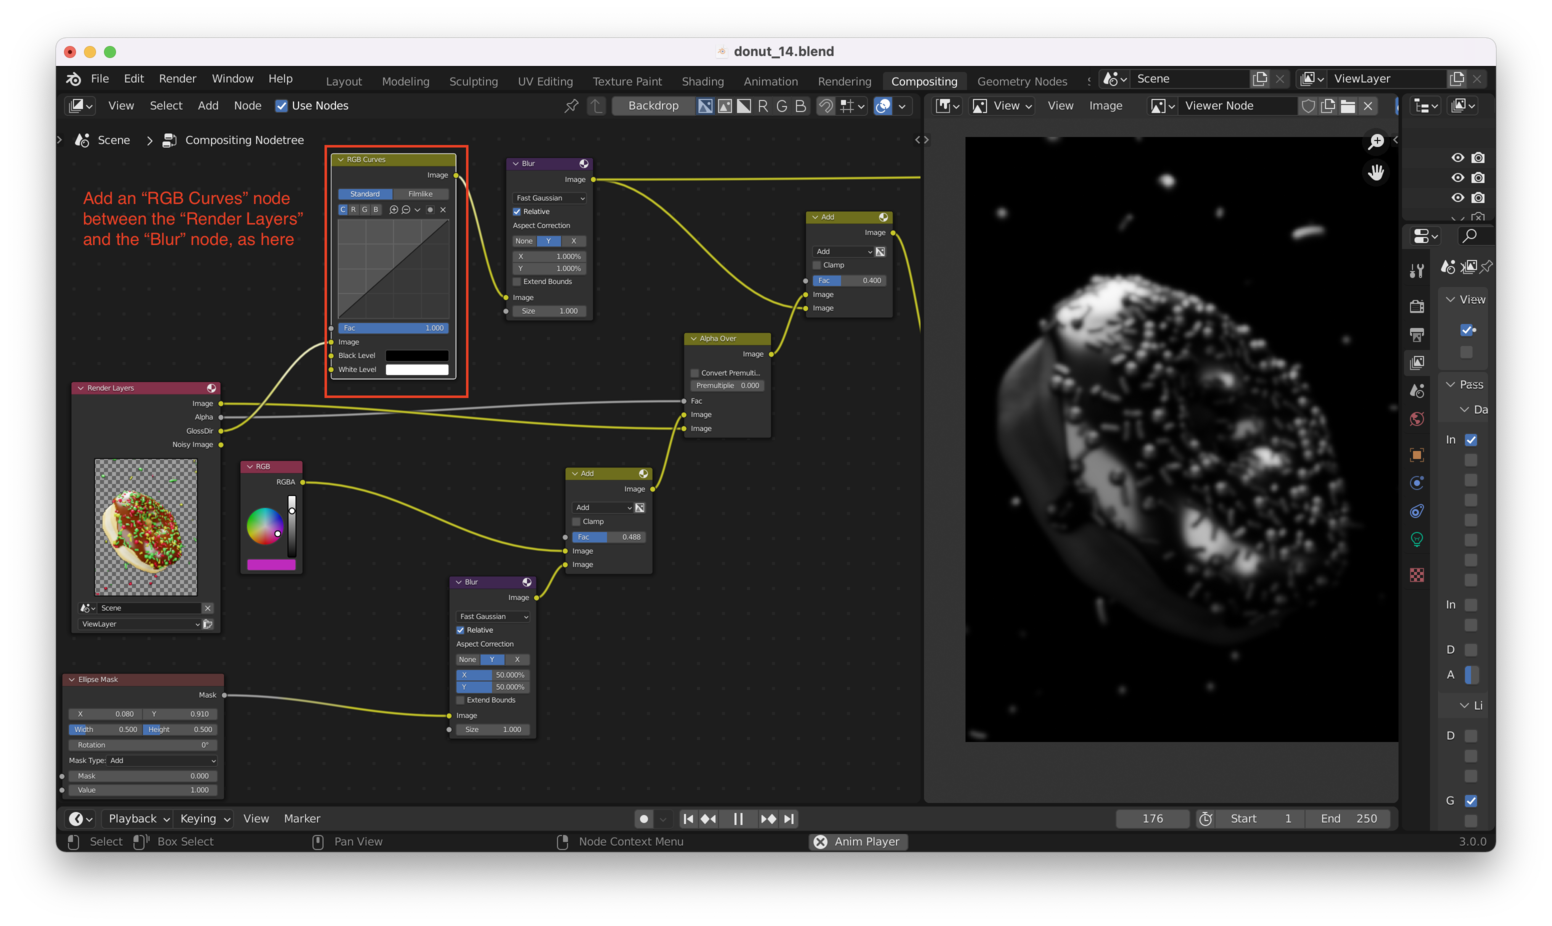
Note: Using an “S curve” will help us limit the blur effect to saturated areas in the render.
Here’s the result:
That’s it for the compositor!