The last two years have seen an explosion of Generative AI tools, including many free and open source models and libraries. Unfortunately, setting up and using these tools can be a challenge. Constantly shifting software and hardware requirements make maintaining a local install difficult and tedious.
Enter Amazon SageMaker notebook instances. notebook instances come preinstalled with common Machine Learning tools and libraries, a fully configured Jupyter Lab environment, and built-in GPU support.
In today’s post, we will show you how to quickly and easily set up the following tools on a SageMaker notebook instance:
- Stable Diffusion WebUI from Automatic1111
- ControlNet, to control the composition of images produced by Stable Diffusion
- SadTalker, to generate animated talking heads from a single photo and an audio file
- Deforum, to generate video using Stable Diffusion
- Infinite zoom
- NSFW filter, to filter out adult content produced by Stable Diffusion
We will automate the process as much as possible using SageMaker Lifecycle Configuration Scripts. Let’s dive in!
Initial Setup Link to heading
To test the setup process, we will start out by manually installing the required components. We will use what we learn during this phase to create configuration scripts which will run whenever we create a new SageMaker notebook instance or reboot an existing instance.
To get started, we need a GPU-equipped instance. An ml.g4dn.xlarge or ml.g4dn.2xlarge should work. These instance types include a T4 GPU with 16 GB of VRAM, which should be enough to run all of the AI tools we will be installing. Keep in mind that different models will have different memory requirements, and some models may need more than 16 GB of VRAM to run successfully.
All the steps in this blog post were tested in the us-east-1 (N. Virginia) region, but other regions which support the ml.g4dn instance type should also work.
Creating the notebook instance Link to heading
From the AWS console search bar, search for sage, then click on Amazon SageMaker:

Next, locate the notebook instances tab under Notebooks:

Click on Create instance and choose the g4dn.2xlarge type, as shown here:

After opening “Advanced configuration” (see bottom of screenshot above) We can see that the default volume size for new notebook instances is 5 GB. We will increase this to 256 GB because we will need space for large machine learning models as well as any video or images we produce:

Notes: If you want to reduce the disk size, 128 GB should also be large enough for all the software we plan to install, with space left over for outputs. Also be sure to give the user root access to the notebook instance (see screenshot above). We will need this, as we will be installing additional software.
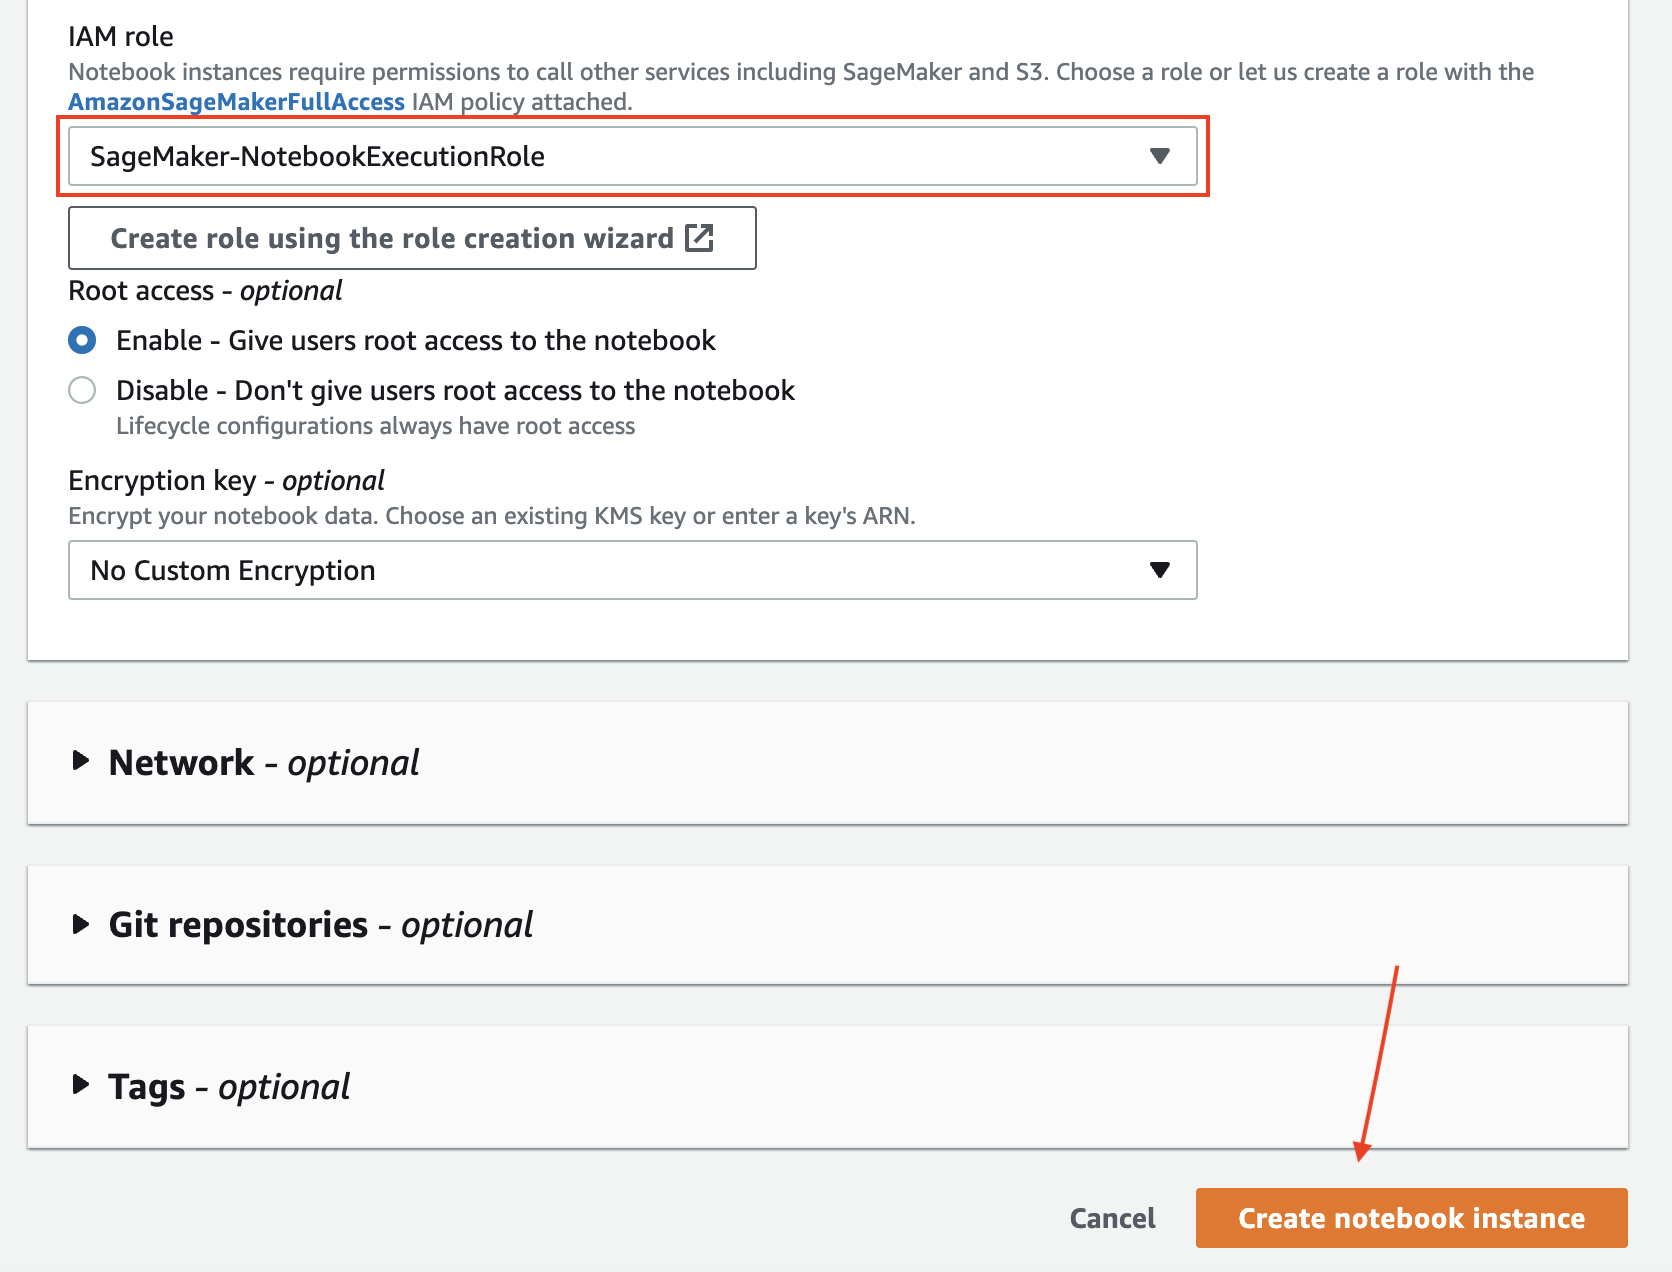
Under Permissions and Encryption we need to attach an Execution Role to our instance. This is the set of permissions our SageMaker notebook instance will use to access other AWS resources:

Right now, this execution role allows full access to S3, via the following policy:
{
    "Version": "2012-10-17",
    "Statement": [
        {
            "Effect": "Allow",
            "Action": [
                "s3:*",
                "s3-object-lambda:*"
            ],
            "Resource": "*"
        }
    ]
}
If you prefer, you could limit permissions to a single, pre-existing S3 bucket. Later on - when we are done uploading configuration files and model data - we can scope the permissions down even further. For our Lifecycle Configuration Scripts to work, we only need read access to the bucket where our files are stored. If our S3 bucket was named aiml-shared-files, the policy below woud allow enough access for our Lifcycle scripts to run (read only access to a single S3 bucket):
{
    "Version": "2012-10-17",
    "Statement": [
        {
            "Action": [
                "s3:ListBucket"
            ],
            "Effect": "Allow",
            "Resource": [
                "arn:aws:s3:::aiml-shared-files"
            ]
        },
        {
            "Action": [
                "s3:GetObject"
            ],
            "Effect": "Allow",
            "Resource": [
                "arn:aws:s3:::aiml-shared-files/*"
            ]
        }
    ]
}
We don’t need to make any changes to the other settings at this point, so we are ready to create our first SageMaker notebook instance. Click on Create notebook instance to start the process:

Note that creating an instance can take several minutes.
Installing Software Link to heading
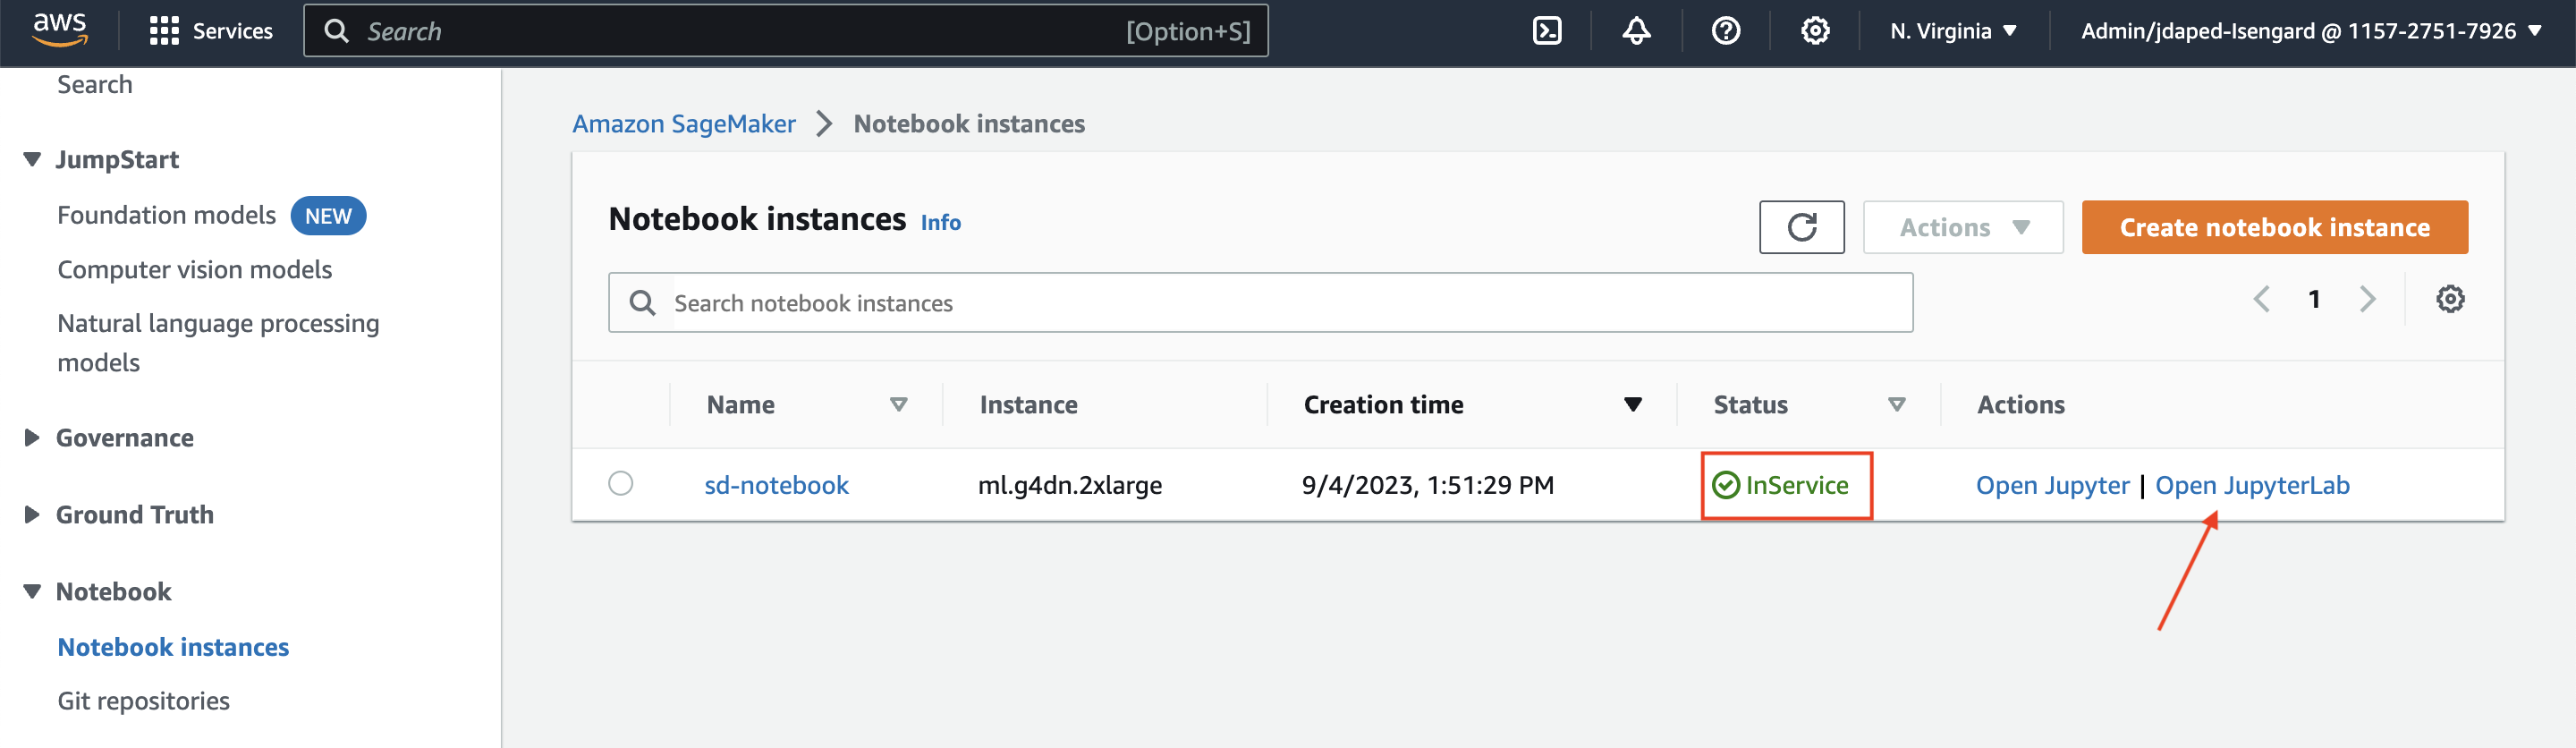
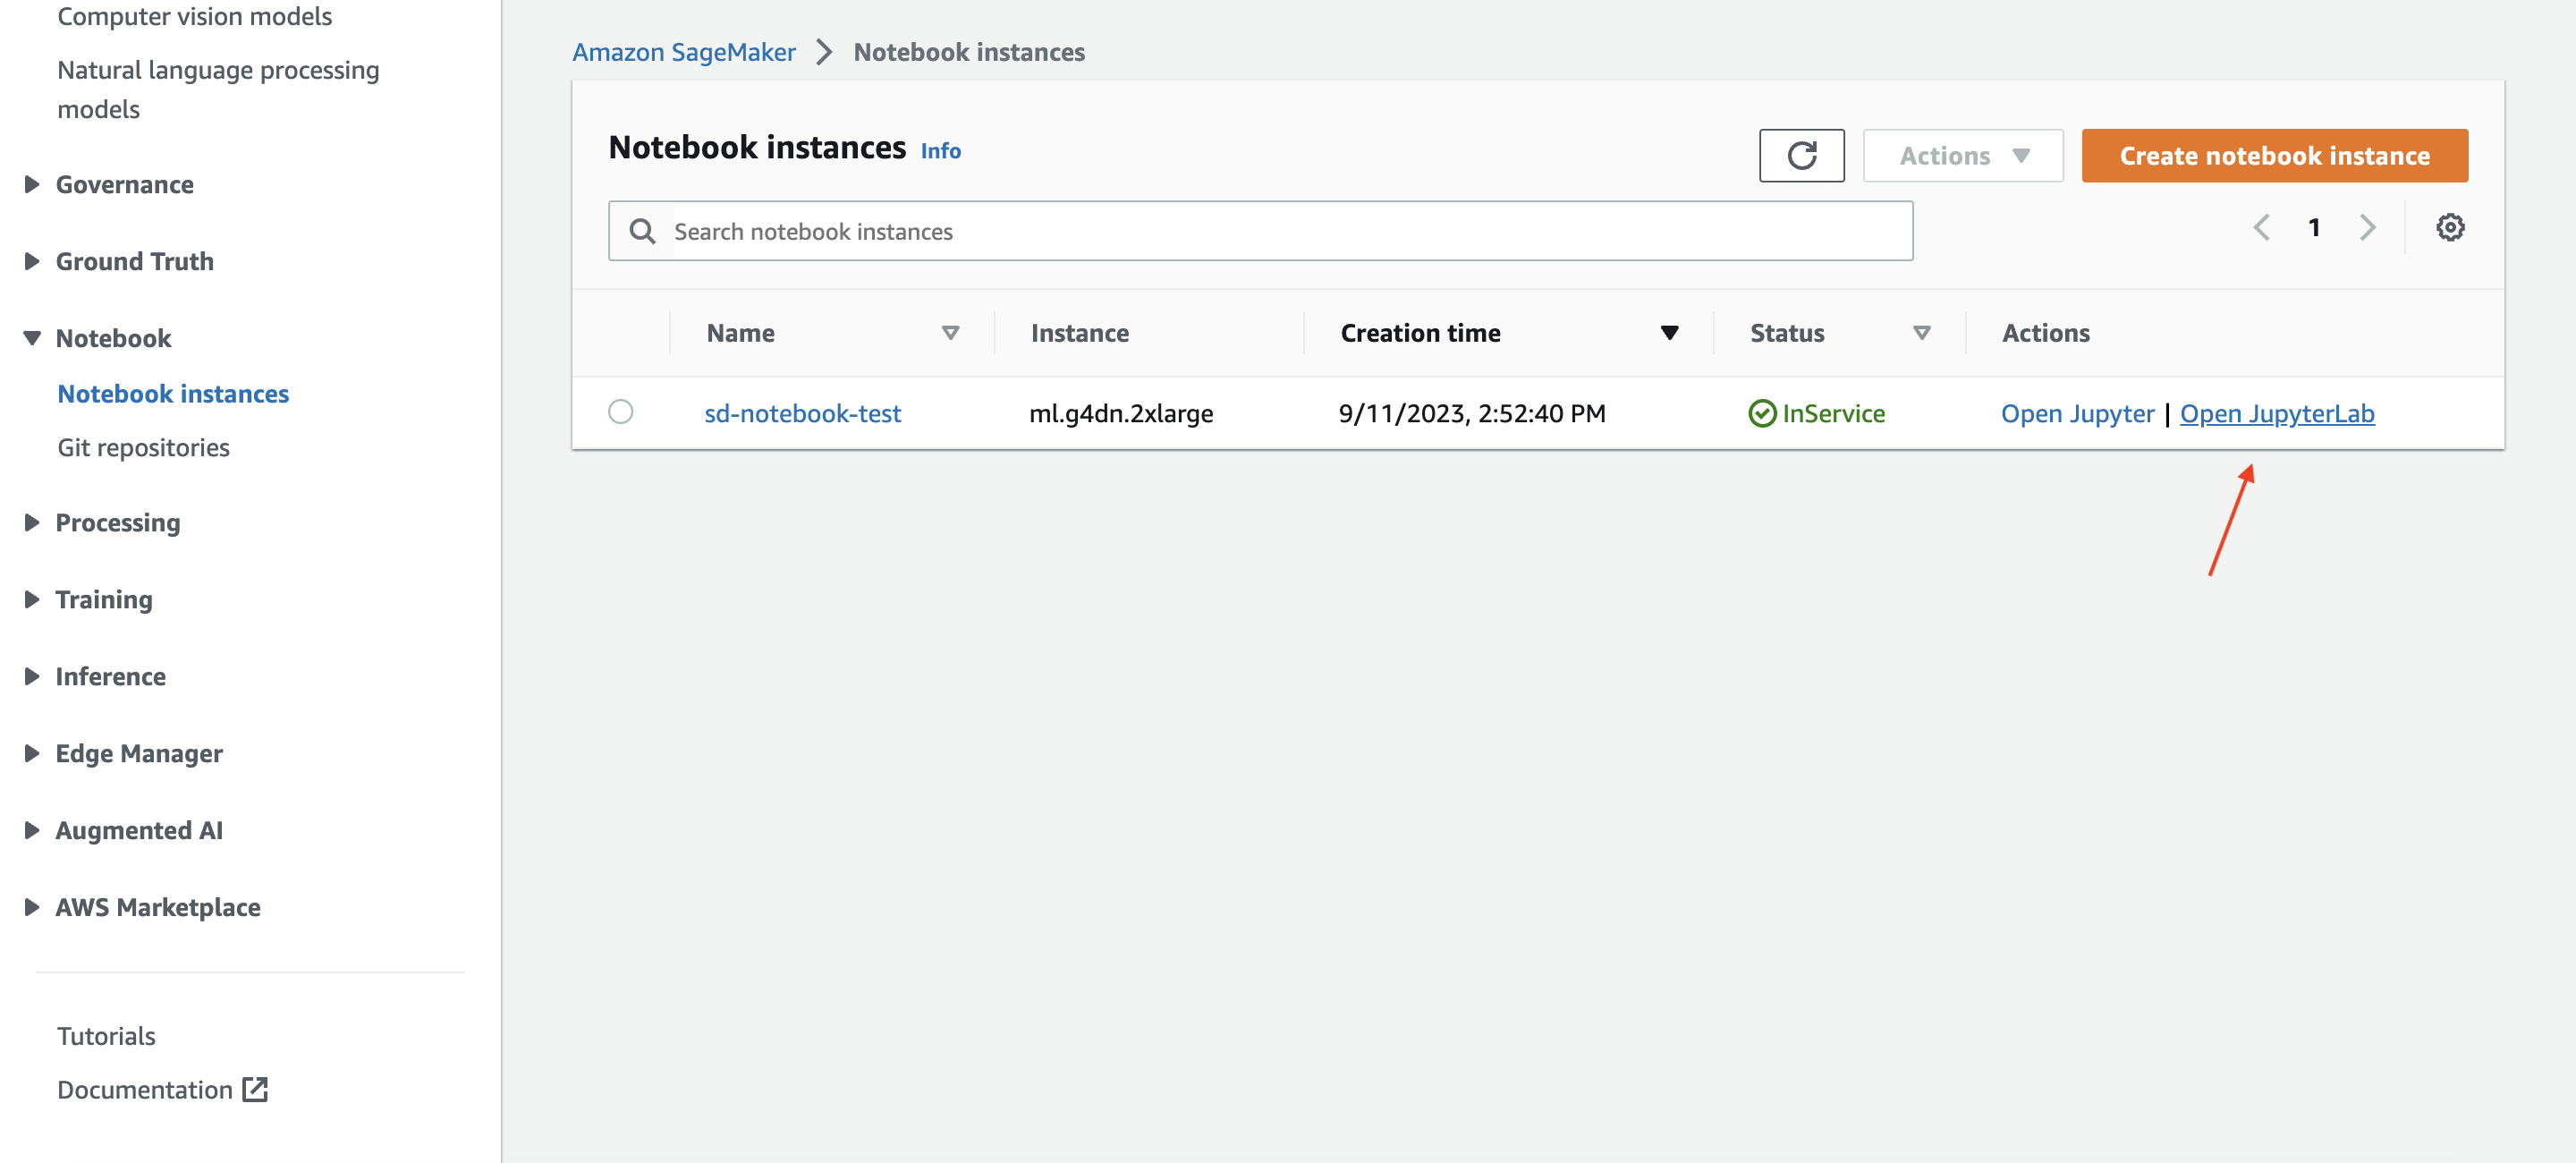
Once the instance is running, its status will change from Pending to InService. Click on Open JupyterLab to access the notebook:
This will open a new tab. In the URL bar you’ll see something like this:
https://sd-notebook-ijip.notebook.us-east-1.sagemaker.aws/lab
Every SageMaker notebook instance has a unique URL. This means access to the instance can be granted independent of the AWS Management Console. There are functions available through the SageMaker API to generate signed URLs which you can share with other people. This can be convenient when you need to grant access to a SageMaker notebook instance but don’t want to create permanent IAM credentials for your users. You can learn more about generating signed URLs here.
Once the JupyterLab page opens, click the terminal icon to open a new terminal:

If we run the ls command, we will see a listing of the SageMaker notebook’s home directory, /home/ec2-user:

The directory called SageMaker is the only directory which will be saved if the instance restarts. This is important to remember: SageMaker notebooks are set up so that restarting the instance will reset its filesystem (with the exception of the SageMaker folder) to its original state.
This is wonderful if you are rebooting in order to fix a problem introduced by installing something which broke the system, but can be confusing for new users.
We want to make sure Stable Diffusion WebUI and any other model checkpoints or software we download will survive a reboot, so we will first move into the SageMaker directory with cd, then confirm we are in the right place with pwd, as shown below:
cd SageMaker
pwd
The second command, pwd, will show us our current working directory (so we can make sure we are in the right place). It should report /home/ec2-user/SageMaker, as shown here:

Fetching stable-diffusion-webui from GitHub
Link to heading
From inside the SageMaker directory, run the commands below to install stable-diffusion-webui into the SageMaker directory:
cd ~/SageMaker
git clone https://github.com/AUTOMATIC1111/stable-diffusion-webui.git
Testing stable-diffusion-webui
Link to heading
Before we install anything else, we need to test that stable-diffusion-webui is working correctly. From a terminal on the SageMaker Notebook intance, execute:
cd ~/SageMaker/stable-diffusion-webui
./webui.sh --share --xformers
If all goes well, this will create a new Python virtual environment, install packages needed by stable-diffusion-webui, and also fetch a Stable Diffusion model checkpoint from Huggingface, which we will use to generate images and video.
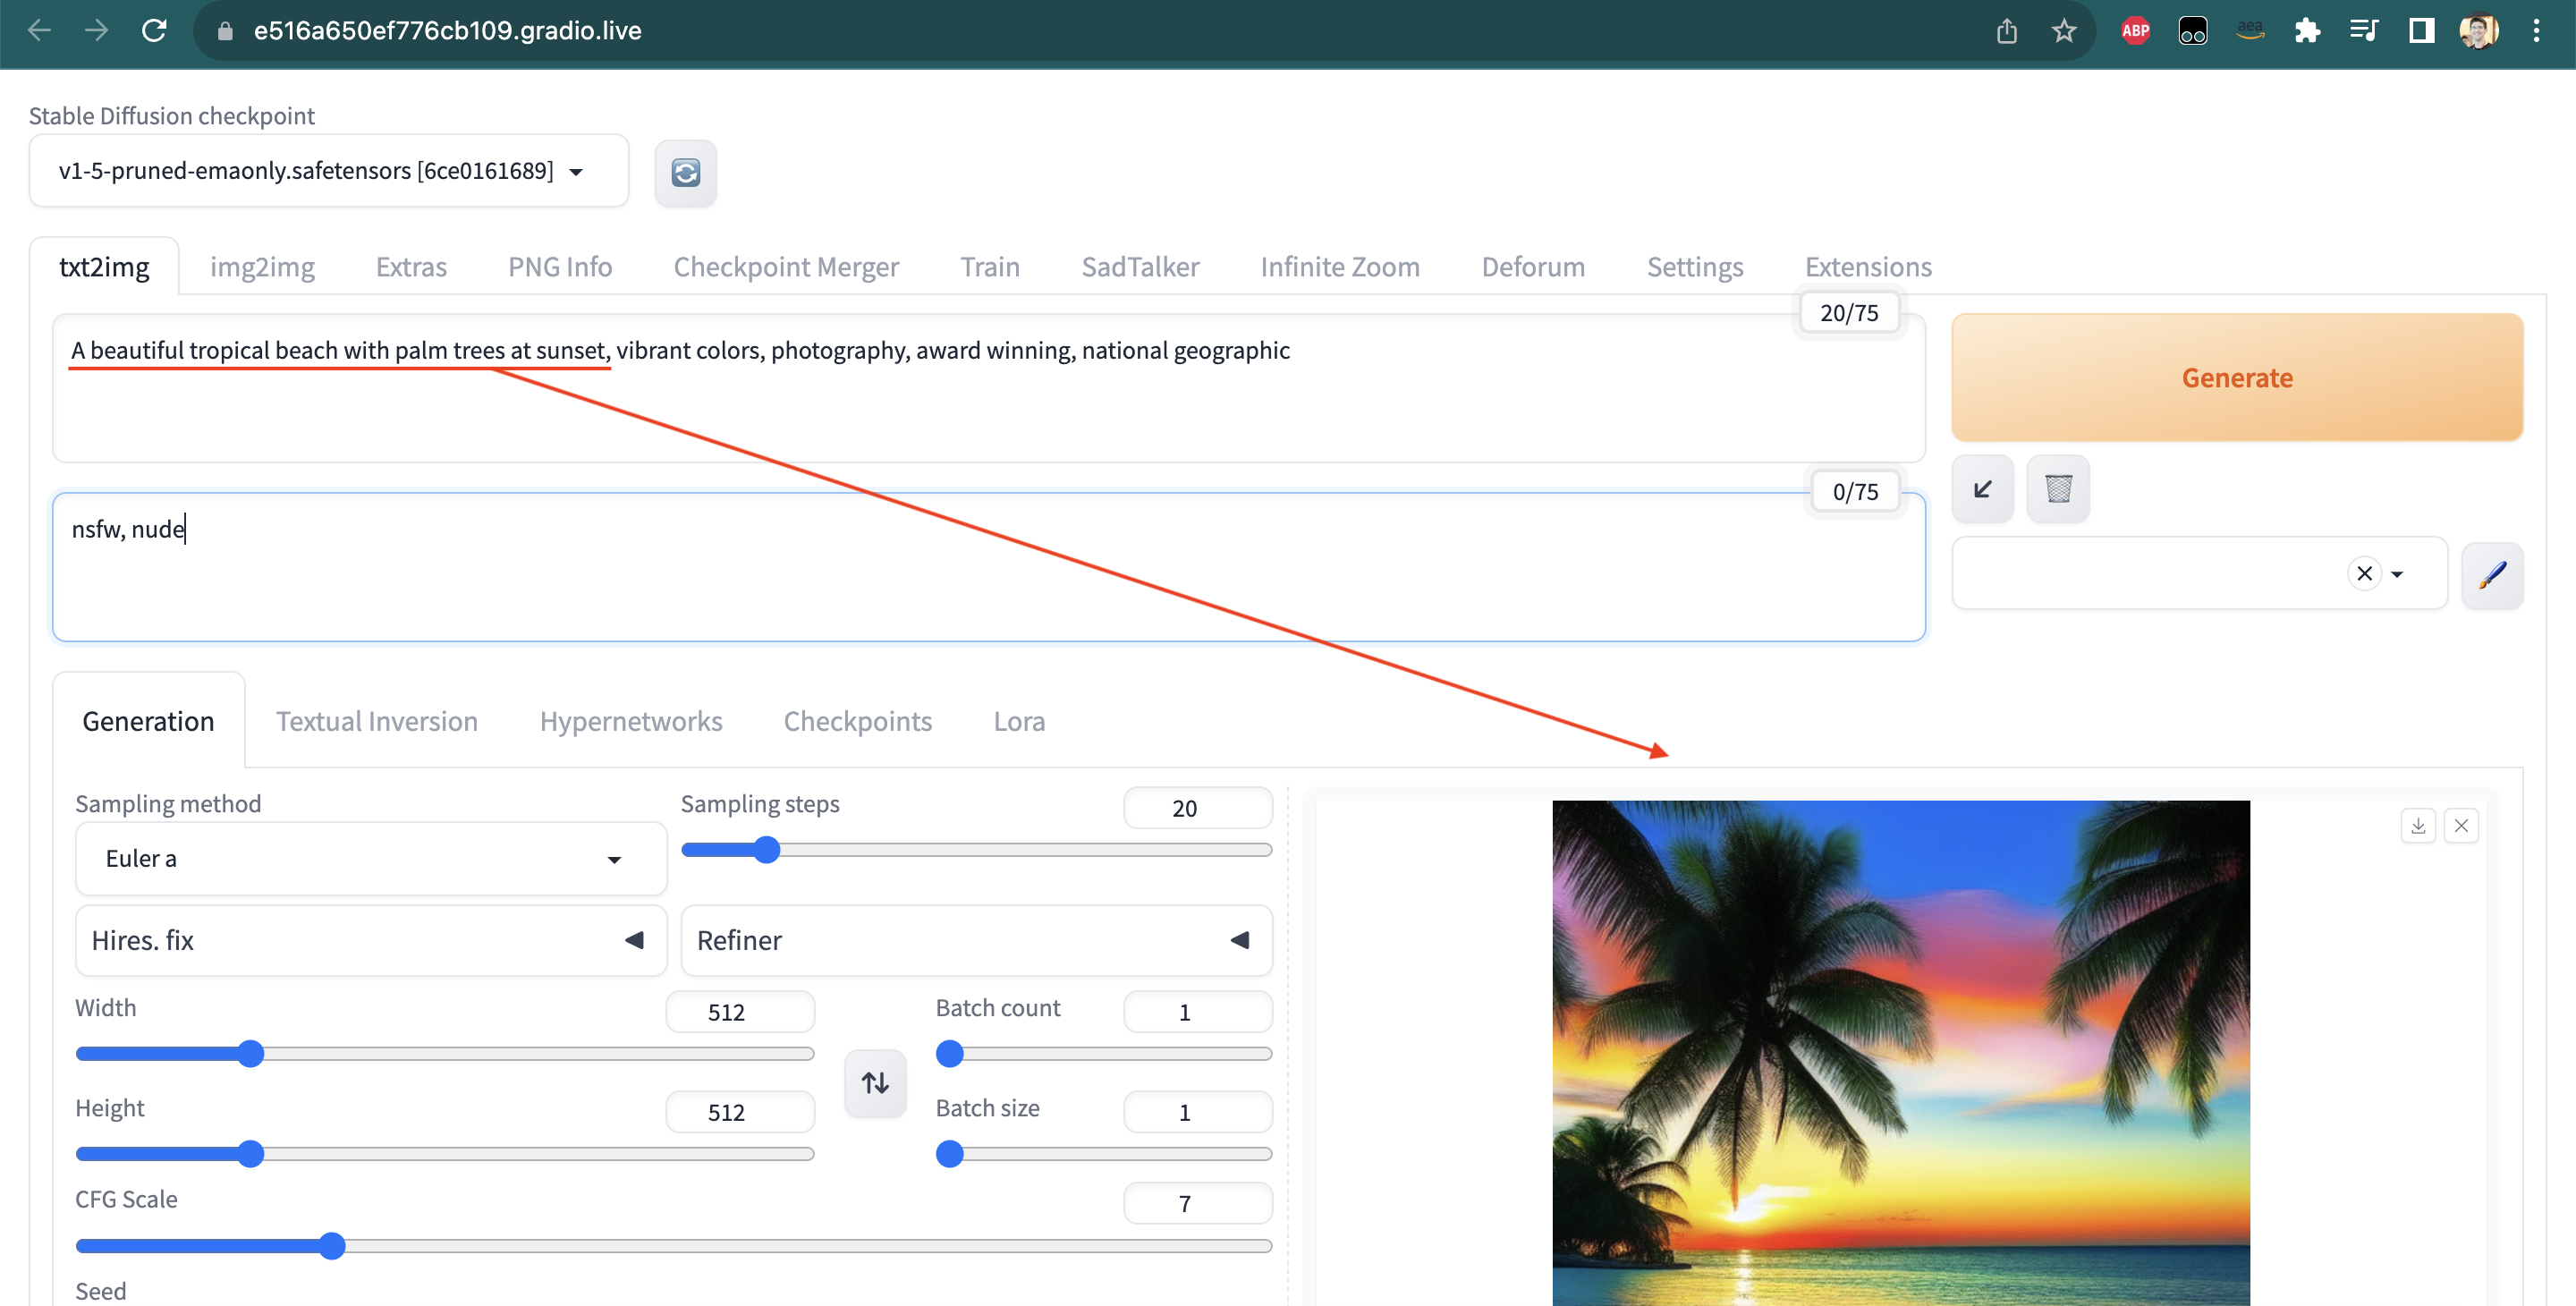
It may take a while for the script to finish running. You should see something like the output shown below, with a public Gradio URL and a line indicating that the stable diffusion model was successfully loaded:

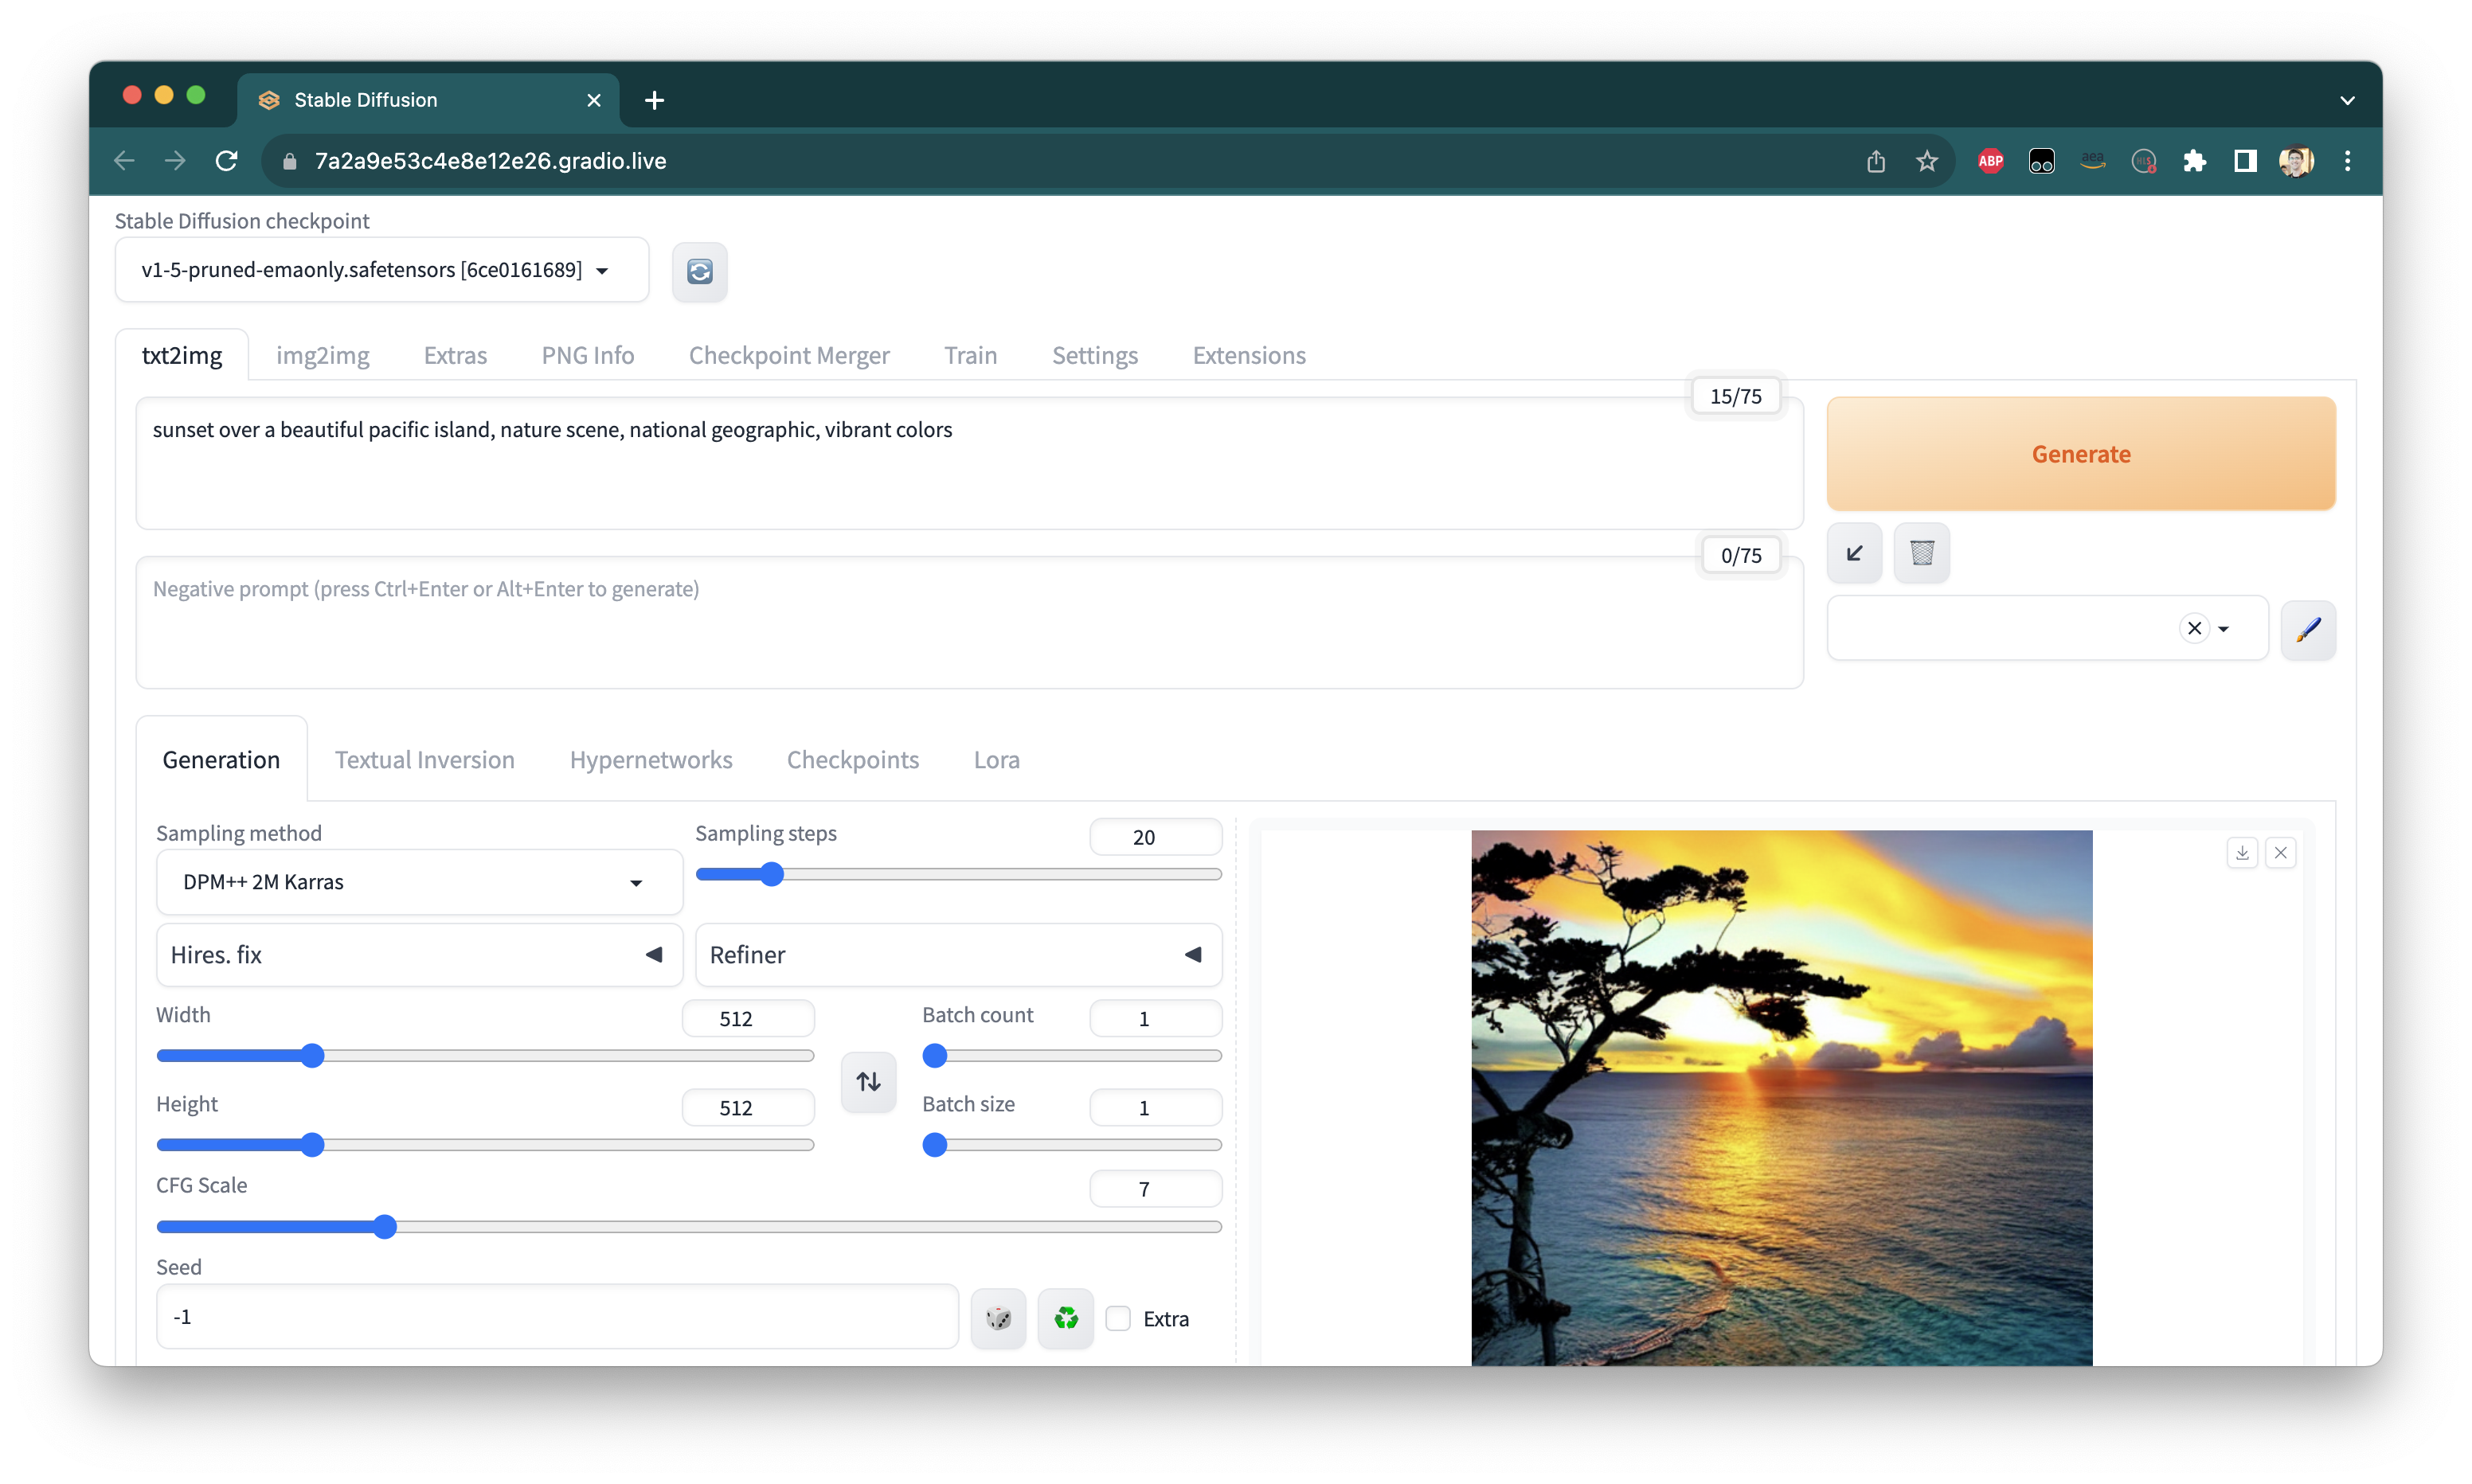
You can click on the Gradio URL to open the web UI in a browser and try creating your first image:
When you are done testing, select the Terminal window where webui.sh is running, and hit Ctrl+C to kill the script.
You may see some scary-looking warning messages like the one shown below, but these can safely be ignored:
# Thread: MainThread(139798412330816)
File: "/home/ec2-user/SageMaker/stable-diffusion-webui/launch.py", line 48, in <module>
  main()
File: "/home/ec2-user/SageMaker/stable-diffusion-webui/launch.py", line 44, in main
  start()
File: "/home/ec2-user/SageMaker/stable-diffusion-webui/modules/launch_utils.py", line 436, in start
  webui.webui()
File: "/home/ec2-user/SageMaker/stable-diffusion-webui/webui.py", line 126, in webui
  server_command = shared.state.wait_for_server_command(timeout=5)
File: "/home/ec2-user/SageMaker/stable-diffusion-webui/modules/shared_state.py", line 62, in wait_for_server_command
  if self._server_command_signal.wait(timeout):
File: "/home/ec2-user/anaconda3/envs/JupyterSystemEnv/lib/python3.10/threading.py", line 607, in wait
  signaled = self._cond.wait(timeout)
File: "/home/ec2-user/anaconda3/envs/JupyterSystemEnv/lib/python3.10/threading.py", line 324, in wait
  gotit = waiter.acquire(True, timeout)
File: "/home/ec2-user/SageMaker/stable-diffusion-webui/modules/initialize_util.py", line 156, in sigint_handler
  dumpstacks()
File: "/home/ec2-user/SageMaker/stable-diffusion-webui/modules/initialize_util.py", line 143, in dumpstacks
  for filename, lineno, name, line in traceback.extract_stack(stack):
Installing additional extensions Link to heading
Now we can begin installing the rest of the software mentioned at the top of the blog post. These other tools, like ControlNet, are packaged as stable-diffusion-webui extensions, and should be installed in the extensions folder:
Execute the following commands from the terminal to start the installation process:
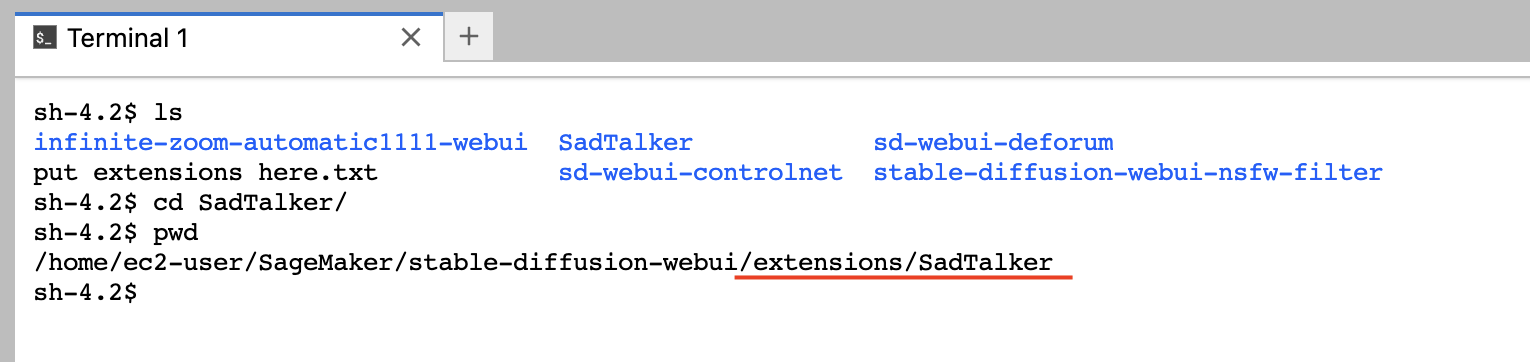
cd ~/SageMaker/stable-diffusion-webui/extensions/
git clone https://github.com/Mikubill/sd-webui-controlnet
git clone https://github.com/OpenTalker/SadTalker
git clone https://github.com/deforum-art/sd-webui-deforum
git clone https://github.com/v8hid/infinite-zoom-automatic1111-webui
git clone https://github.com/jovijovi/stable-diffusion-webui-nsfw-filter
Running ls -1 (note: the character after the - is the number one, not a lowercase L), we see that all these GitHub repositories are now present in the extensions folder:

Most of these tools require installing additional Python packages (which will be fetched automatically when we run stable-diffusion-webui’s webui.sh script the next time). Some of them also require that we download trained machine learning models, ranging in size from a few hundred Megabytes to several Gigabytes.
Some tools (such as infinite zoom, SadTalker, and Deforum) require additional tools for handling video (ffmpeg), which the SageMaker notebook instance doesn’t include.
Let’s install these additional dependencies now.
Installing model data for SadTalker Link to heading
First, cd into the SadTalker directory:
cd SadTalker
pwd
You should now be inside the SadTalker extension folder:
SadTalker includes a script to automatically fetch the required trained models. We can fetch these model files by running the following command from inside the SadTalker directory:
bash scripts/download_models.sh
Once we have run this script, a new checkpoints folder will be present. Run ls to verify that the checkpoints folder is present:

Installing model data for ControlNet Link to heading
Downloading the model files needed by ControlNet is slightly more difficult, because of the large size of the model files, which are many Gigabytes in size.
We will start by returning to our home directory with:
cd ~/SageMaker/
The authors of ControlNet provide pre-trained models via their Huggingface project.
In order to download them, we need help from Git LFS, a tool designed to enable storing large files outside a Git repository by providing text “pointers” to them.
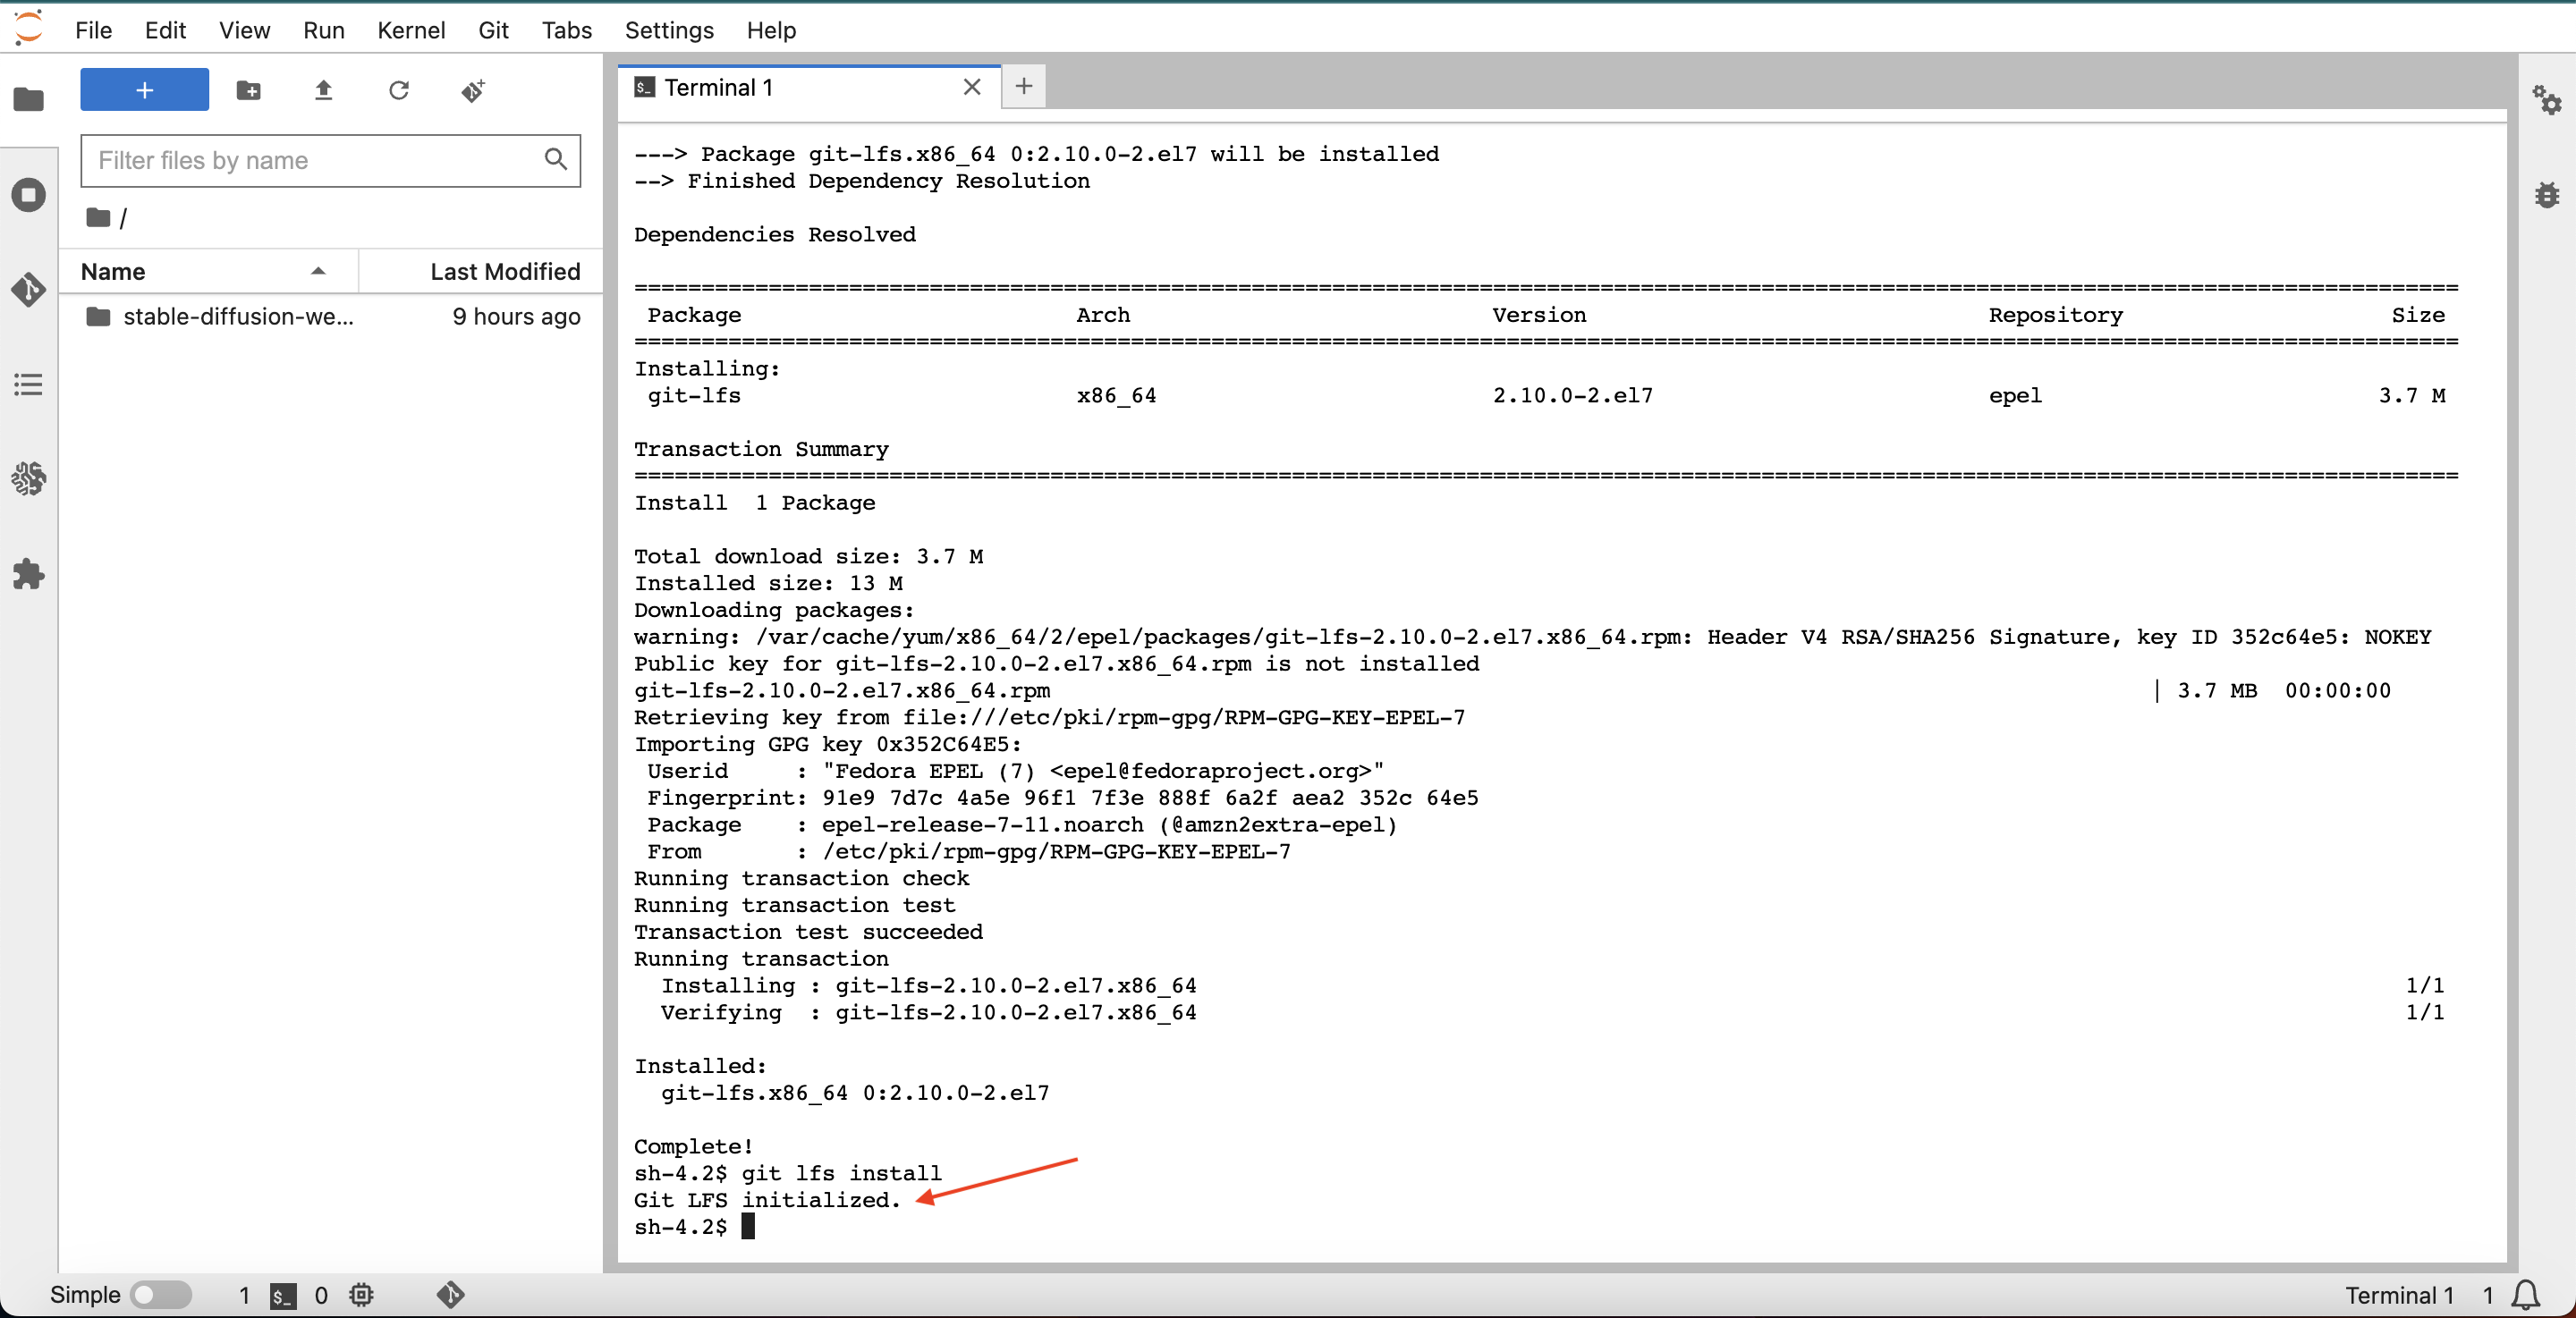
The SageMaker Notebook environment does not include git-lfs, so we need to install it first:
sudo amazon-linux-extras install epel -y
curl -s https://packagecloud.io/install/repositories/github/git-lfs/script.rpm.sh | sudo bash
sudo yum install git-lfs -y
git lfs install
If everything went well, we should see Git LFS Initialized on the last line, as shown here:
Note: If we restart the SageMaker notebook instance at this point, we will have to reinstall Git LFS, because (again) anything installed outside the SageMaker folder will be lost at the next restart. We will create a Lifecycle Configuration Script later on to help us solve this problem.
Now, we are ready to fetch the ControlNet model files:
git clone https://huggingface.co/lllyasviel/ControlNet-v1-1
It may take some time to download all the model checkpoint (.pth) files, because of their size. We can check that they are downloaded correctly by running ls on the newly-created ControlNet-v1-1 directory:
ls -lh ControlNet-v1-1/
We should not have a folder filled with .pth and .yaml files. The .pth files are model files, while the .yaml files contain model metadata for each .pth file:

We need to copy the files from ControlNet-v1-1 into stable-diffusion-webui/extensions/sd-webui-controlnet/models/, which we can do by executing:
mv ControlNet-v1-1/* stable-diffusion-webui/extensions/sd-webui-controlnet/models/
Note: The .pth files are very large, so we move them rather than copying them. This speeds things up significantly and saves disk space.
Installing ffmpeg Link to heading
Several of the Stable Diffusion WebUI extensions need to work with video (SadTalker, Deforum, and Infinite Zoom all produce .mp4 files as output).
These tools create their video output using ffmpeg, which is not installed in the SageMaker notebook environment by default. The easiest way to install ffmpeg on a SageMaker notebook instance is to use the static builds created by John Van Sickle.
From the SageMaker directory, install them with:
cd ~/SageMaker
wget "https://johnvansickle.com/ffmpeg/builds/ffmpeg-git-amd64-static.tar.xz"
tar -xvf ffmpeg*.tar.xz
sudo cp ffmpeg-*-static/ffmpeg /usr/local/bin/
sudo cp ffmpeg-*-static/ffprobe /usr/local/bin/
sudo cp ffmpeg-*-static/qt-faststart /usr/local/bin/
(Re)testing stable-diffusion-webui
Link to heading
Now that all the extensions and model files are in place, we need to re-run the webui.sh script and allow stable-diffusion-webui to fetch any dependencies that our new extensions have, and install them into the Python virtual environment:
screen -S sdwebui
cd ~/SageMaker/stable-diffusion-webui
./webui.sh --share --xformers
Notes on the screen command: This will create a virtual shell where the webui.sh script can run, even if we accidentally close our terminal window. We can disconnect from a screen session using Ctrl + A followed by Ctrl + D, and can reconnect from a new terminal using screen -r <name>, replacing <name> with the session number or name of the screen (it will be sdwebui, if you copy-pasted the commands above). You can learn more about screen here.
Notes on webui.sh: The --share flag will enable us to access the Web UI via a public reverse proxy provided by Gradio. The --xformers flag is used to speed up Stable Diffusion inference. You can learn more about xformers here. The public link provided by Gradio is valid for 72 hours. You can learn more about sharing Gradio apps here. Stopping and restarting the webui.sh script will generate a new Gradio sharing link, again valid for 72 hour time limit.
It will take several minutes for stable-diffusion-webui to start up, because we need to install a lot of additional dependencies for the new extensions.
The Deforum, SadTalker, and Infinite Zoom tabs now appear at the top of the interface:

The NSFW (adult content) filter now appears at the bottom as well:

Changing stable-diffusion-webui default settings
Link to heading
The model we are using (Stable Diffusion v1.5) has a few limitations which we want to work around, so we need to adjust the default settings for stable-diffusion-webui.
First, the model’s training dataset includes many images collected from the open Internt, including some nude and pornographic content. As a result, the model sometimes produces nude or pornographic outputs.
The model also has a difficult time accurately reproducing human faces, and additional tools such as CodeFormer or GFPGAN need to be used to correct faces.
To avoid producing adult content, we need to add terms such as “nude” and “nsfw” to the model’s negative prompt by default, and also enable the NSFW filter we installed earlier. To fix faces, we will enable CodeFormer by default.
Inside the stable-diffusion-webui folder, look for a file called ui-config.json. This file contains all of the settings for the Web UI, including default prompts, face restoration settings, image upscaling settings, and more.
Feel free to spend some time reading through the file yourself. Because of its length, I provide a download link rather than reproducing the file here. I have modified ui-config.json to:
- Enable the NSFW Filter by default with the strongest possible settings
- Add “nude” and “nsfw” as keywords to most prompts
- Change the default sampling method to “Euler a” (wondering what this means? you can learn more from this article)
- Enable the face restoration tool “CodeFormer” with the strongest possible settings
You can directly download a copy of ui-config.json with the changes mentioned above from here.
Uploading ui-config.json to the SageMaker environment
Link to heading
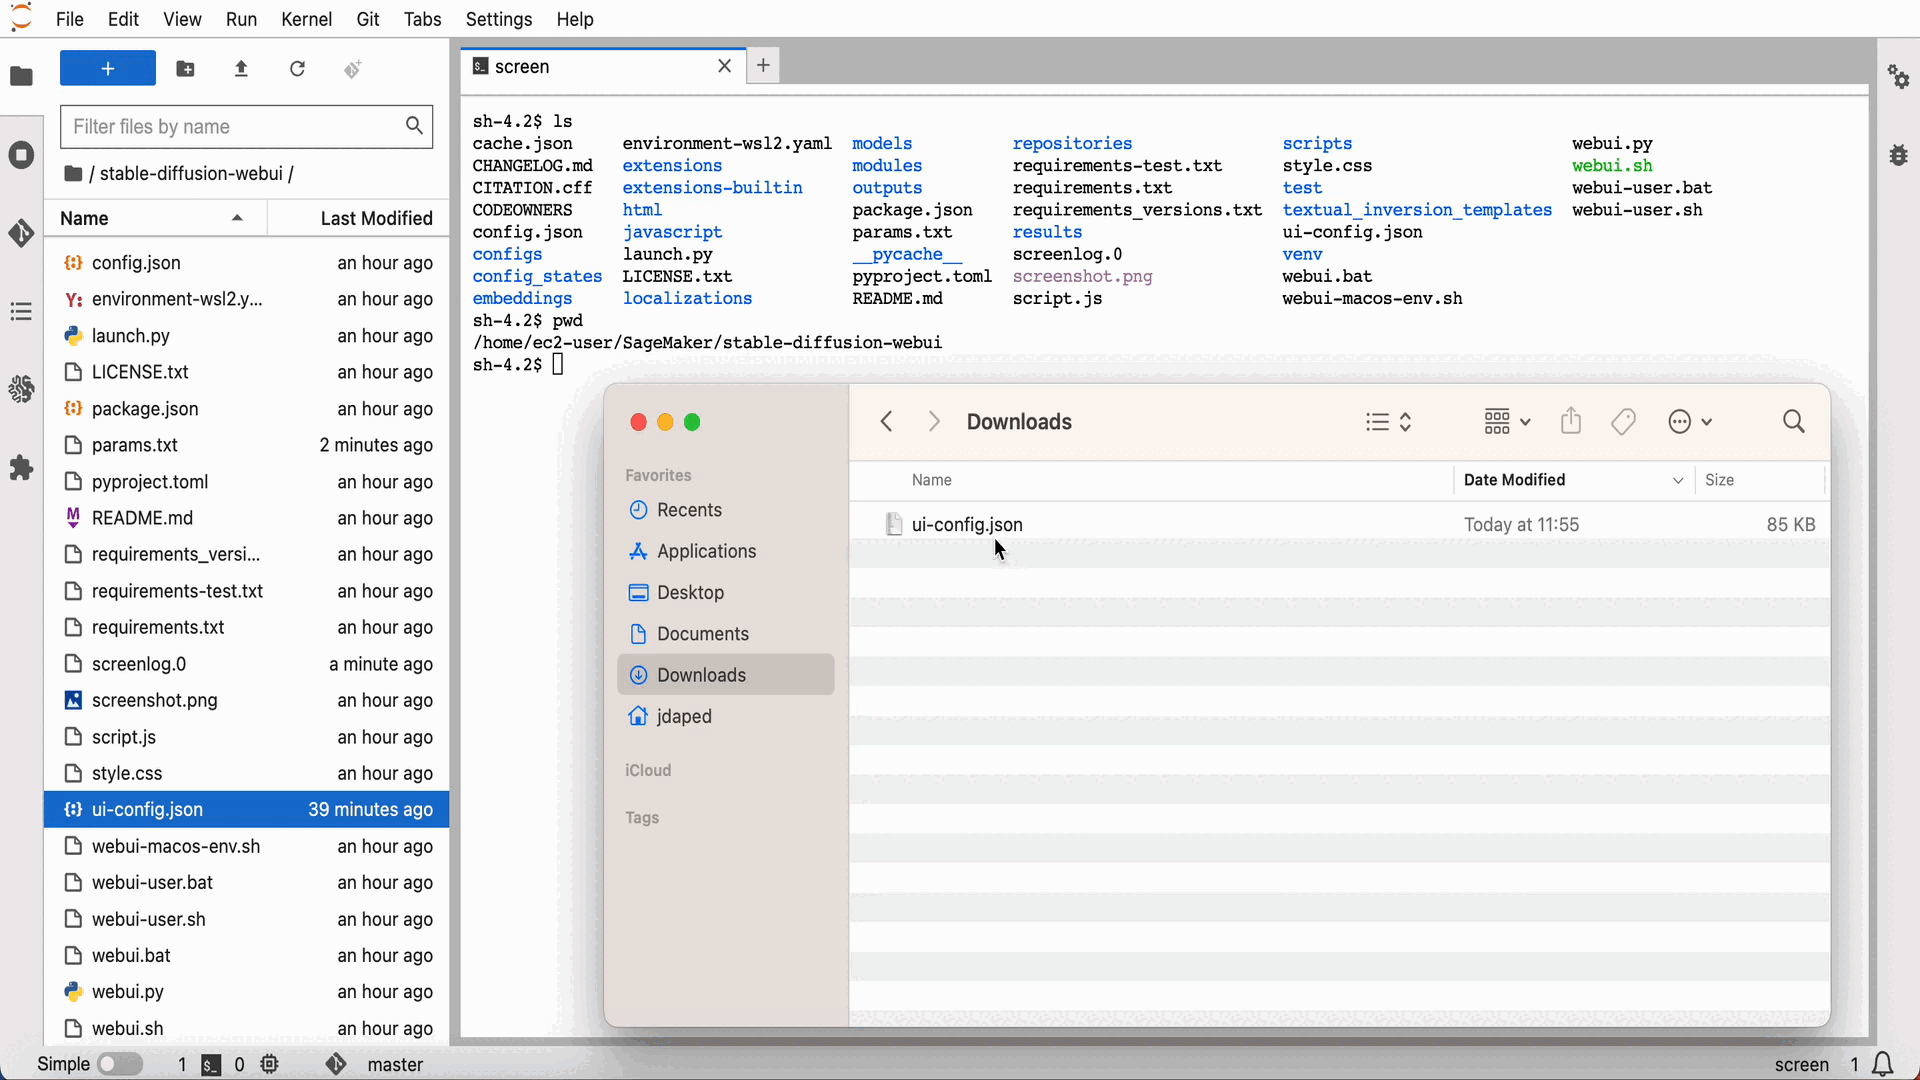
You can use the built-in Jupyter Lab file browser to upload ui-config.json. First, navigate to the stable-diffusion-webui folder:

Next, drag your local copy of ui-config.json onto the file browser. You may also need to confirm that you want to overwrite an existing copy of ui-config.json:
Saving the environment to S3 Link to heading
Our next step will be to automate the process of creating (and starting) SageMaker notebooks by creating Lifcycle Configuration scripts. These scripts have a 5 minute execution time limit, meaning we cannot have the script re-download all model files, extensions, and other dependencies from the Internet. This would take far more than 5 minutes (and would waste the bandwidth of the services hosting these files, too).
To get around this, we need to save our environment to S3. Each time we create (or restart) a SageMaker environment, we will be able to pull any data we need directly from S3 instead of from the Internet.
The files we need to copy to S3 are very large, so rather than using aws s3 sync or aws s3 cp, we will use the s5cmd tool, which does very fast batch S3 uploads and downloads. This tool is not included in the Amazon SageMaker notebook environment by default, so we need to install it first:
cd ~/SageMaker
curl -L https://github.com/peak/s5cmd/releases/download/v2.0.0/s5cmd_2.0.0_Linux-64bit.tar.gz | tar -xz s5cmd
sudo cp s5cmd /usr/local/bin/
Now, before we copy our local environment to S3, we should remove some files and directories which are no longer needed:
cd ~/SageMaker
rm -rf ControlNet-v1-1
rm -rf *.tar.gz
rm -rf *.tgz
rm -rf *.tar.xz
rm -rf lost+found
cd stable-diffusion-webui
rm -rf __pycache__
rm -rf outputs
rm -rf venv
Great! Now we are ready to synchronize to S3:
cd ~/SageMaker
s5cmd sync . s3://sd-notebook-config
Once this command completes, we are ready to move on to Automation. Nice!
Automation Link to heading
We have spent a lot of time getting our environment set up the way we want it. How can we make sure those changes persist? SageMaker notebook instances reset to their initial state when restarted, meaning tools we have installed to /usr/bin or /usr/local/bin such as ffmpeg and git-lfs will be gone after a restart.
It would also be nice to make sure that:
stable-diffusion-webui, all extensions, and supporting tools (likeffmpeg) are reinstalled when we create a new SageMaker notebook instance.- After restarting an instance, any tools that did not persist (
ffmpeg,git-lfs) should be re-installed.
We can do this using a SageMaker Lifecycle Configuration Script.
We will need to write two scripts:
- An
on-createscript, which is run when a SageMaker notebook instance is created for the first time - An
on-startscript, which is run whenever a SageMaker notebook is started
When we first create a SageMaker notebook instance, both scripts will be run.
Here are the scripts. The instructions below will explain how to create a new Lifecycle configuration from the AWS web console:
The on-start script
Link to heading
#!/bin/bash
set -ex
echo "Preparing to run updates and installs as ec2-user"
sudo -i -u ec2-user << EOF
cd ~/SageMaker
sudo amazon-linux-extras install epel -y
curl -s https://packagecloud.io/install/repositories/github/git-lfs/script.rpm.sh | sudo bash
sudo yum install git-lfs -y
git lfs install --force
sudo cp ffmpeg-*-static/ffmpeg /usr/local/bin/
sudo cp ffmpeg-*-static/ffprobe /usr/local/bin/
sudo cp ffmpeg-*-static/qt-faststart /usr/local/bin/
sudo chmod ugo+x /usr/local/bin/ffmpeg
sudo chmod ugo+x /usr/local/bin/ffprobe
sudo chmod ugo+x /usr/local/bin/qt-faststart
EOF
echo "Done"
The on-create script
Link to heading
#!/bin/bash
set -ex
echo "Preparing to download stable-diffusion-webui and supporting software"
sudo -i -u ec2-user << EOF
cd ~/SageMaker
aws s3 cp s3://sd-notebook-config/s5cmd .
chmod u+x s5cmd
./s5cmd sync s3://sd-notebook-config/* .
cd stable-diffusion-webui
chmod u+x webui.sh
EOF
echo "Done"
Creating the Lifcycle Configuration (from the web console) Link to heading
First, click on “Lifecycle configurations”, then choose the “Notebook Instance” tab:

Then, click on “Create configuration”:

Paste the “on-start” script above into the “Start notebook” script window:

Paste the “on-create” script above into the “Create notebook” script window:

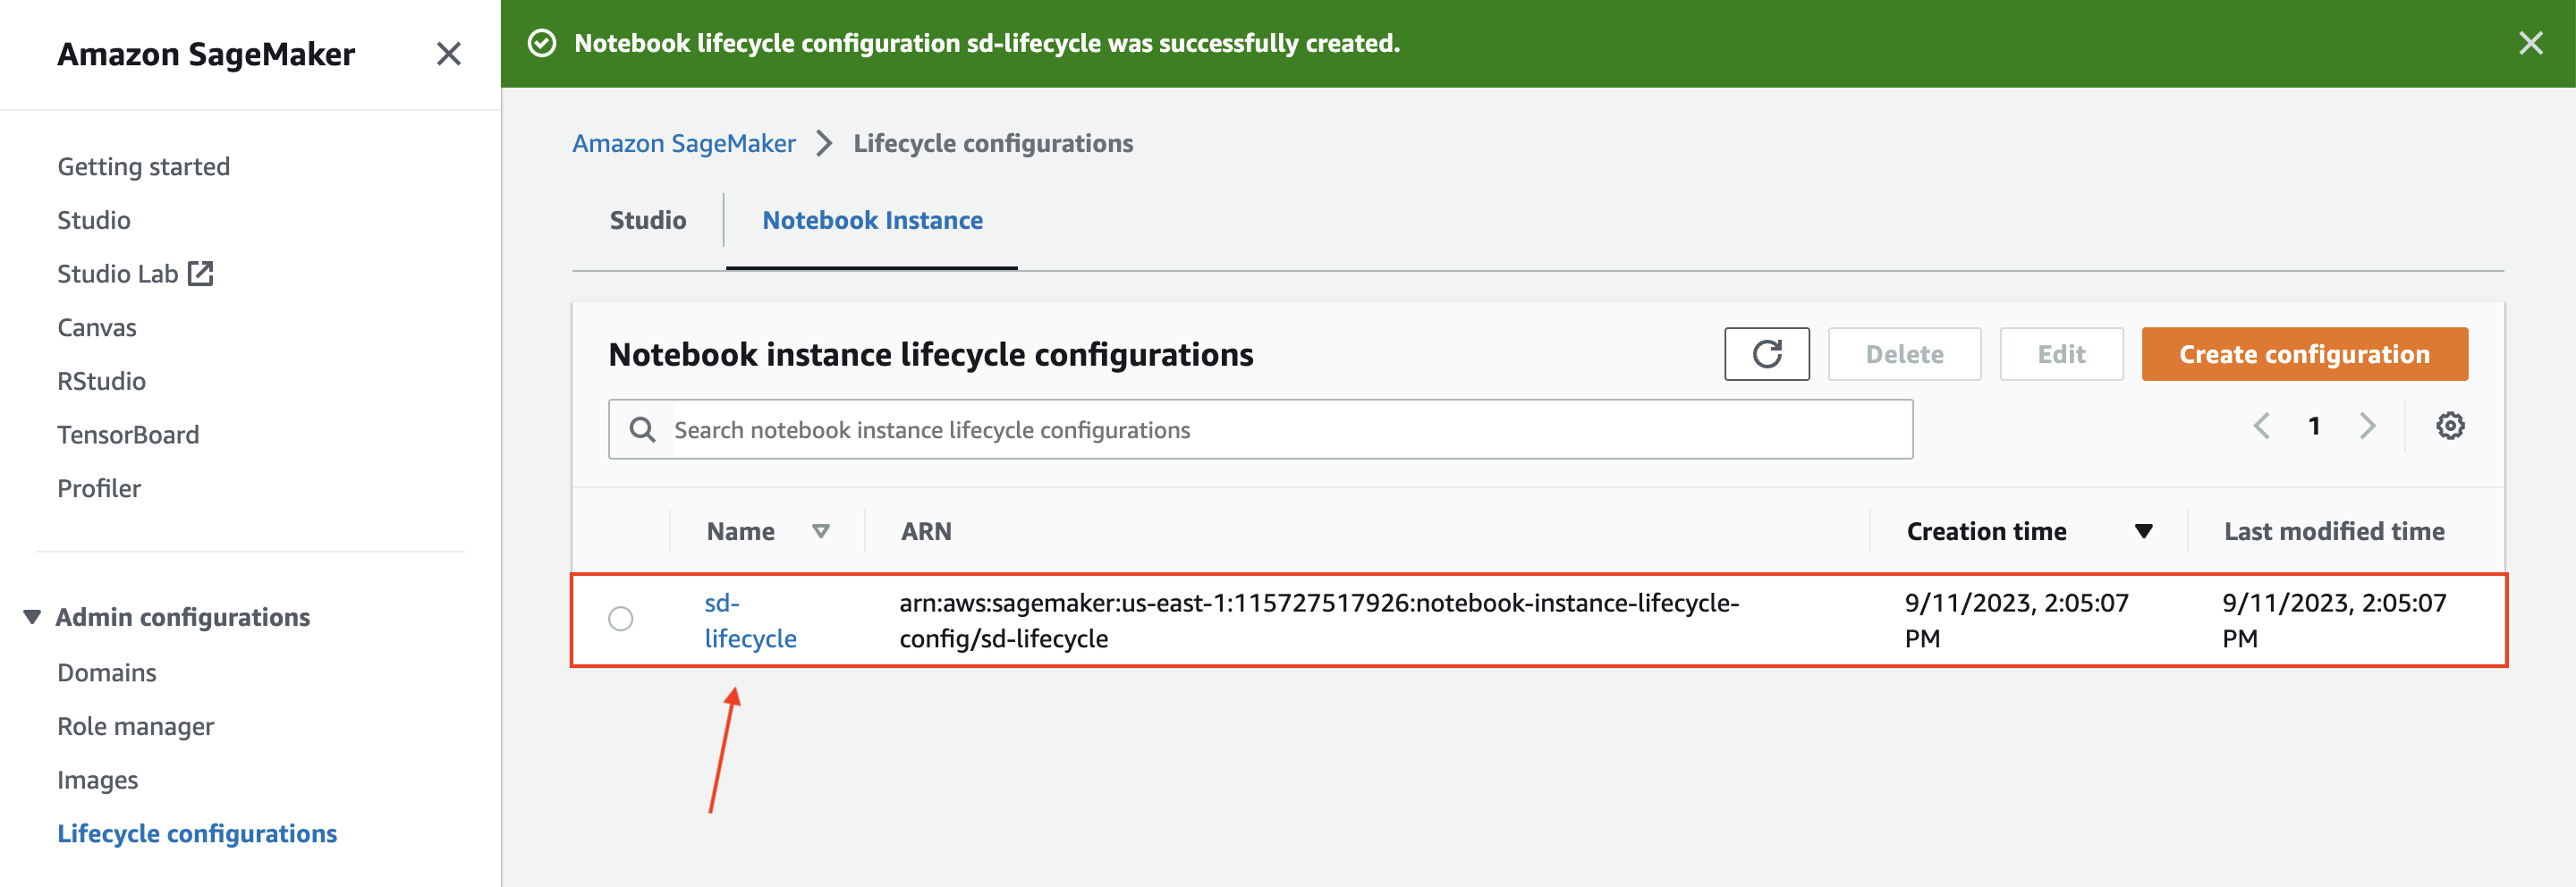
Scroll to the bottom of the page and click on “Create configuration”:

This will return you to the Lifecycle configurations page. Your new configuration should now appear:
Testing the scripts Link to heading
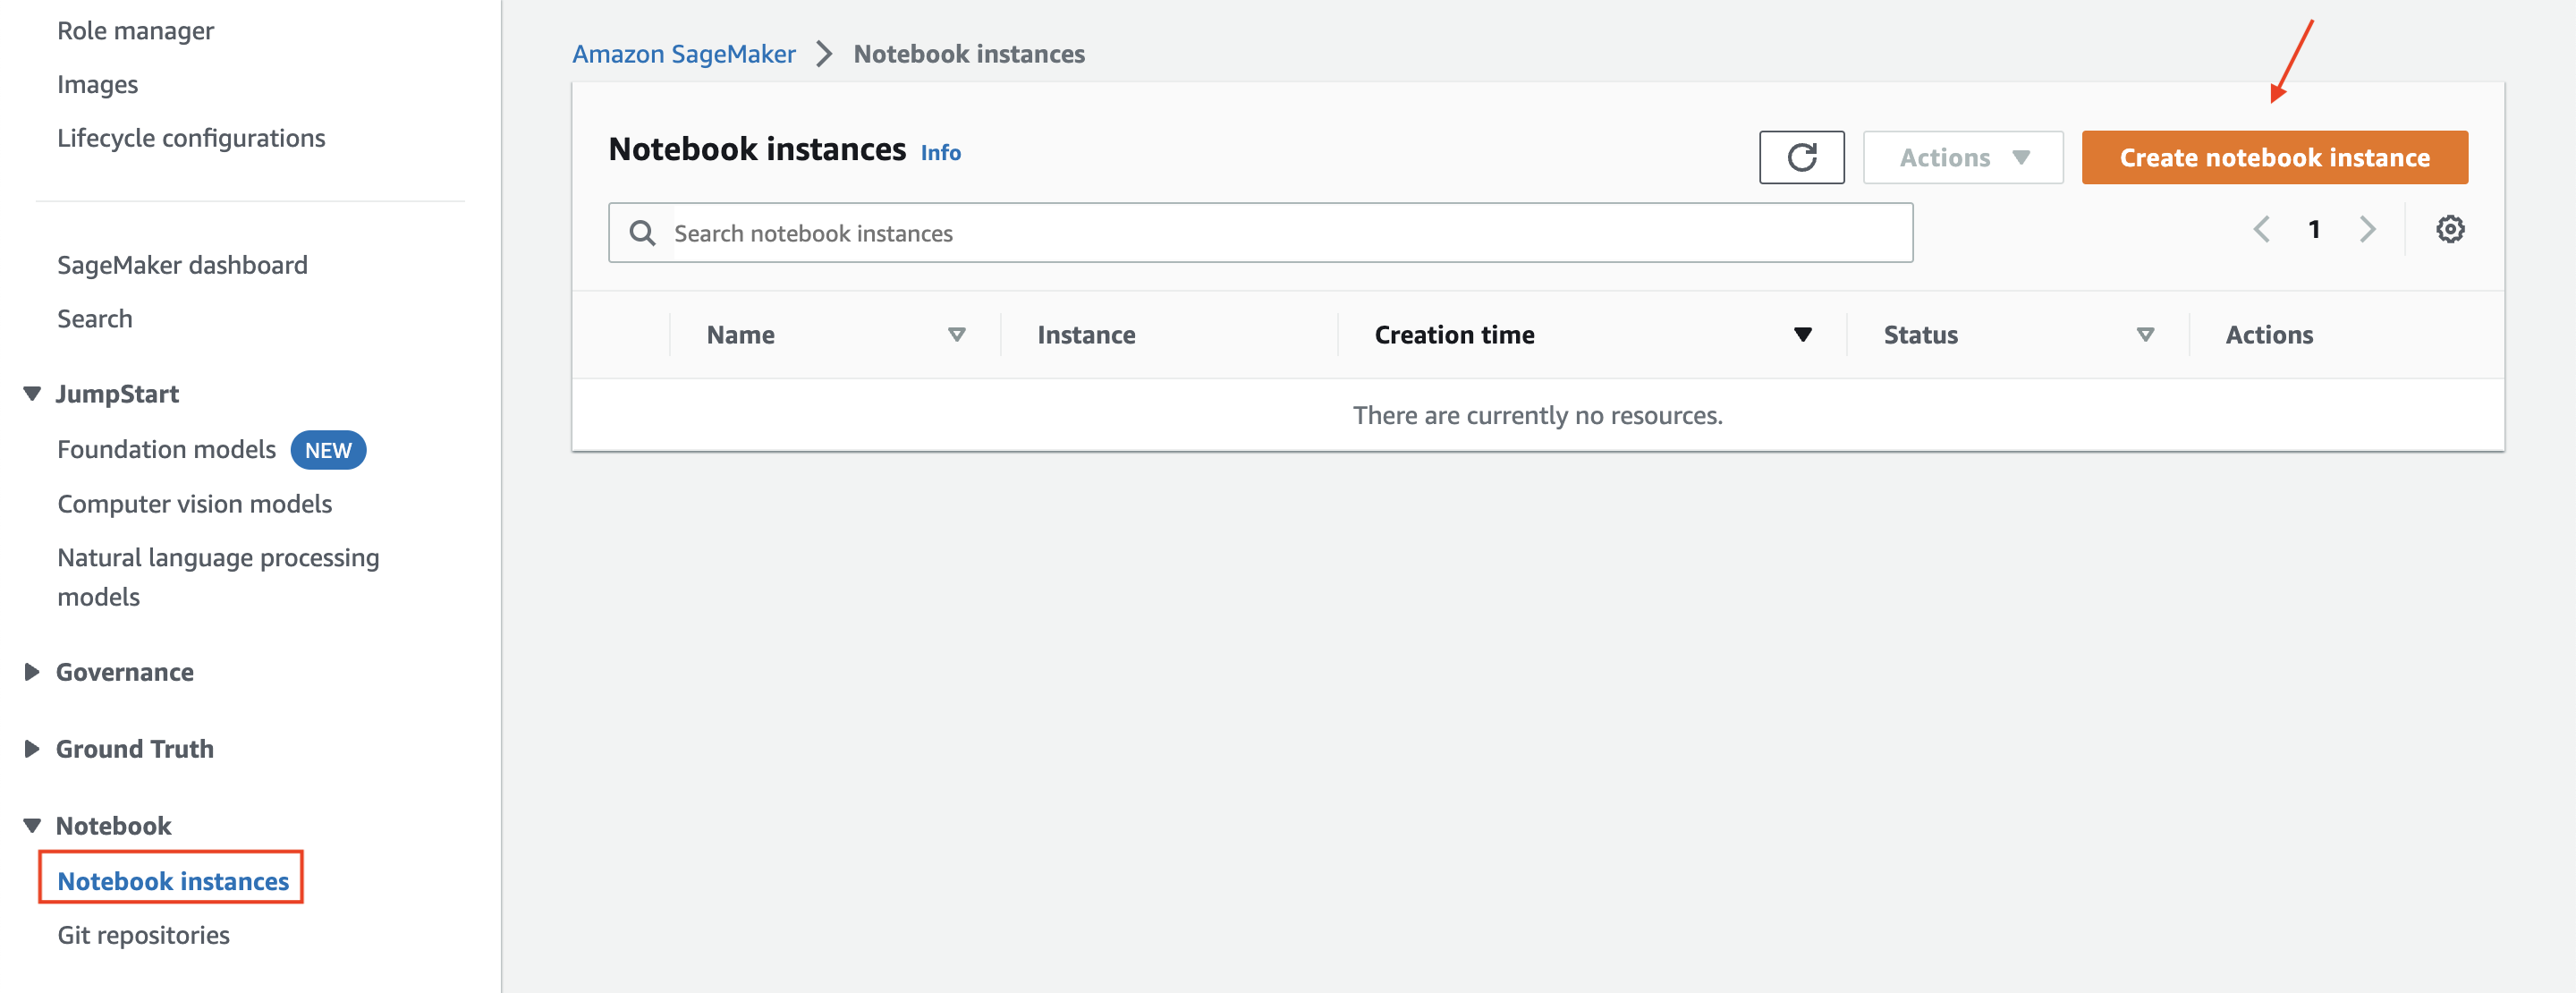
We can test that the lifecycle configuration is working by creating a new SageMaker notebook instance. Return to the “Notebook instances” list and click on “Create notebook instance”:
Choose a name, and choose a GPU-equipped instance type (both g4dn.xlarge and g4dn.2xlarge should work), then click to expand “Additional configuration”:
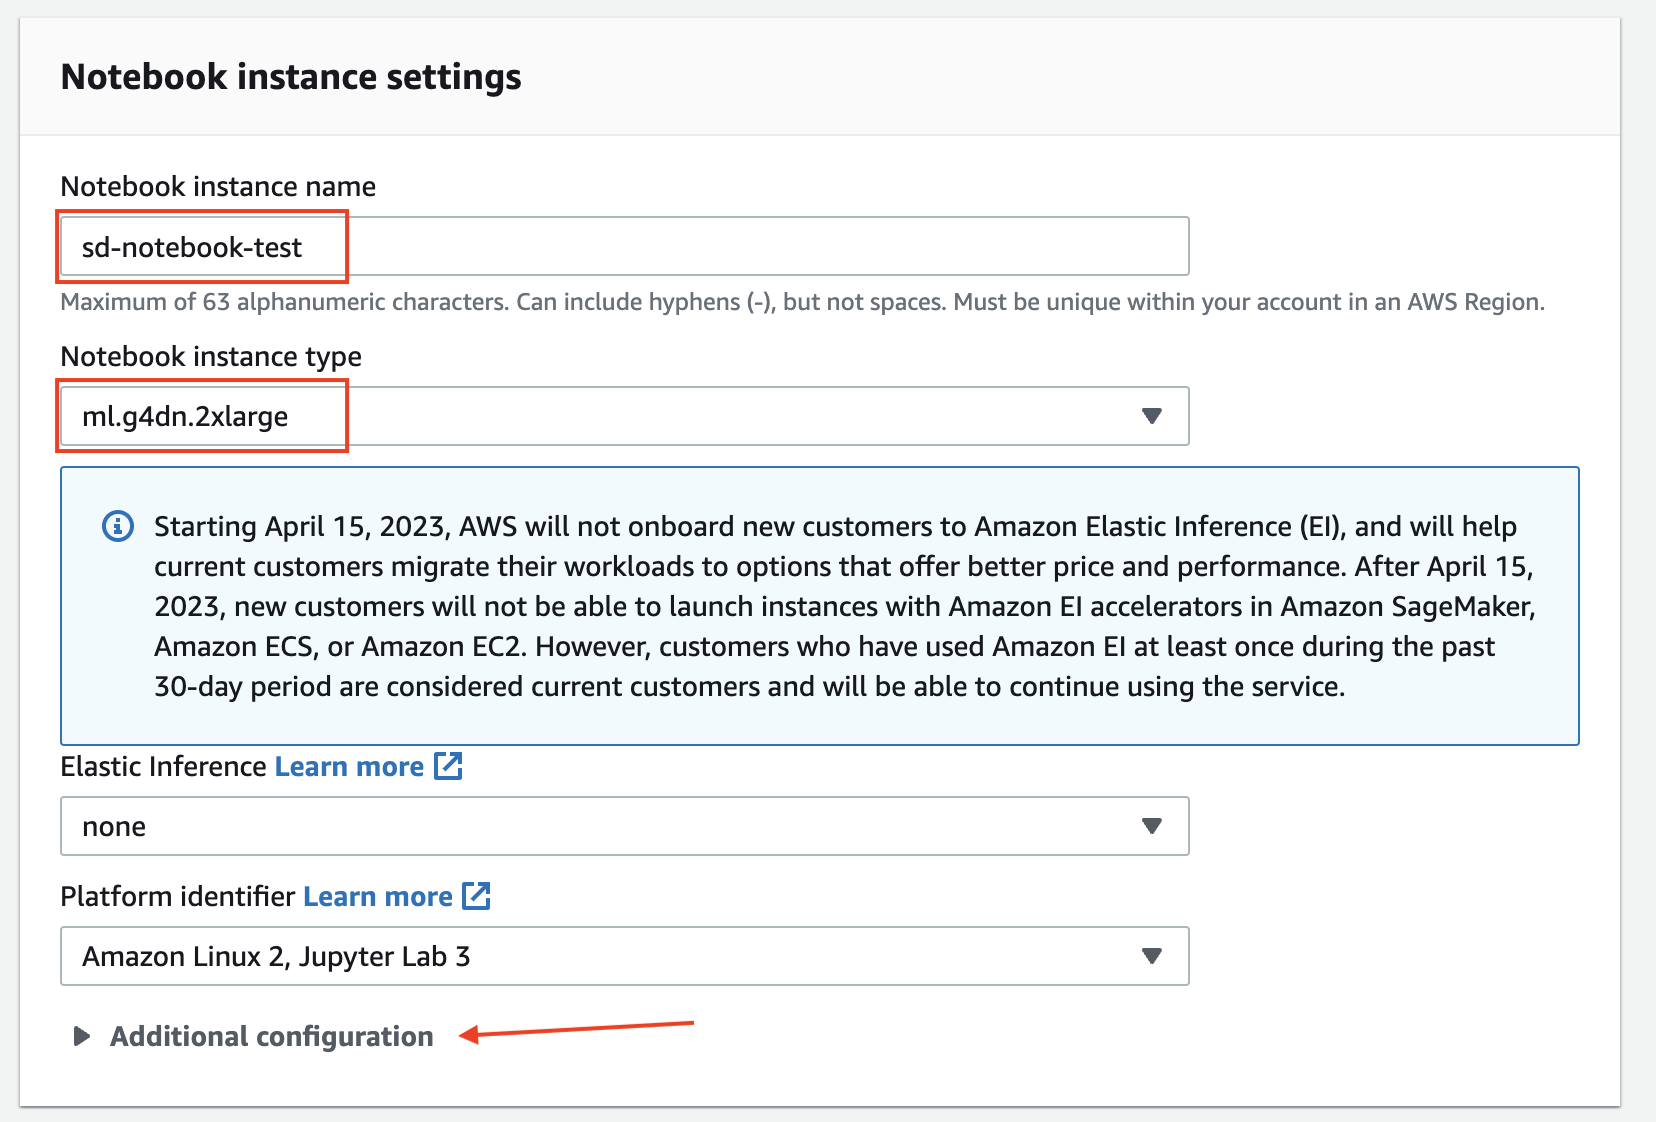
From the “Additional configuration” options, choose a large disk size (any size greater than 100 GB should be OK), and select your lifecycle configuration from the “Lifecycle configuration” dropdown:

Finally, select an execution role for your Sagemaker notebook instance that has permission to read the S3 bucket accessed by the Lifecycle configuration scripts, then click “Create notebook instance”:
Checking that everything works Link to heading
Once the instance starts, log in by opening Jupyter Lab:
Start a new screen session and start webui.sh:
cd ~/SageMaker/stable-diffusion-webui/
screen -S webui
./webui.sh --xformers --share
If the script fails with errors about missing dependencies, or if tools like SadTalker (which depends on ffmpeg) aren’t working, you should go back and verify that you copy-pasted the on-create and on-start scripts correctly, and make sure the S3 bucket contains the stable-diffusion-webui folder and other dependencies.
Run screen -r webui to connect, and look for the Gradio URL:

Click the link to access the web interface. Try creating a few test images (and videos) to confirm that everything is working!
Final steps Link to heading
Great! This means the on-create script is working. To test on-start, try shutting down your instance and re-starting it, then check again you can start webui.sh without errors and can access the new Gradio URL.
Troubleshooting Link to heading
You may find that SadTalker is not able to generate video when you pass it an .mp3 file, and fails with an error about not being able to locate ffprobe. If this happens, connect to the screen session from a terminal using the screen -r command, then use Ctrl + C to terminate the webui.sh script. You can then start a new screen session and restart webui.sh using the commands below:
cd ~/SageMaker/stable-diffusion-webui
screen -S webui ./webui.sh --share --xformers
Next steps Link to heading
Try applying Lifecycle configurations to your own workflows. Lifecycle configurations are a great way to create a consistent, customized SageMaker notebook environment for you (or your team).