Note: This is part of a series where I follow along with the ROS 2 Humble and Gazebo Fortress tutorials and demos. This is not original content.
In today’s post we’ll follow along with this tutorial from the official ROS 2 Humble docs, which will show us how to create and build our own workspace using the ROS 2 build tool, colcon. Let’s dive in.
Previously, ROS used a build system called catkin and a tool suite called ament_tools. The full list of catkin/ament tools was:
catkin_makecatkin_make_isolatedcatkin_toolsament_tools
To simplify and streamline the build process, these tools have been superceded by colcon. Before we can use colcon, we need to make sure we have the prerequisites installed:
sudo apt install python3-colcon-common-extensions
Of course we need to have ROS 2 installed as well, but I’m assuming you’ve already done that! If not, you can take a look at this earlier blog post.
Workspace structure Link to heading
colcon will build packages from source using a ROS workspace. A ROS workspace is just a directory which contains code (and other artefacts) used to build ROS packages. ROS workspaces will usually contain a src directory. This is where the source code of the ROS package is stored.
In addition to src, colcon will create the following directories:
build, which will hold intermediate files (usually one subfolder will be created for each package that is part of the workspace)install, which is where completed (built) packages will be installedlog, which is where logging information will be stored each timecolconis run
Note: Unlike catkin, the colcon build tool does not create a devel directory.
Create a workspace Link to heading
We start by creating a workspace. A common (default) name for ROS 2 workspaces is ros2_ws so let’s use that:
mkdir -p ~/ros2_ws/src
cd ~/ros2_ws
Awesome. We now have a workspace directory ros2_ws which contains a single empty subdirectory, src. We need to add some source code to src so that colcon has something to build. Rather than do the build ourselves, we’ll use an example that’s been built for us:
git clone https://github.com/ros2/examples src/examples -b humble
If we run the handy tree -L 3 command (install with sudo apt-get install tree if you don’t already have it) from inside ros2_ws we should see something like this:
ubuntu@ip-10-0-3-184:~/ros2_ws$ tree -L 3
.
└── src
    └── examples
        ├── CONTRIBUTING.md
        ├── launch_testing
        ├── LICENSE
        ├── rclcpp
        ├── rclpy
        └── README.md

5 directories, 3 files
“Underlays” Link to heading
We don’t want to build our package in isolation. Rather, we want to be able to depend on pre-built ROS 2 packages and functionality, so we don’t have to “reinvent the wheel”. To do this, we need to source an underlay.
Our new ros2_ws workspace is what we call an overlay….it will contain additional ROS 2 packages we use alongside our underlay (the packages that are part of the default ROS 2 humble installation).
Source your underlay with:
source /opt/ros/humble/setup.bash
Now it’s time to run colcon build, which will biuld our package.
Building with colcon build
Link to heading
Note: Unlike catkin which had a concept of a devel directory, some colcon build types such as ament_cmake don’t support this and actually require packages to be installed when they are built. To allow us to continue altering packges in the source space even after the package is built (i.e. for making changes to scripts in non-compiled languages like Python), we can add the --symlink-install flag, like this:
colcon build --symlink-install
Note: The command above sould be executed from the root of our workspace, ros2_ws. The build process will output a lot of messages. If it succeeds, you’ll see something like this:

After the build, we should see build, install, and log directories. Here I have run tree -L 1 to get a look at these new directories:
ubuntu@ip-10-0-3-184:~/ros2_ws$ tree -L 1
.
├── build
├── install
├── log
└── src

4 directories, 0 files
Running tests Link to heading
It’s always a good idea to run any tests you have defined:
colcon test
You should see some output like this:

Sourcing the new environment Link to heading
Before we can use our shiny new packages, we need to add them to our executable and/or library paths. The build process will have created new setup.bat and setup.bash scripts in the install director, so we need to source those:
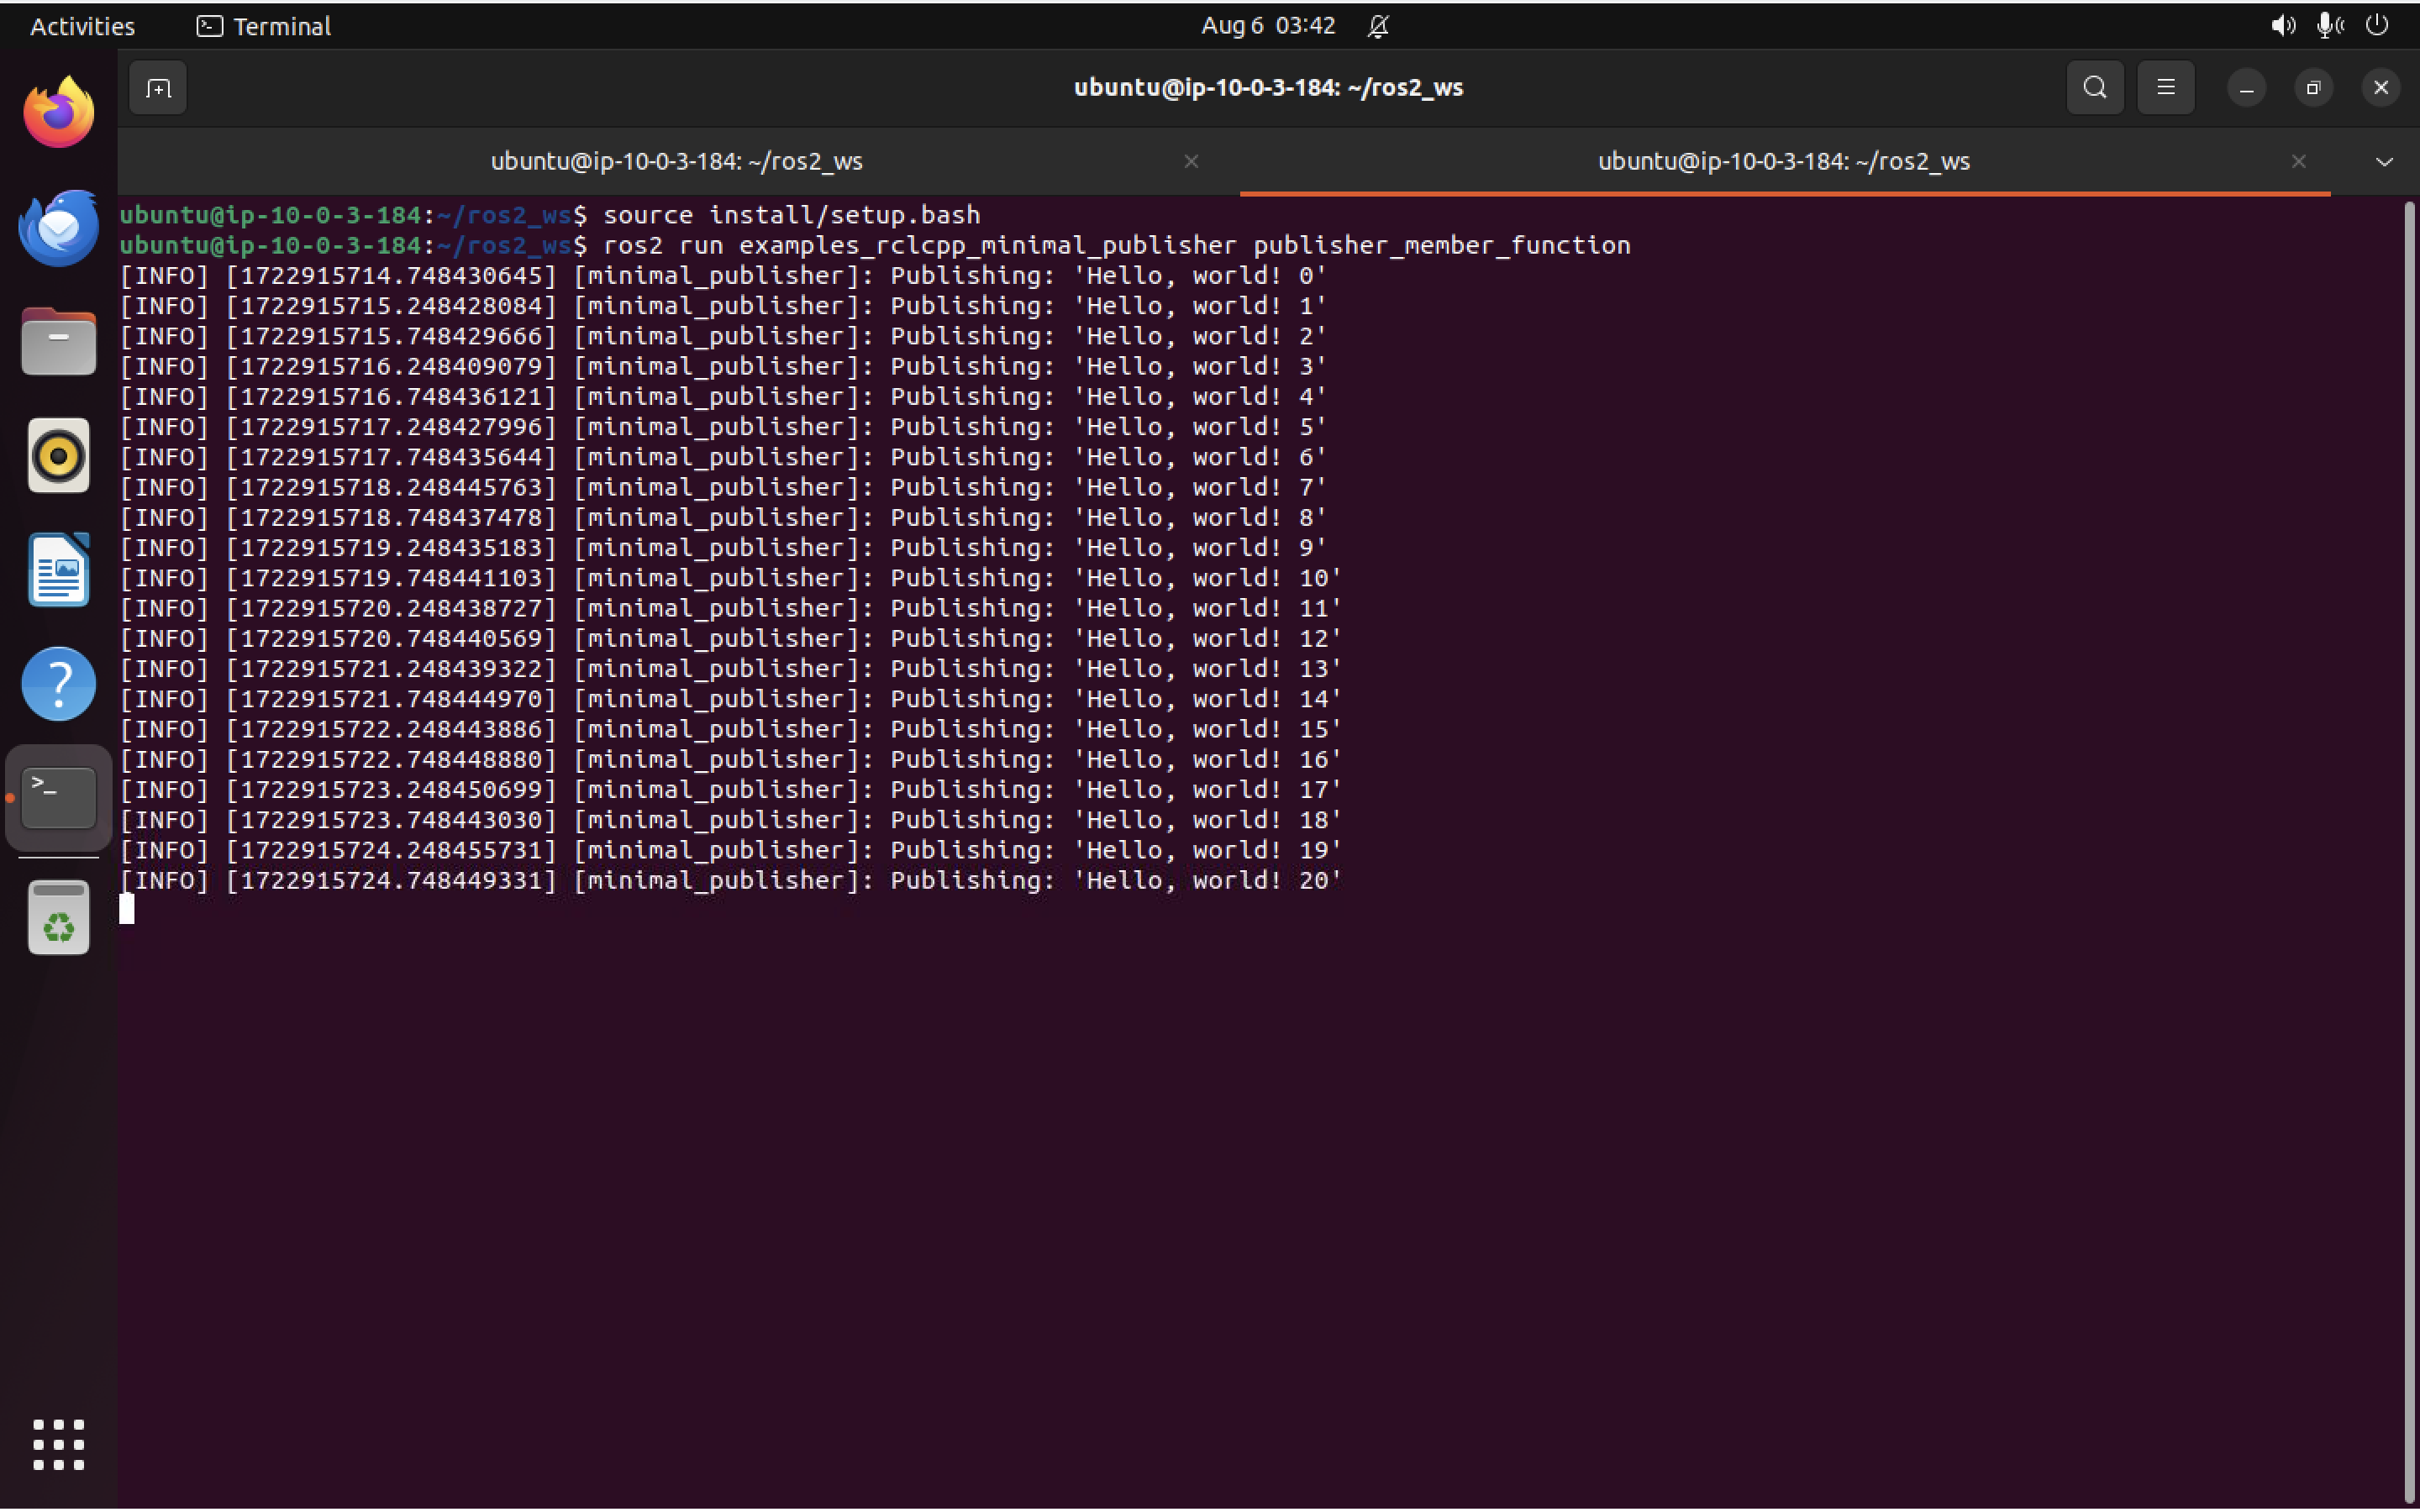
source install/setup.bash
Great, now we’re ready to use our packages.
Make sure you run that source install/setup.bash in two separate terminals, then (again in two separate terminals), run:
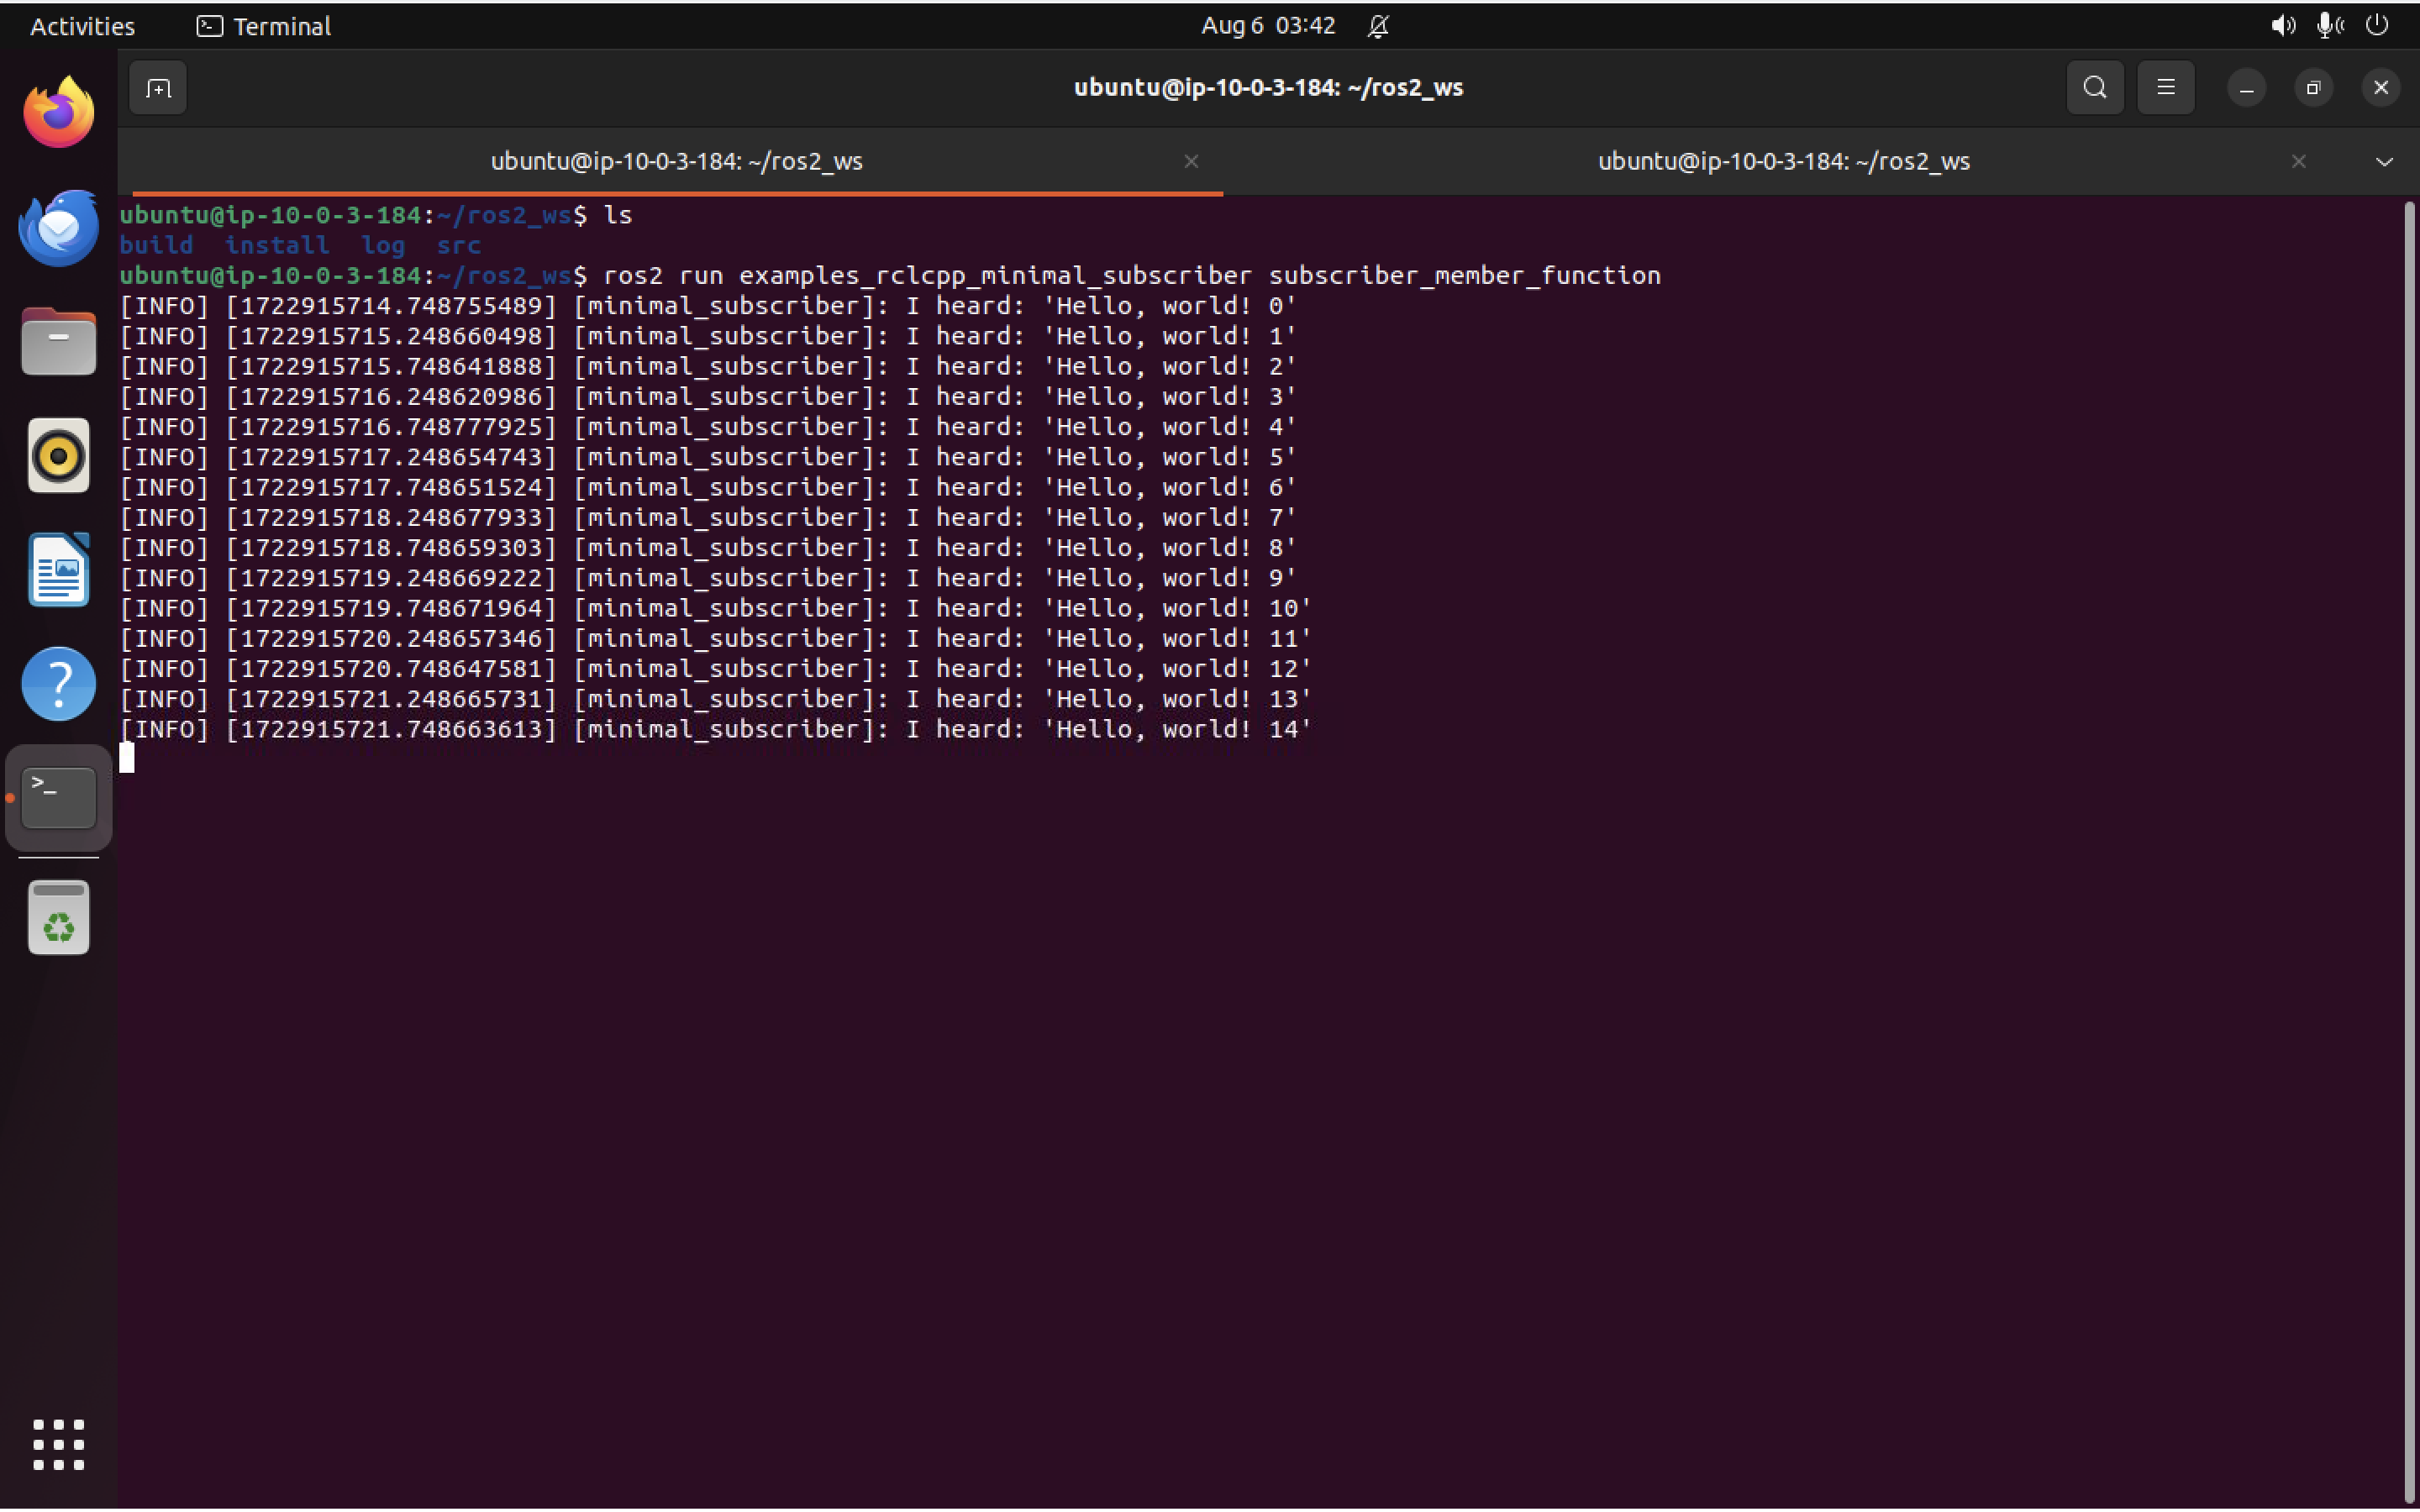
ros2 run examples_rclcpp_minimal_subscriber subscriber_member_function
and
ros2 run examples_rclcpp_minimal_publisher publisher_member_function
Once you’ve run both of these commands, the subscriber should start receiving messages from the publisher. The subscriber terminal will show something like this:
And the terminal where the publisher is running will show:
Creating a package Link to heading
So far we have built the code and tested it, but haven’t actually packaged it up as a ROS package. We can do that useing the package.xml specification defined in REP 149 (“format 2” is also supported).
Again, a note about build types (this matters when creating the package). The supported build types are:
ament_cmakeament_python- Pure
cmake
For an example of a package built with ament_python, take a look at ament_index_python_package. That package uses setup.py as its primary entry point for the build (a Python script).
The demo_nodes_cpp package, on the other hand, uses the ament_cmake built type, and uses CMake to perform the actual build.
For convenience, we can just create packges with ros2 pkg create which will create a new package from a template.
Note: Users of the catkin build tool would use catkin_create_package instead.
(Optional) create a package Link to heading
Let’s test out the package creation process, in a new, isolated directory. We should leave ros2_ws first:
cd ..
ros2 pkg create myfirstpackage
If everything worked well, you should see some output like this:
going to create a new package
package name: myfirstpackage
destination directory: /home/ubuntu
package format: 3
version: 0.0.0
description: TODO: Package description
maintainer: ['ubuntu <ubuntu@todo.todo>']
licenses: ['TODO: License declaration']
build type: ament_cmake
dependencies: []
creating folder ./myfirstpackage
creating ./myfirstpackage/package.xml
creating source and include folder
creating folder ./myfirstpackage/src
creating folder ./myfirstpackage/include/myfirstpackage
creating ./myfirstpackage/CMakeLists.txt

[WARNING]: Unknown license 'TODO: License declaration'.  This has been set in the package.xml, but no LICENSE file has been created.
It is recommended to use one of the ament license identitifers:
Apache-2.0
BSL-1.0
BSD-2.0
BSD-2-Clause
BSD-3-Clause
GPL-3.0-only
LGPL-3.0-only
MIT
MIT-0
You should now have a directory called myfirstpackage in the same directory where you created ros2_ws. Taking a look inside myfirstpackage, you should see:
ubuntu@ip-10-0-3-184:~/myfirstpackage$ tree
.
├── CMakeLists.txt
├── include
│   └── myfirstpackage
├── package.xml
└── src

3 directories, 2 files
src and include directories have been created for us automatically, and a CMakeLists.txt and package.xml package spec file have also been set up. If you take a look inside the package.xml file, you’ll see that placeholder values have been inserted for most fields:
<?xml version="1.0"?>
<?xml-model href="http://download.ros.org/schema/package_format3.xsd" schematypens="http://www.w3.org/2001/XMLSchema"?>
<package format="3">
  <name>myfirstpackage</name>
  <version>0.0.0</version>
  <description>TODO: Package description</description>
  <maintainer email="ubuntu@todo.todo">ubuntu</maintainer>
  <license>TODO: License declaration</license>

  <buildtool_depend>ament_cmake</buildtool_depend>

  <test_depend>ament_lint_auto</test_depend>
  <test_depend>ament_lint_common</test_depend>

  <export>
    <build_type>ament_cmake</build_type>
  </export>
</package>
By default, the command has created an ament_cmake package.
Set up colcon_cd
Link to heading
Now, back to ros2_ws. We can use colcon_cd to quickly change the current working directory of our shell (terminal) to the directory of a package. This is handy when we need to look at the code for a specific package but don’t want to type in long or cumbersome paths. This also saves us the difficulty of needing to know where every single ROS package is located! colcon_cd will take us right where we need to go.
To get this working we’ll need to add two lines to our .bashrc file:
echo "source /usr/share/colcon_cd/function/colcon_cd.sh" >> ~/.bashrc
echo "export _colcon_cd_root=/opt/ros/humble/" >> ~/.bashrc
Setting up colcon tab completion Link to heading
The colcon command supports tab completion in bash-like shells. You need to have the colcon-argcomplete package installed for this to work. See the docs for complete setup instructions.
In my case, I also want to enable autocomplete for colcon_cd, so I run the two commands below:
echo "source /usr/share/colcon_argcomplete/hook/colcon-argcomplete.bash" >> ~/.bashrc
echo "source /usr/share/colcon_cd/function/colcon_cd-argcomplete.bash" >> ~/.bashrc
And of course restart your shell (or run source ~/.bashrc) to make sure the changes take effect.
Great! Now both colcon and colcon_cd should offer autocompletions when you hit the Tab key. Now when I type in colcon_cd and hit Tab I see a list of completions:
ubuntu@ip-10-0-3-184:~$ colcon_cd
base_control_ros2                       examples_rclpy_executors                --reset
--base-paths                            examples_rclpy_guard_conditions         robot_description
costmap_converter                       examples_rclpy_minimal_action_client    robot_navigation_ros2
costmap_converter_msgs                  examples_rclpy_minimal_action_server    robot_vision_ros2
examples_rclcpp_async_client            examples_rclpy_minimal_client           roscpp_tutorials
examples_rclcpp_cbg_executor            examples_rclpy_minimal_publisher        rospy_tutorials
examples_rclcpp_minimal_action_client   examples_rclpy_minimal_service          ros_tutorials
examples_rclcpp_minimal_action_server   examples_rclpy_minimal_subscriber       sclidar_ros2
examples_rclcpp_minimal_client          examples_rclpy_pointcloud_publisher     --set
examples_rclcpp_minimal_composition     -h                                      slam_gmapping
examples_rclcpp_minimal_publisher       --help                                  sllidar_ros2
examples_rclcpp_minimal_service         launch_testing_examples                 teb_local_planner
examples_rclcpp_minimal_subscriber      myfirstpackage                          teb_msgs
examples_rclcpp_minimal_timer           nanocarpro_description                  turtlesim
examples_rclcpp_multithreaded_executor  nvilidar_ros2                           ydlidar_ros2_driver
examples_rclcpp_wait_set                openslam_gmapping
Let’s try moving to the directory where the examples_rclcpp_minimal_publisher package lives:
colcon_cd examples_rclcpp_minimal_publisher
After the command executes, running pwd shows:
/opt/ros/humble/share/examples_rclcpp_minimal_publisher
So I have moved to the location of this package.
In our next post we’ll take a look at creating a more complete workspace, following along with this doc.